Wall Hanging Vanity
This is an ongoing page documenting the design and progression of form of the project below. The study will begin with the preliminary drawings of the piece along with initial constraints and design desires. It will then onto more refined, scale drawings and diagrams. From there, images of the final piece will be presented. Current construction methods and techniques will then be discussed. Strengths and weaknesses in the design and construction will be identified in the images, and new ideas and solutions will be proposed. Lastly, final images of the second (and hopefully final) iteration of the project will be presented.
Design Constraints/Desires with Preliminary Drawings
For over a year, a design for a sort of wall hanging vanity - type shelf has been floating around in my brain. At this time, I didn't currently have any other projects underway, and I was not taking any woodworking classes at my college this semester, however - I had access to our woodshop. Because of this, I figured it would be the perfect time to finally design and build this piece.
I knew what I wanted, after all, I had been thinking about it for a year now. I knew I wanted this piece to be conceptual in nature, this would be my first ever piece that had actual meaning and connection behind the design. I wanted this piece to be a portrayal of human connection and the rhythms and patterns we create and experience. These patterns I wanted to analyze and portray was our morning and nightly routines, and the relationship between our patterns, and the natural ones found in nature, like the sun. In general, we wake up roughly when the sun rises, and we go to bed at night once the sun has set, we wake up at the same time each morning, and go to bed at the same time each night. The sun does similar.
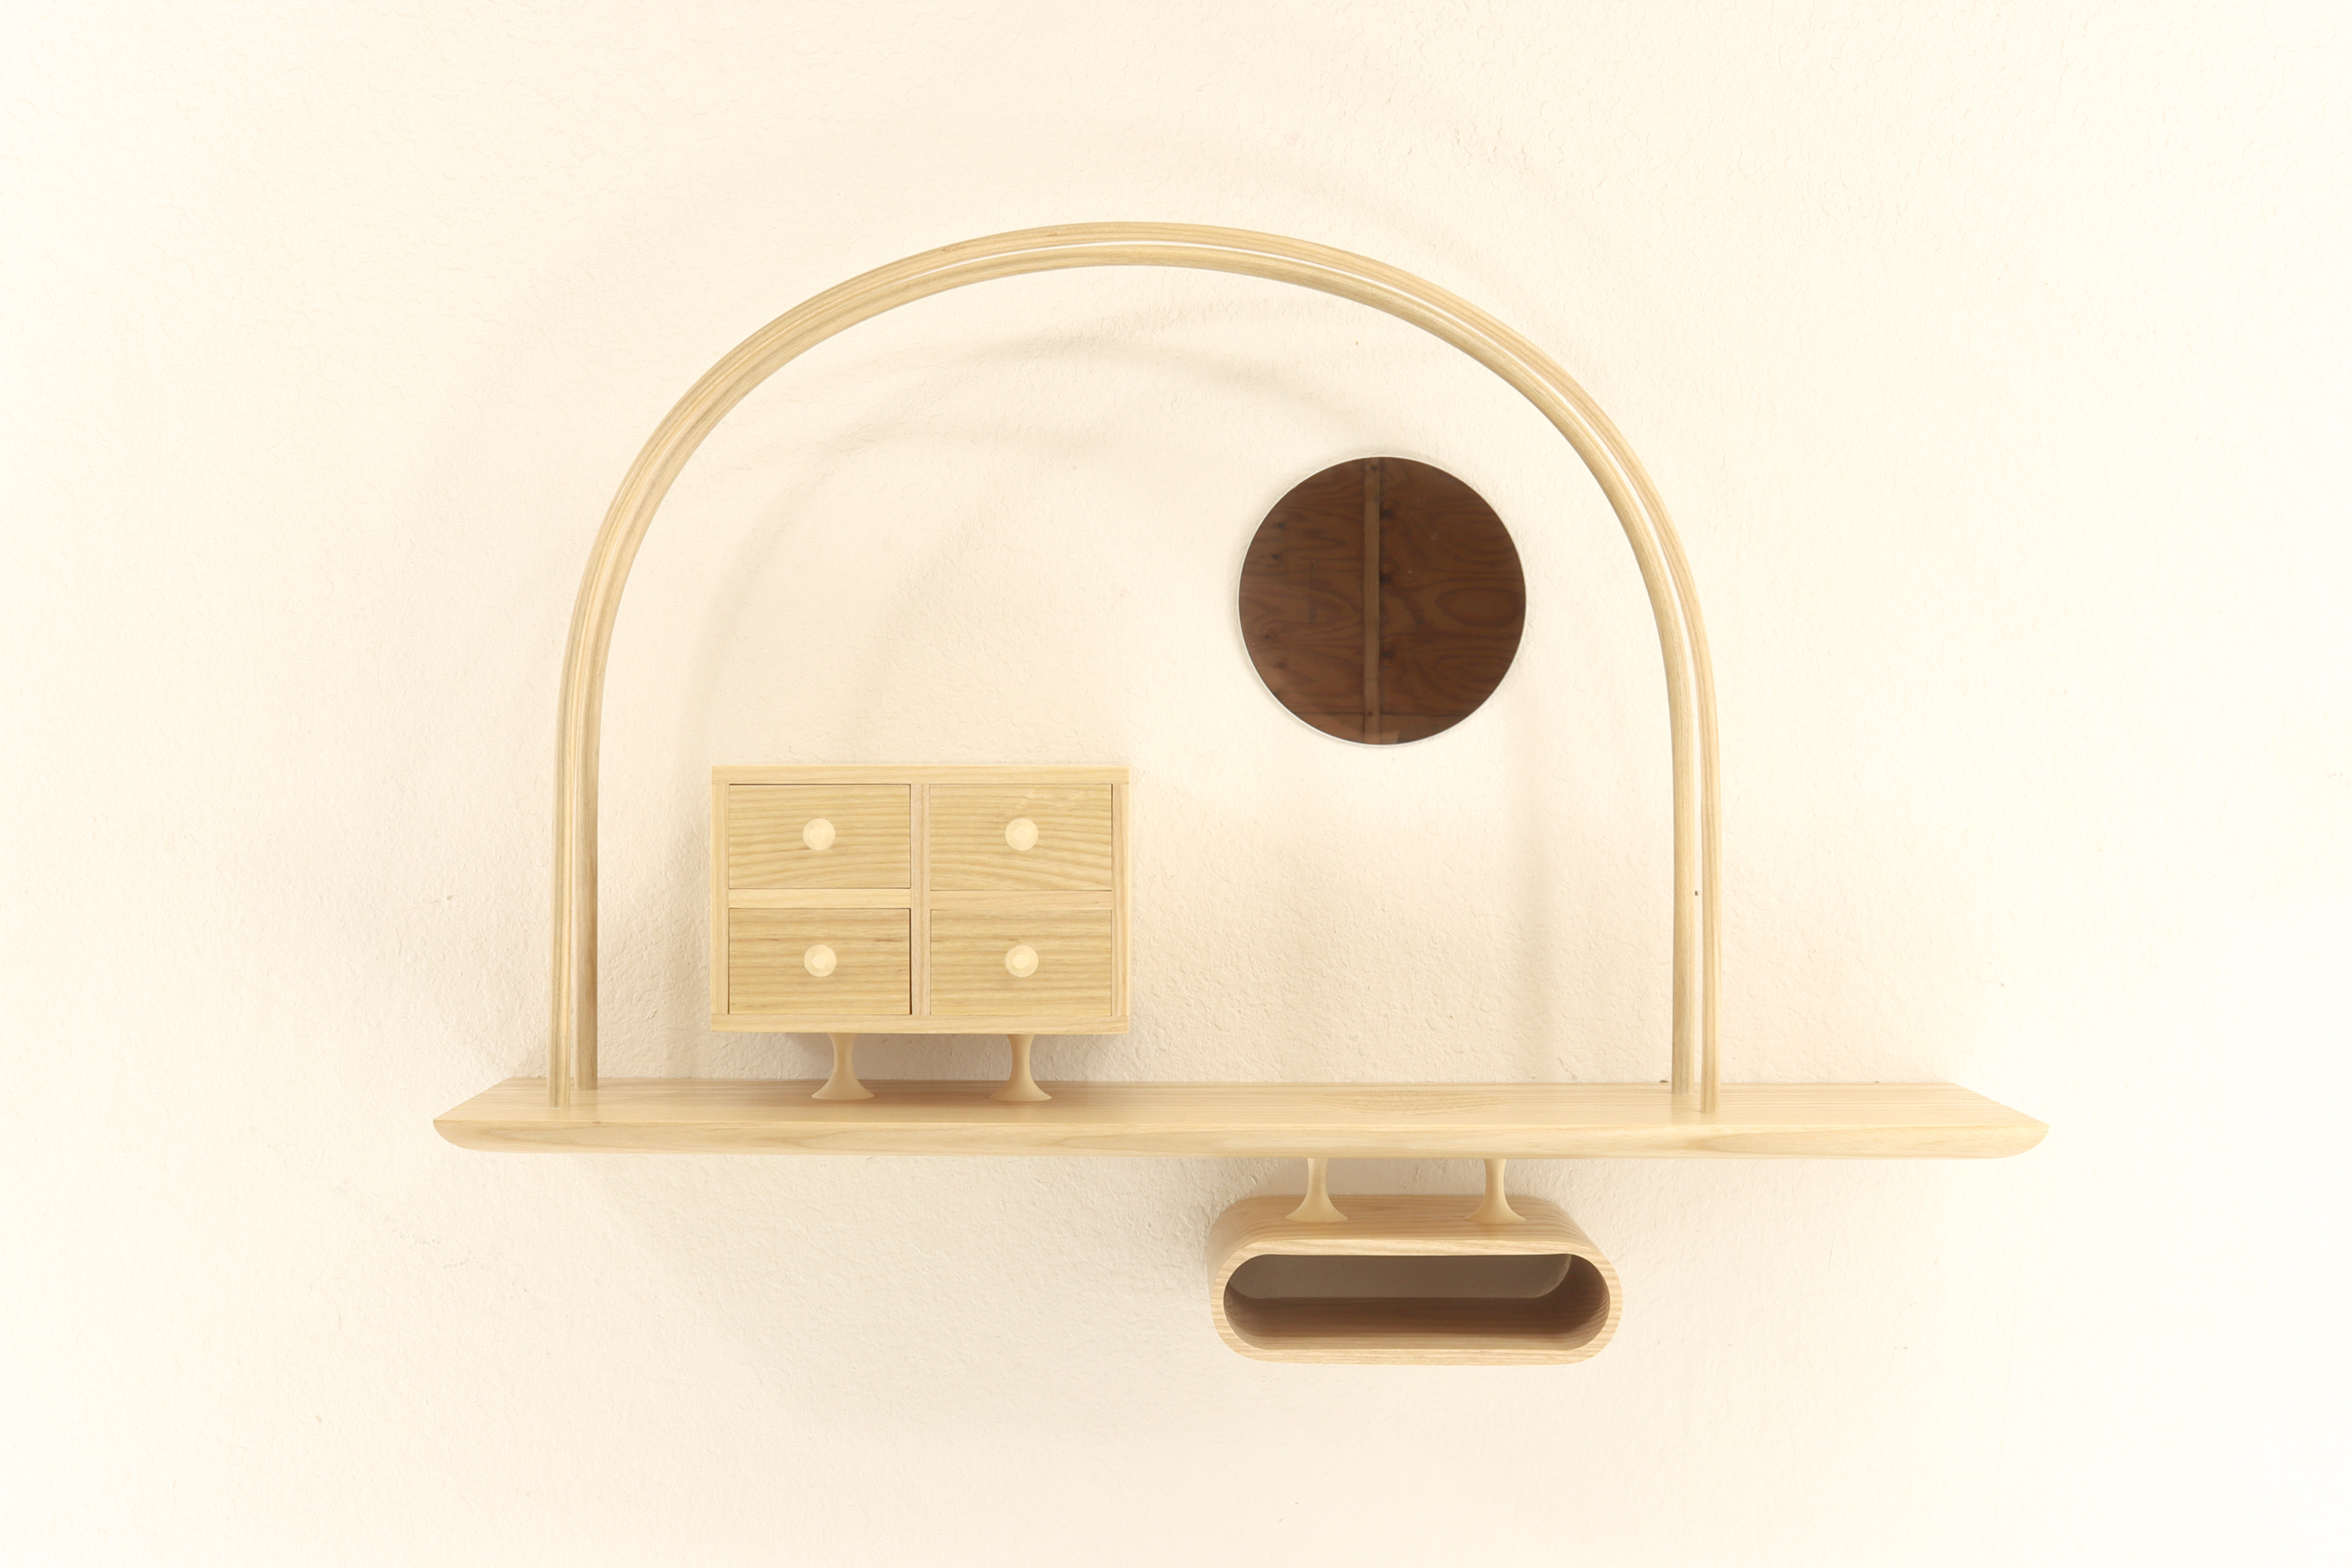
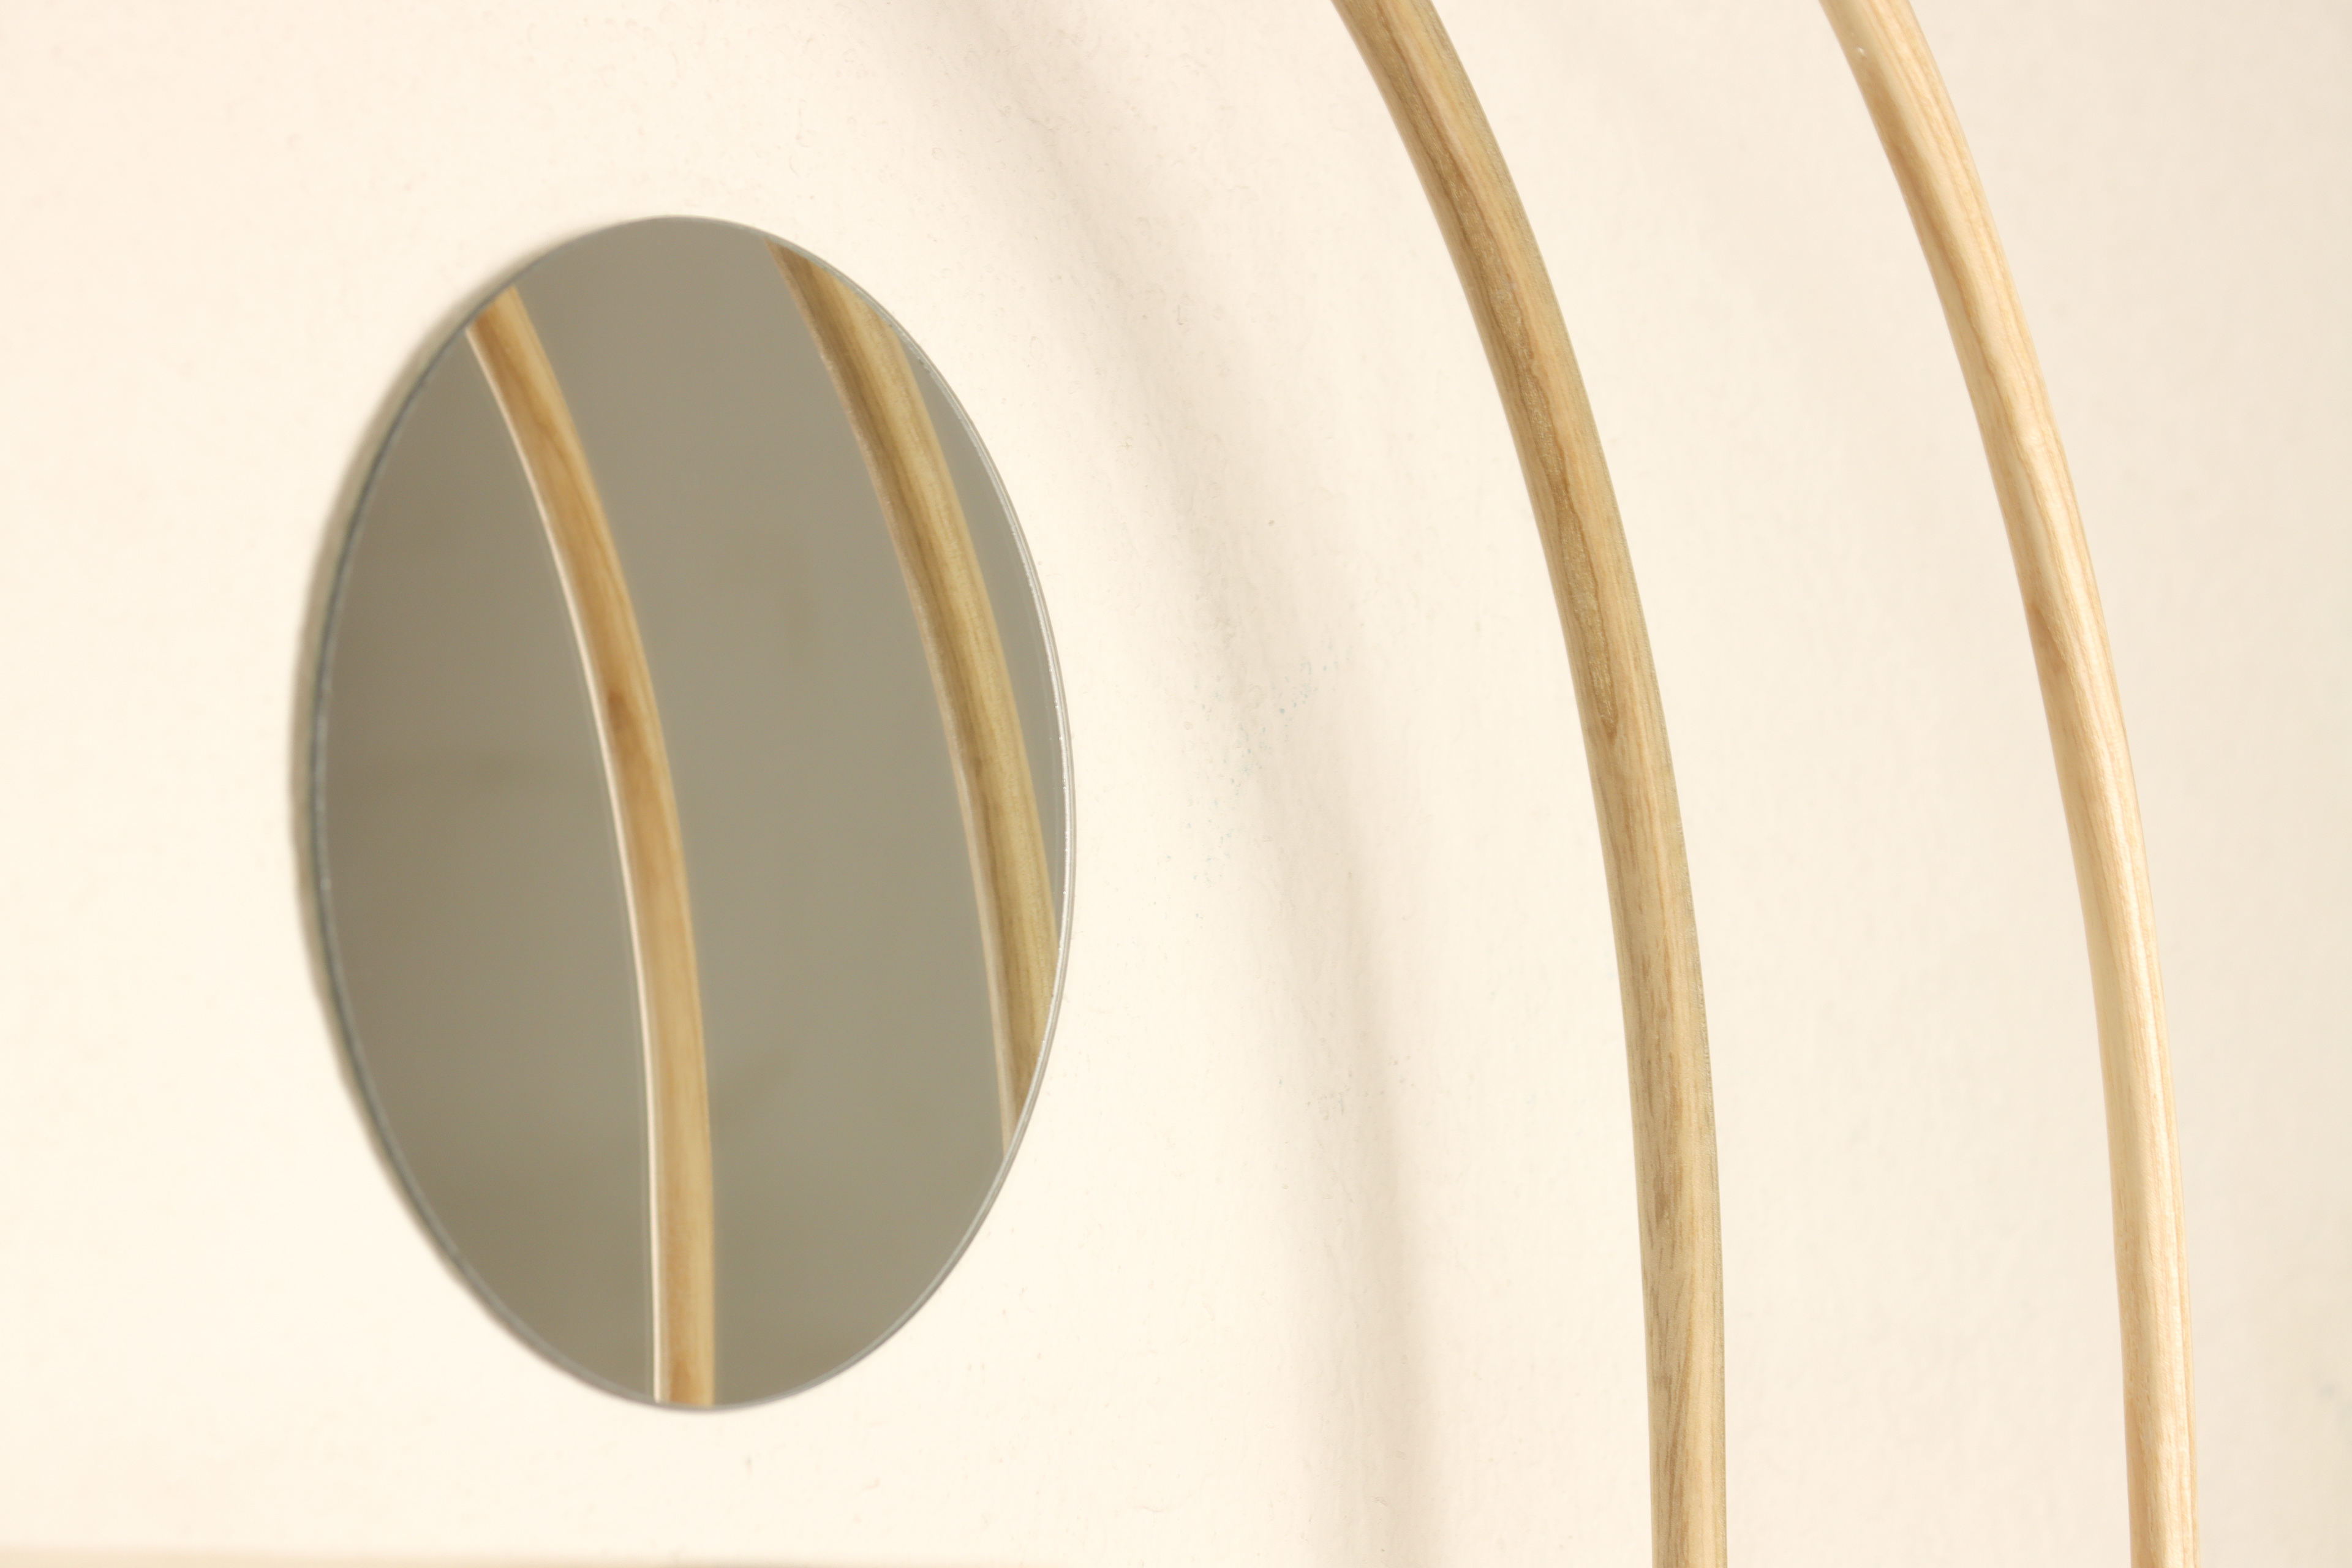
Because of these similarities, I wanted this to be a piece that is interacted with in the morning and at night. Traditionally, a vanity is a type of furniture which is interacted with in a similar manner - to get ready with in the morning, and to winddown with at night. I knew I did not want it to look anything like a traditional vanity. It would be small, and wall hanging. I didn't want it to take up floor space, and I would want it to be hung at chest level. It would have to be functional like a normal vanity; It would incorporate a circular mirror for getting ready (makeup, hair, etc.), it would have drawers to hold things; jewelry or watches perhaps. It would need to have some sort of easy catch all tray for quick use. And lastly, it had to be designed in a way that connected the conceptual aspects of the design together.
In addition, I wanted low contrast colored woods to be used in the construction of the piece. To accomplish this, I thought that two light colored woods would be best, this would achieve the subtle contrast I am looking for.
The initial drawings below are what I came up with.

Image shows a variety of two and three dimensional layouts of the piece, mostly playing with shelf length, mirror shape and orientation of the drawer casing and catch-all tray. There are then some diagrams proposing different arrays of steam-bent arches that would surround the piece. Detail ideas are also scribbled around the page as well. One of these ideas was inspired by On Kawara's series of "Date Paintings", where he painted a painting of the date everyday. The painting was a painting of the date on which he painted the painting of the date, if that makes sense. I liked this fun and repetitive idea. I decided it would be cool to incorporate the times of sunrise and sunset when I started the construction of the vanity, and when i finished construction - more on this later.
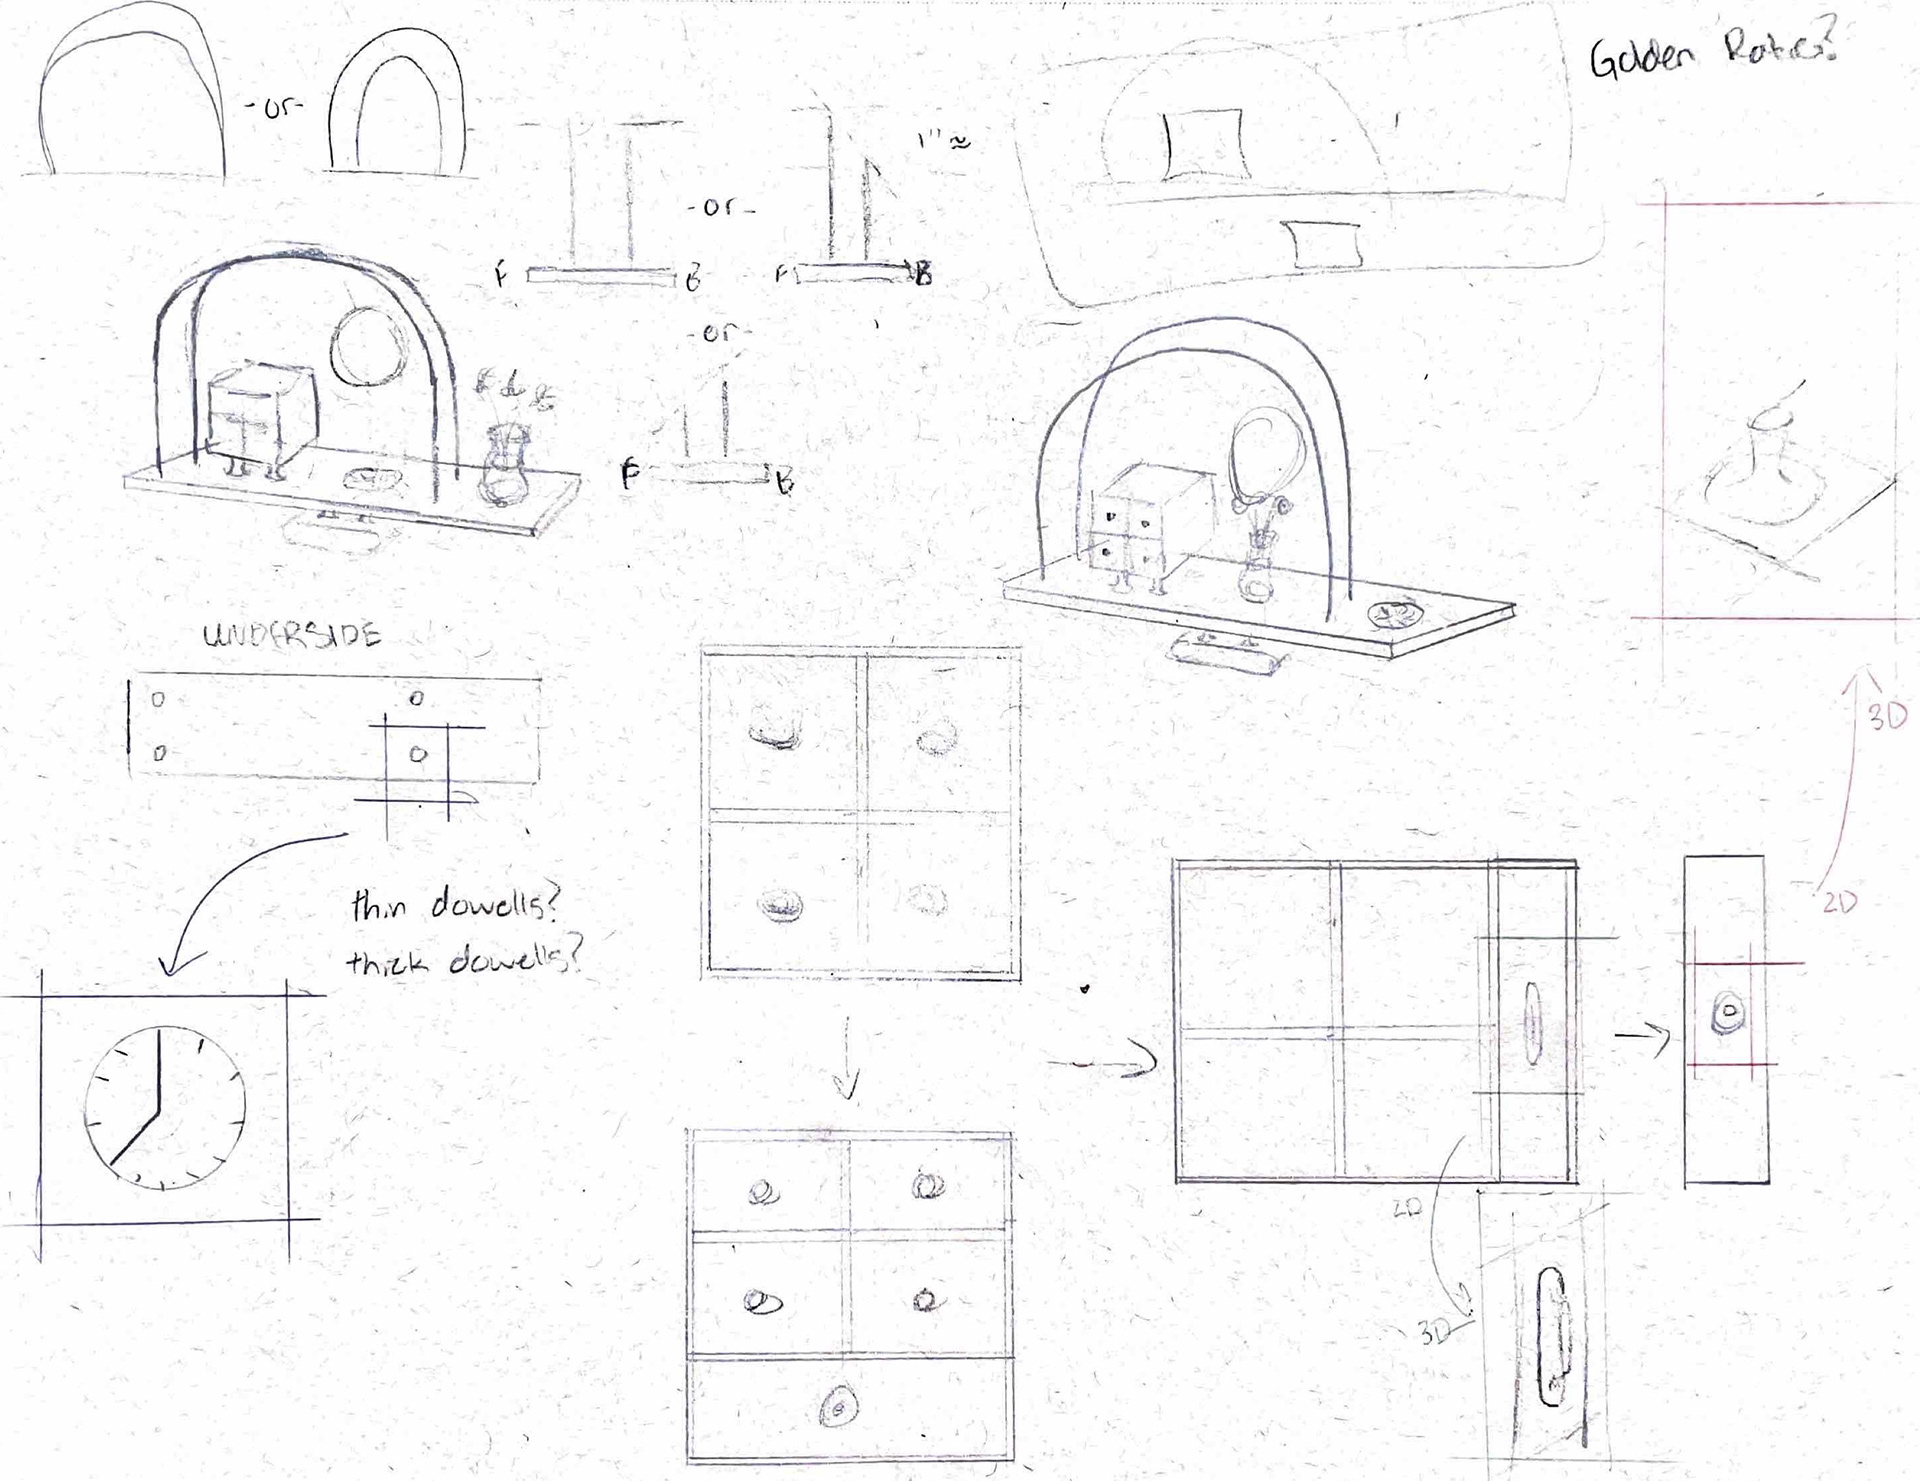
Image shows more three dimensional drawings which play with the layout of a little inset - carved dish, and a flower vase. In addition, the On Kawara inspired detail is explored further on the left hand side, and layouts for the case of drawers are expanded on. I also narrow down the array of arches.
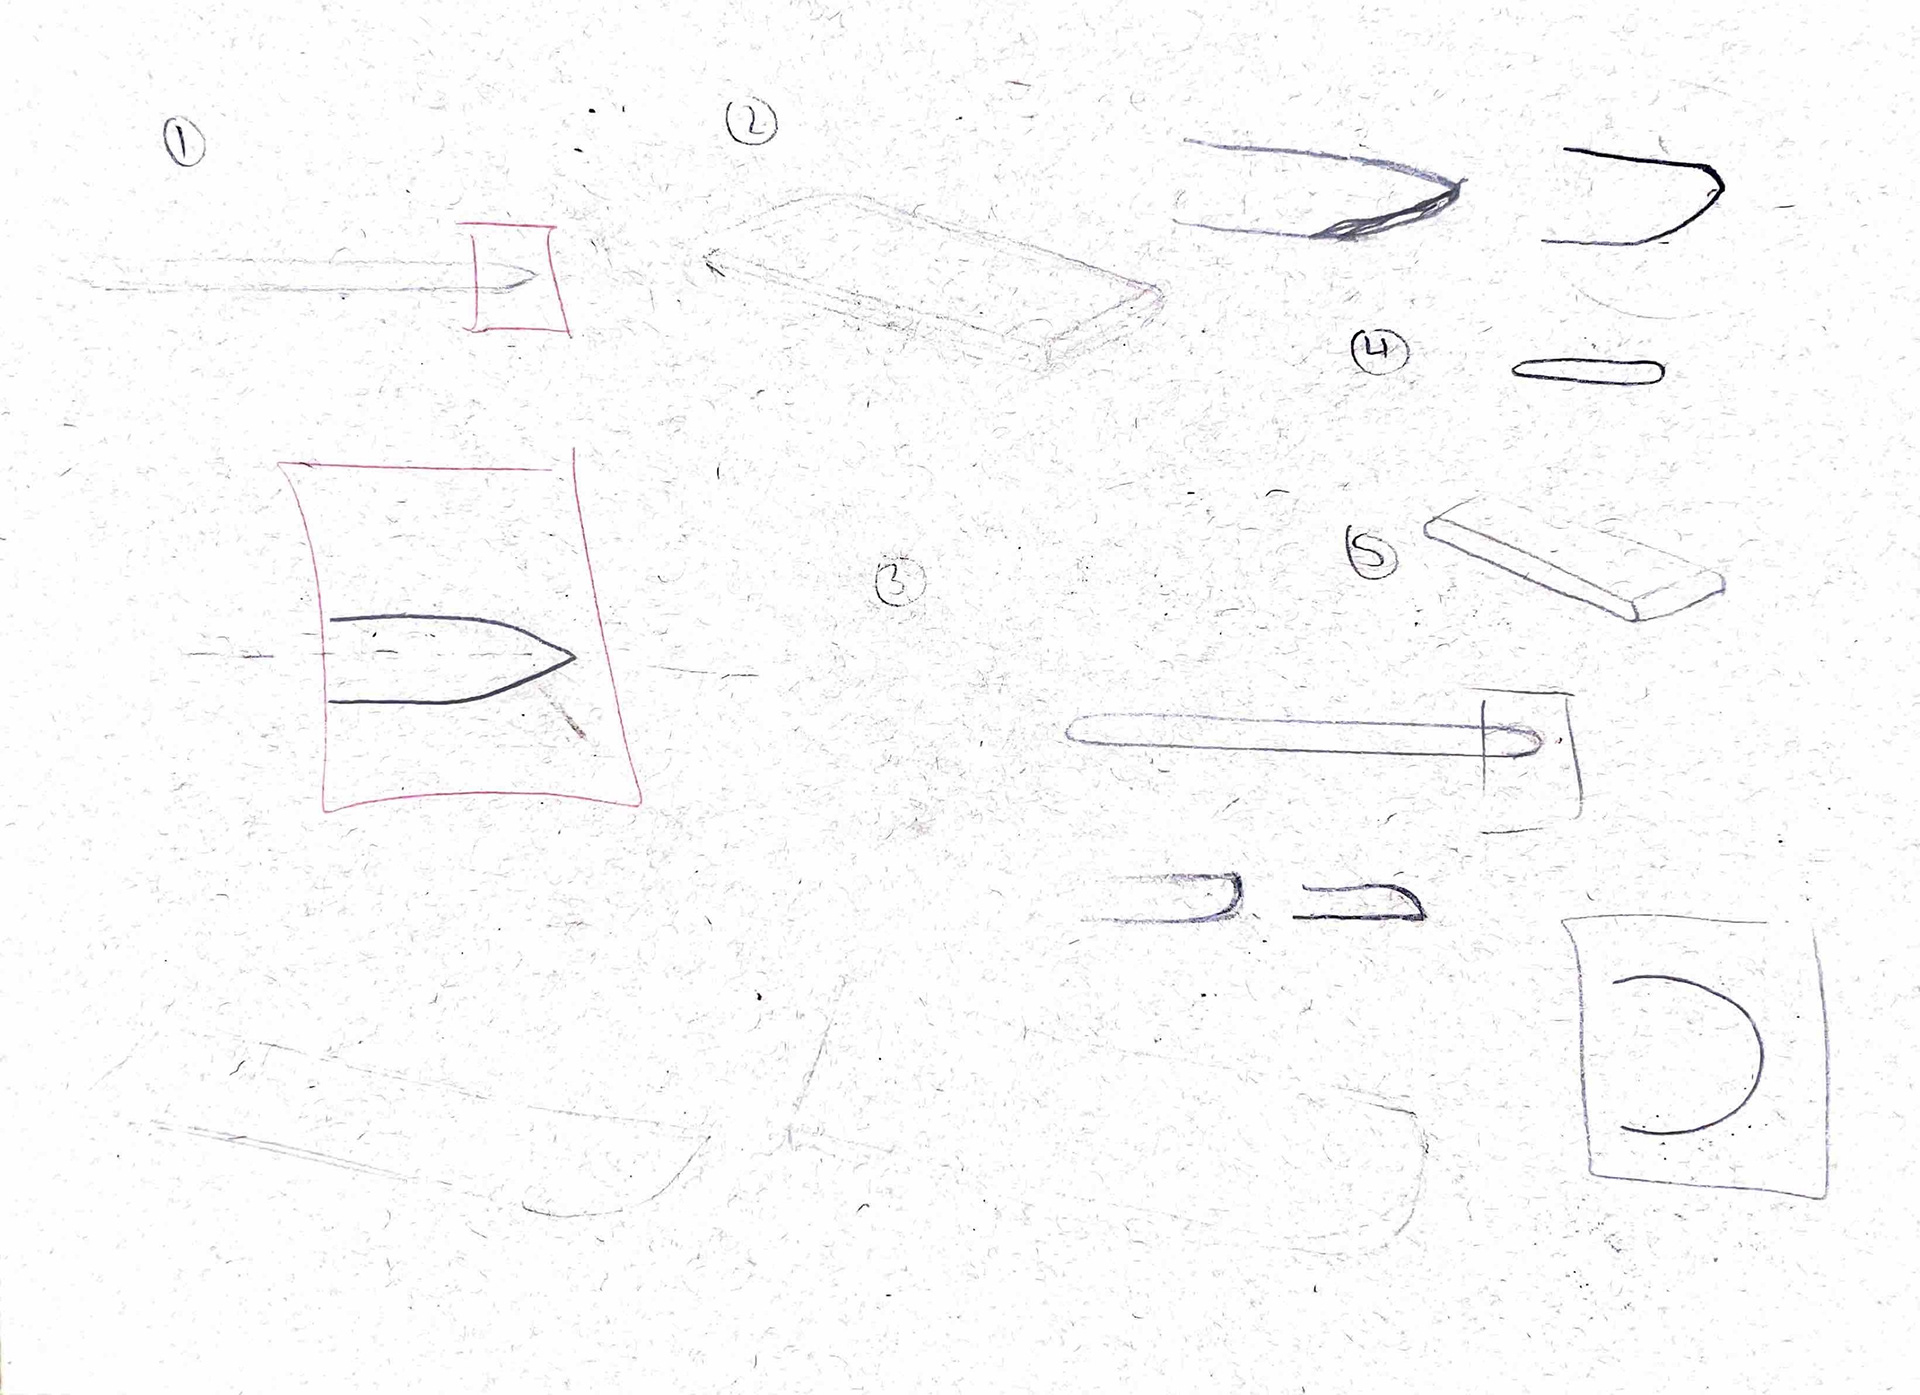
Image shows different ideas for edge profiles of the main shelf of the vanity. Boxes show expanded details.
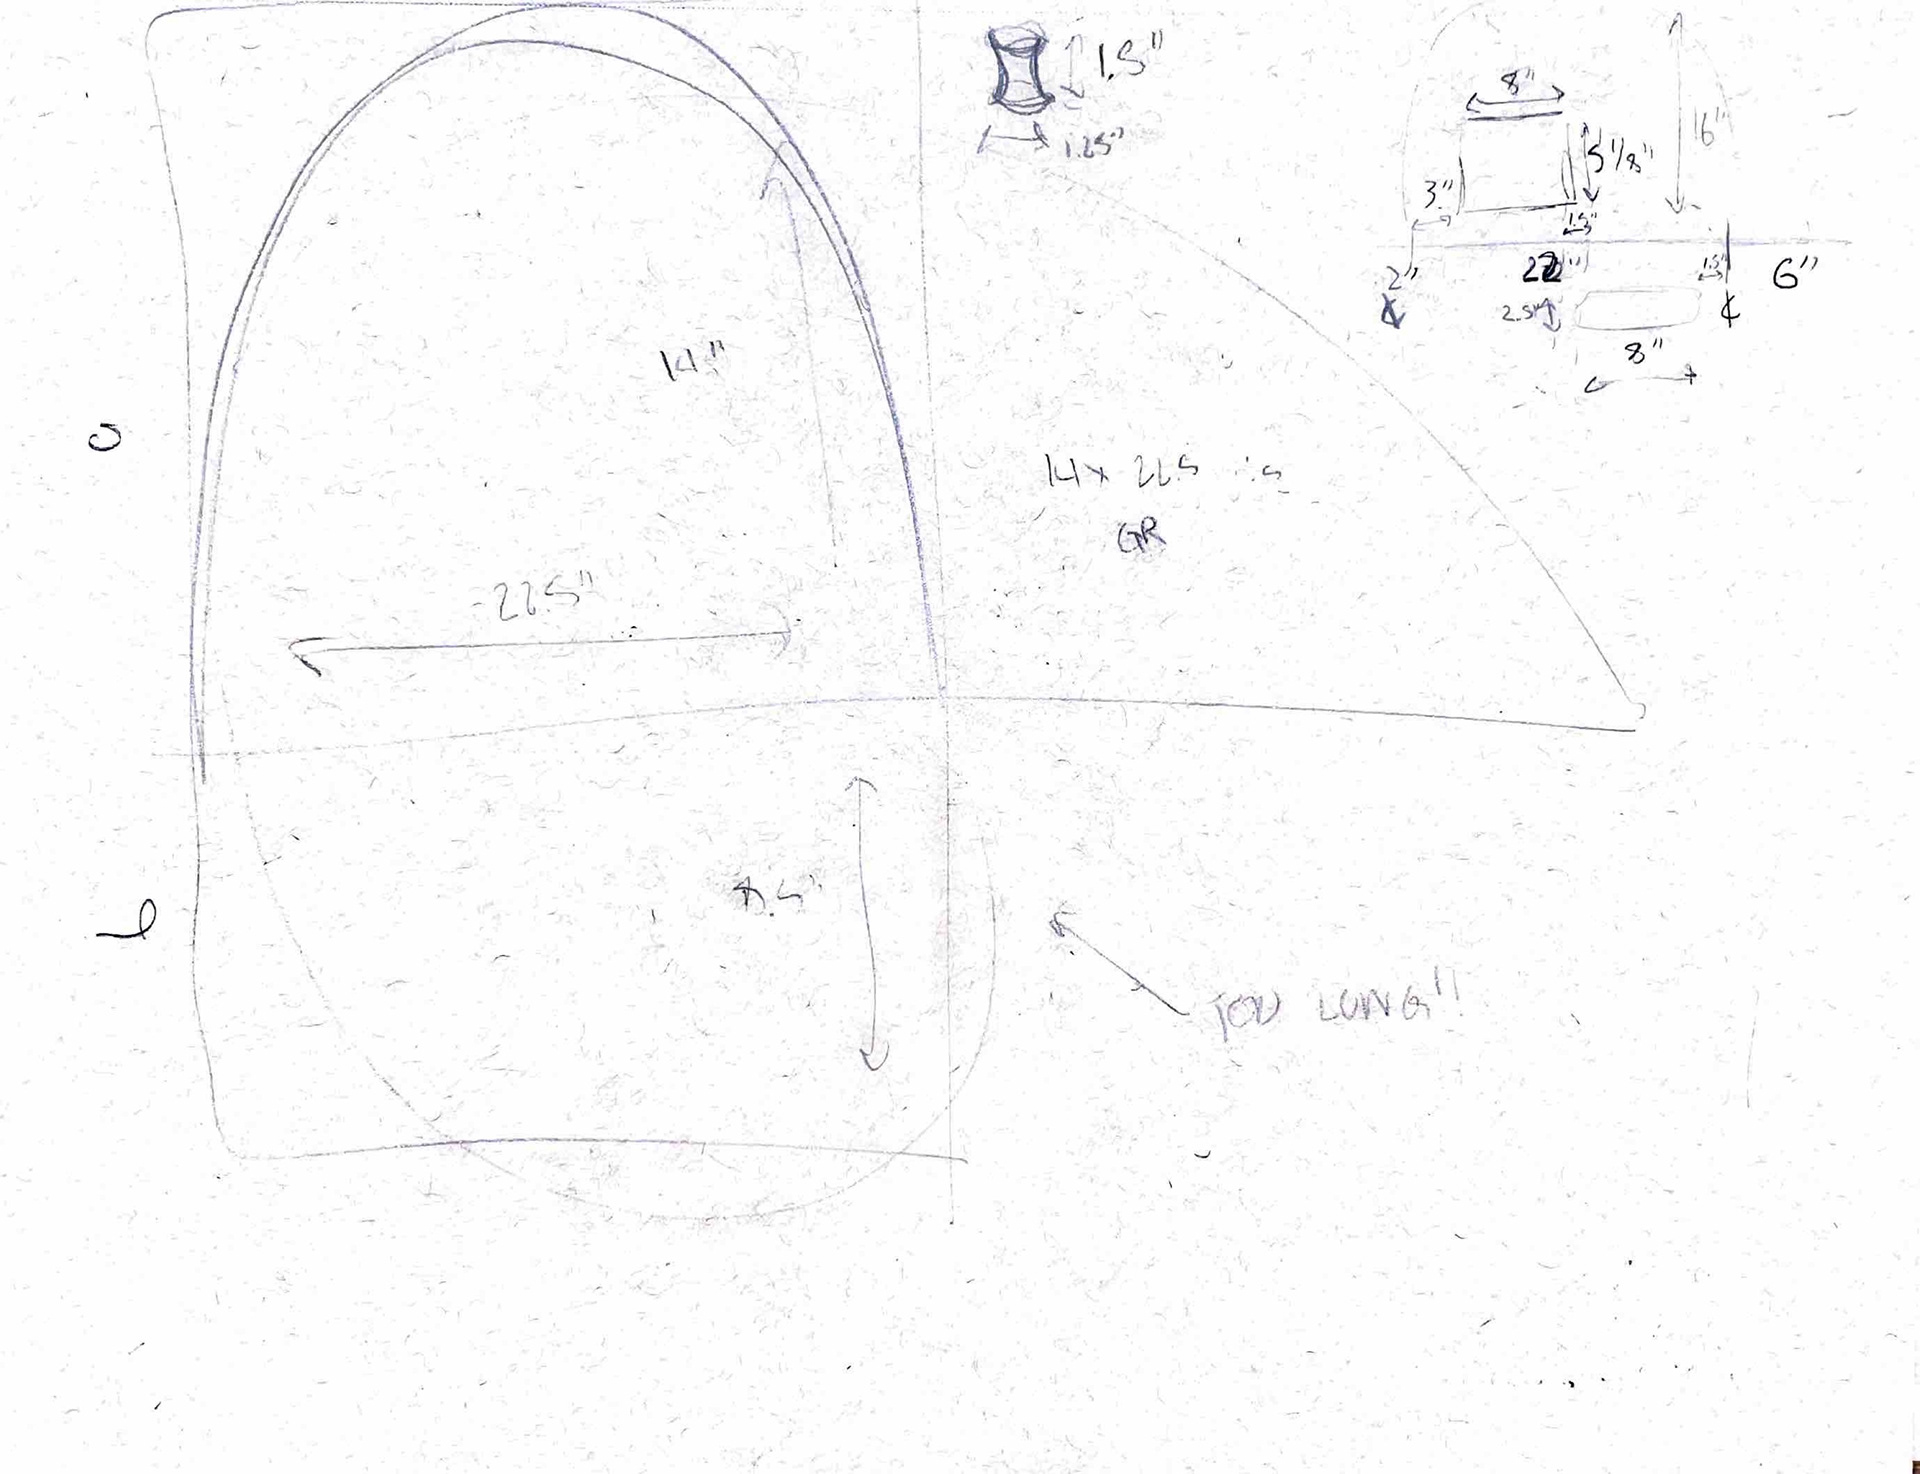
Image shows potential dimensions for the overall piece. These dimensions are attempting to work within the constraints of the Golden Ratio of 1.618.
Final Dimensioned Drawings
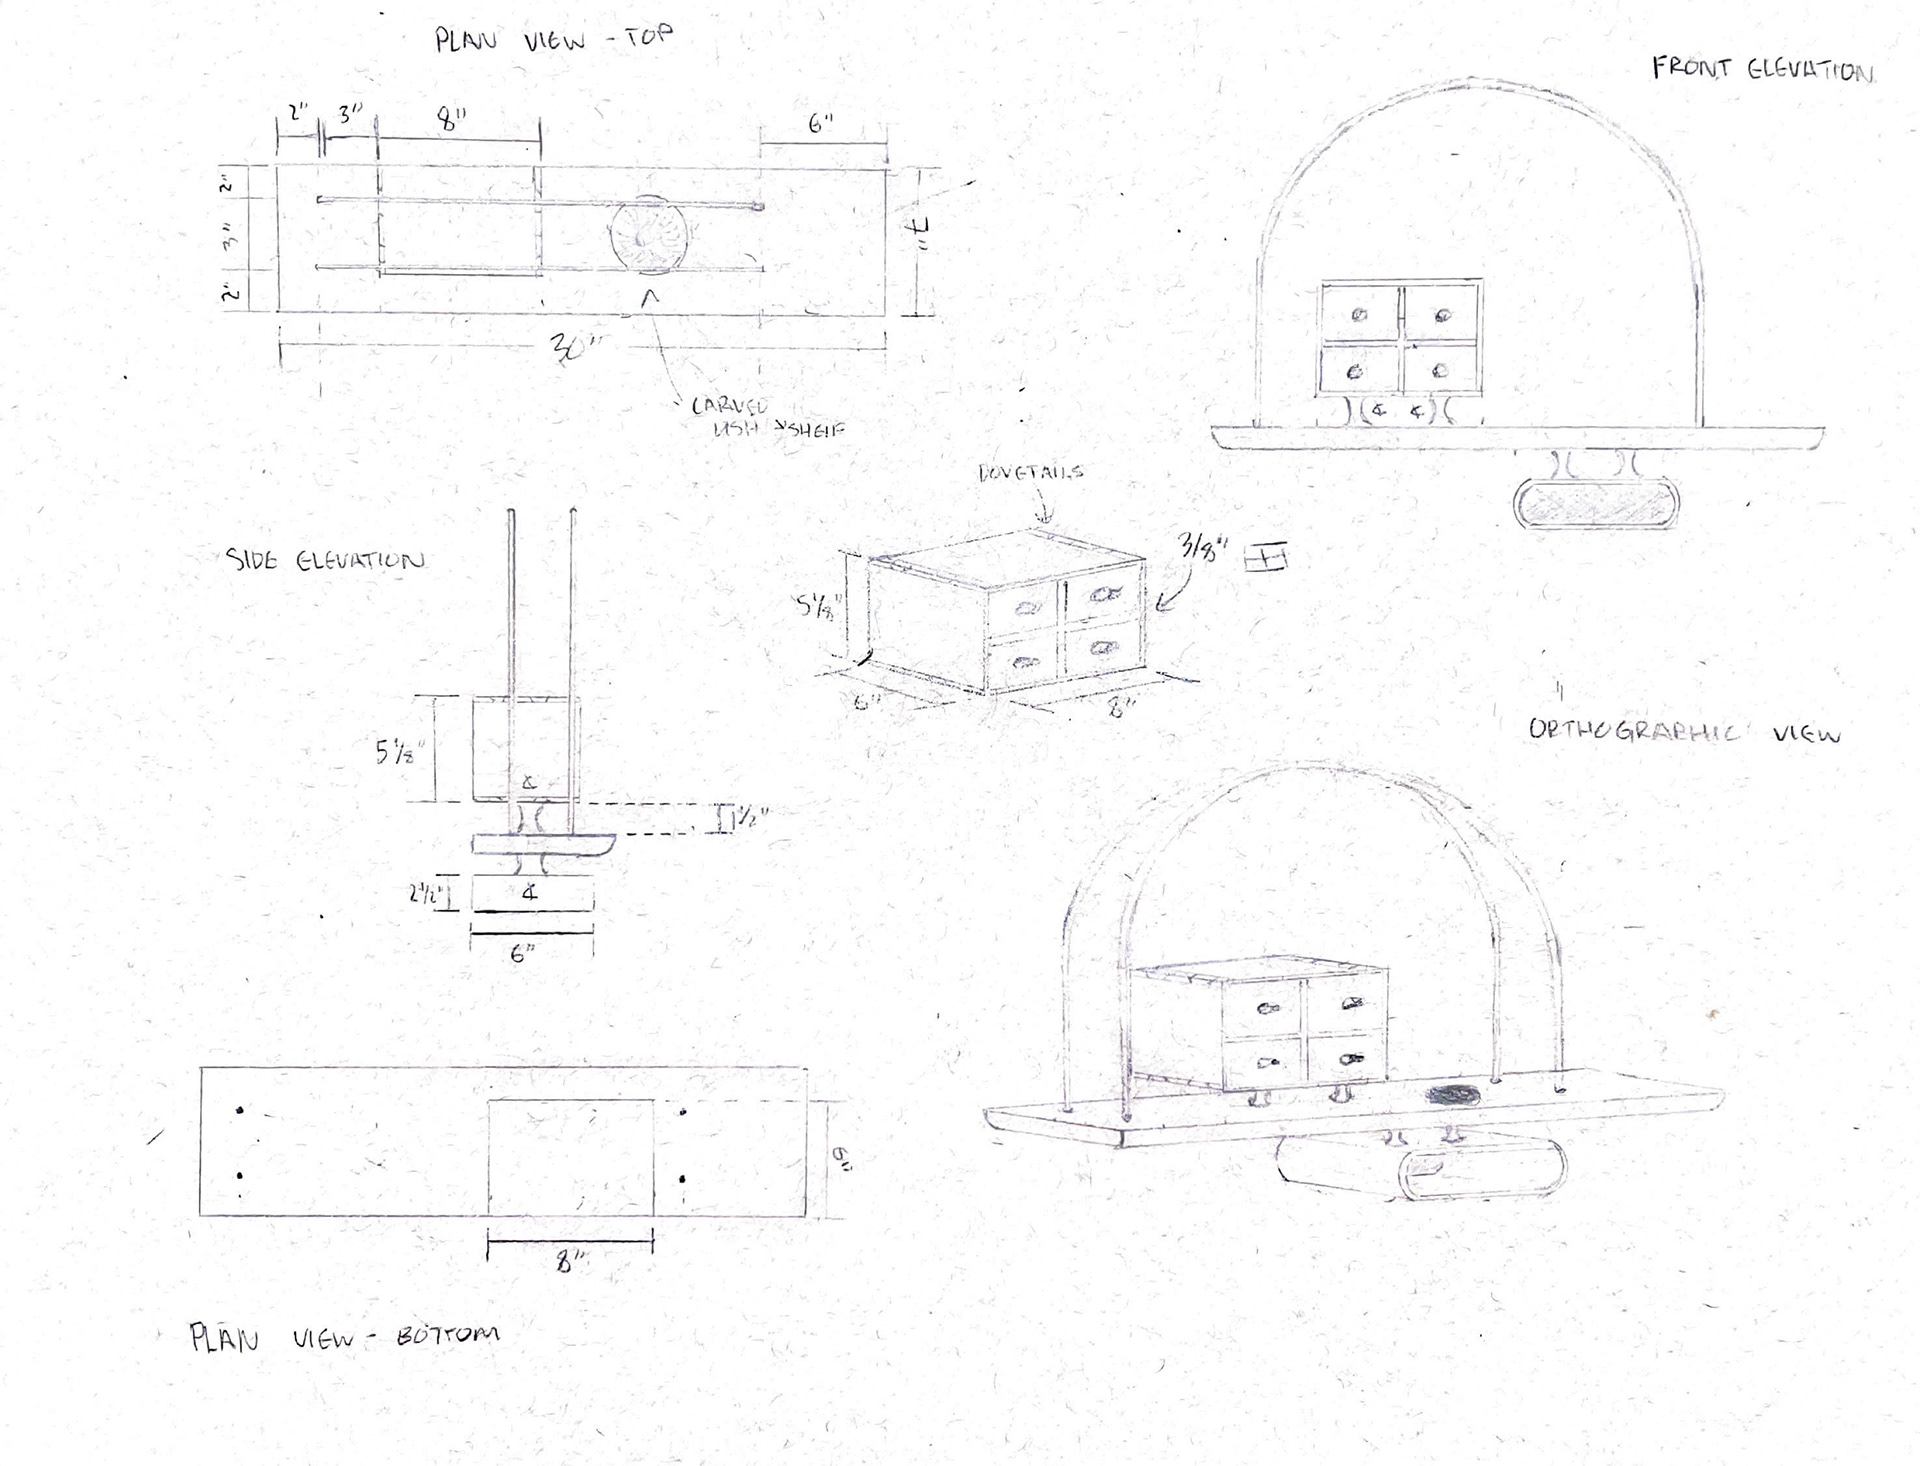
This image shows the final design of the Wall Hanging Vanity, taking all of the previous ideas into consideration. It depicts a Plan view of the top and bottom of the piece, and Orthographic view of the overall piece as well as the drawer casing. It also shows a Side and Front elevation view. For the dimensions - the ratio between the width and height of the arches match the 1.618 value of the Golden Ratio, as does the overall length of the shelf in relation to the arches width, and the dimensions of the drawer casing!
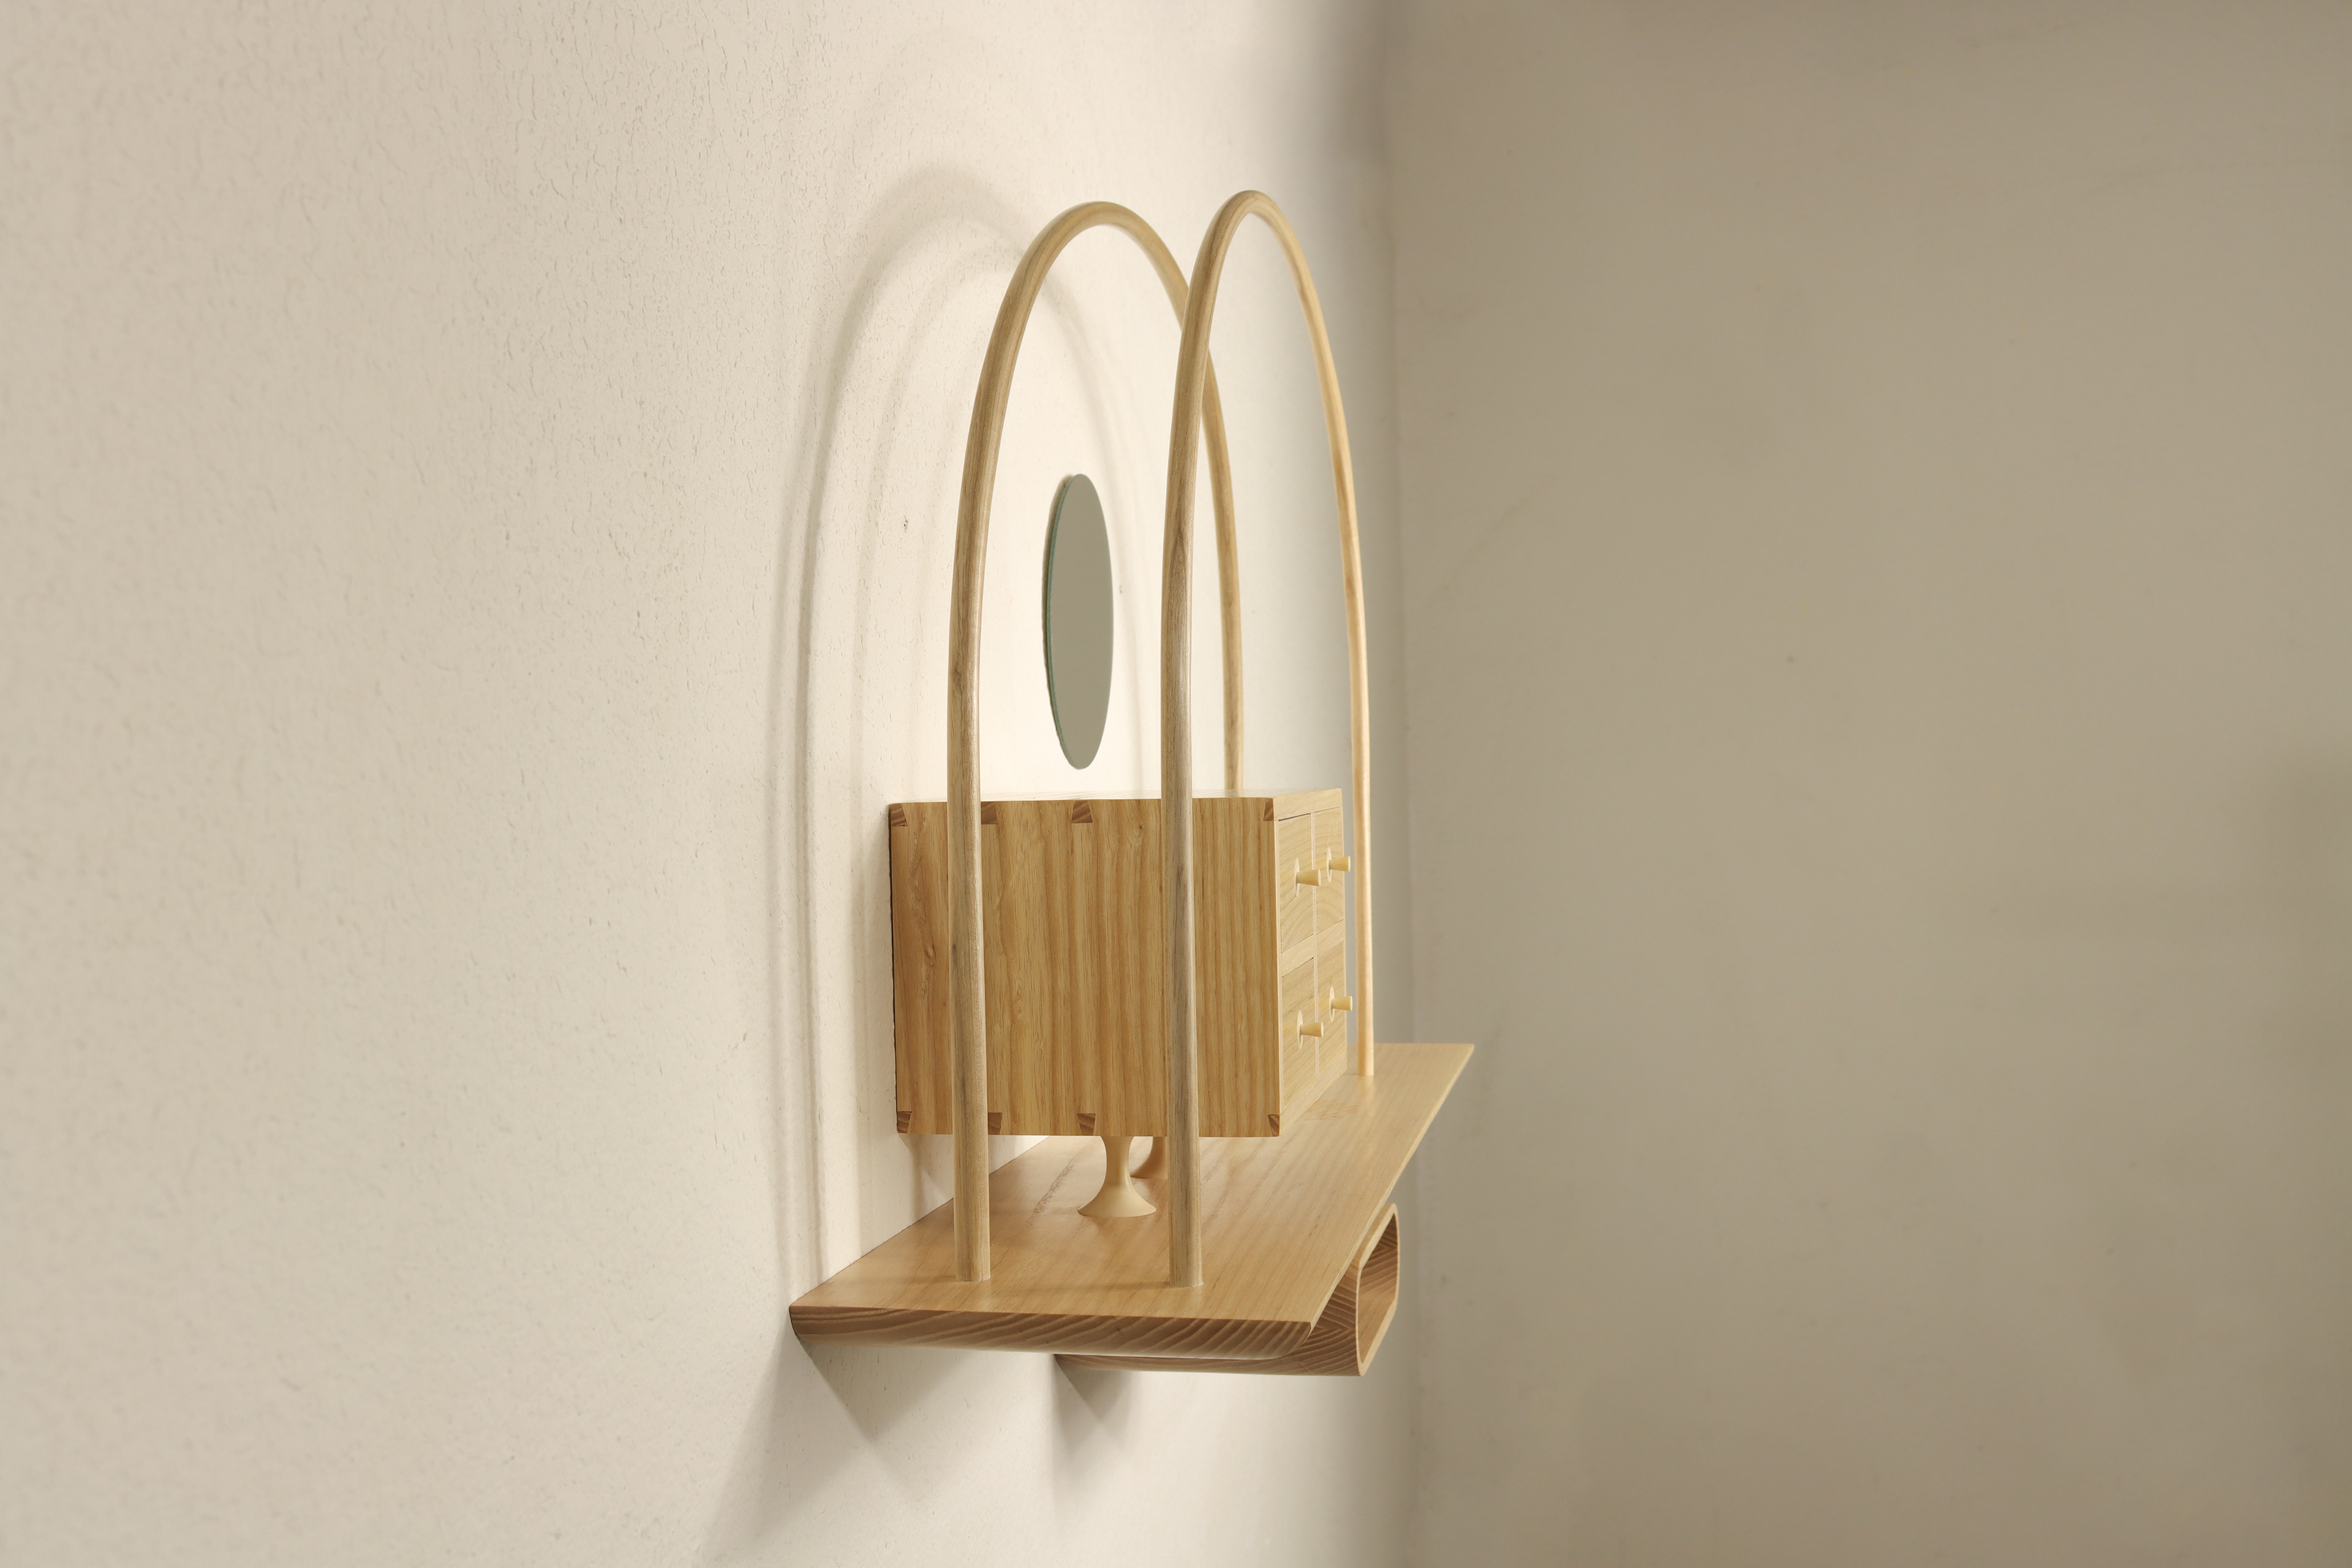
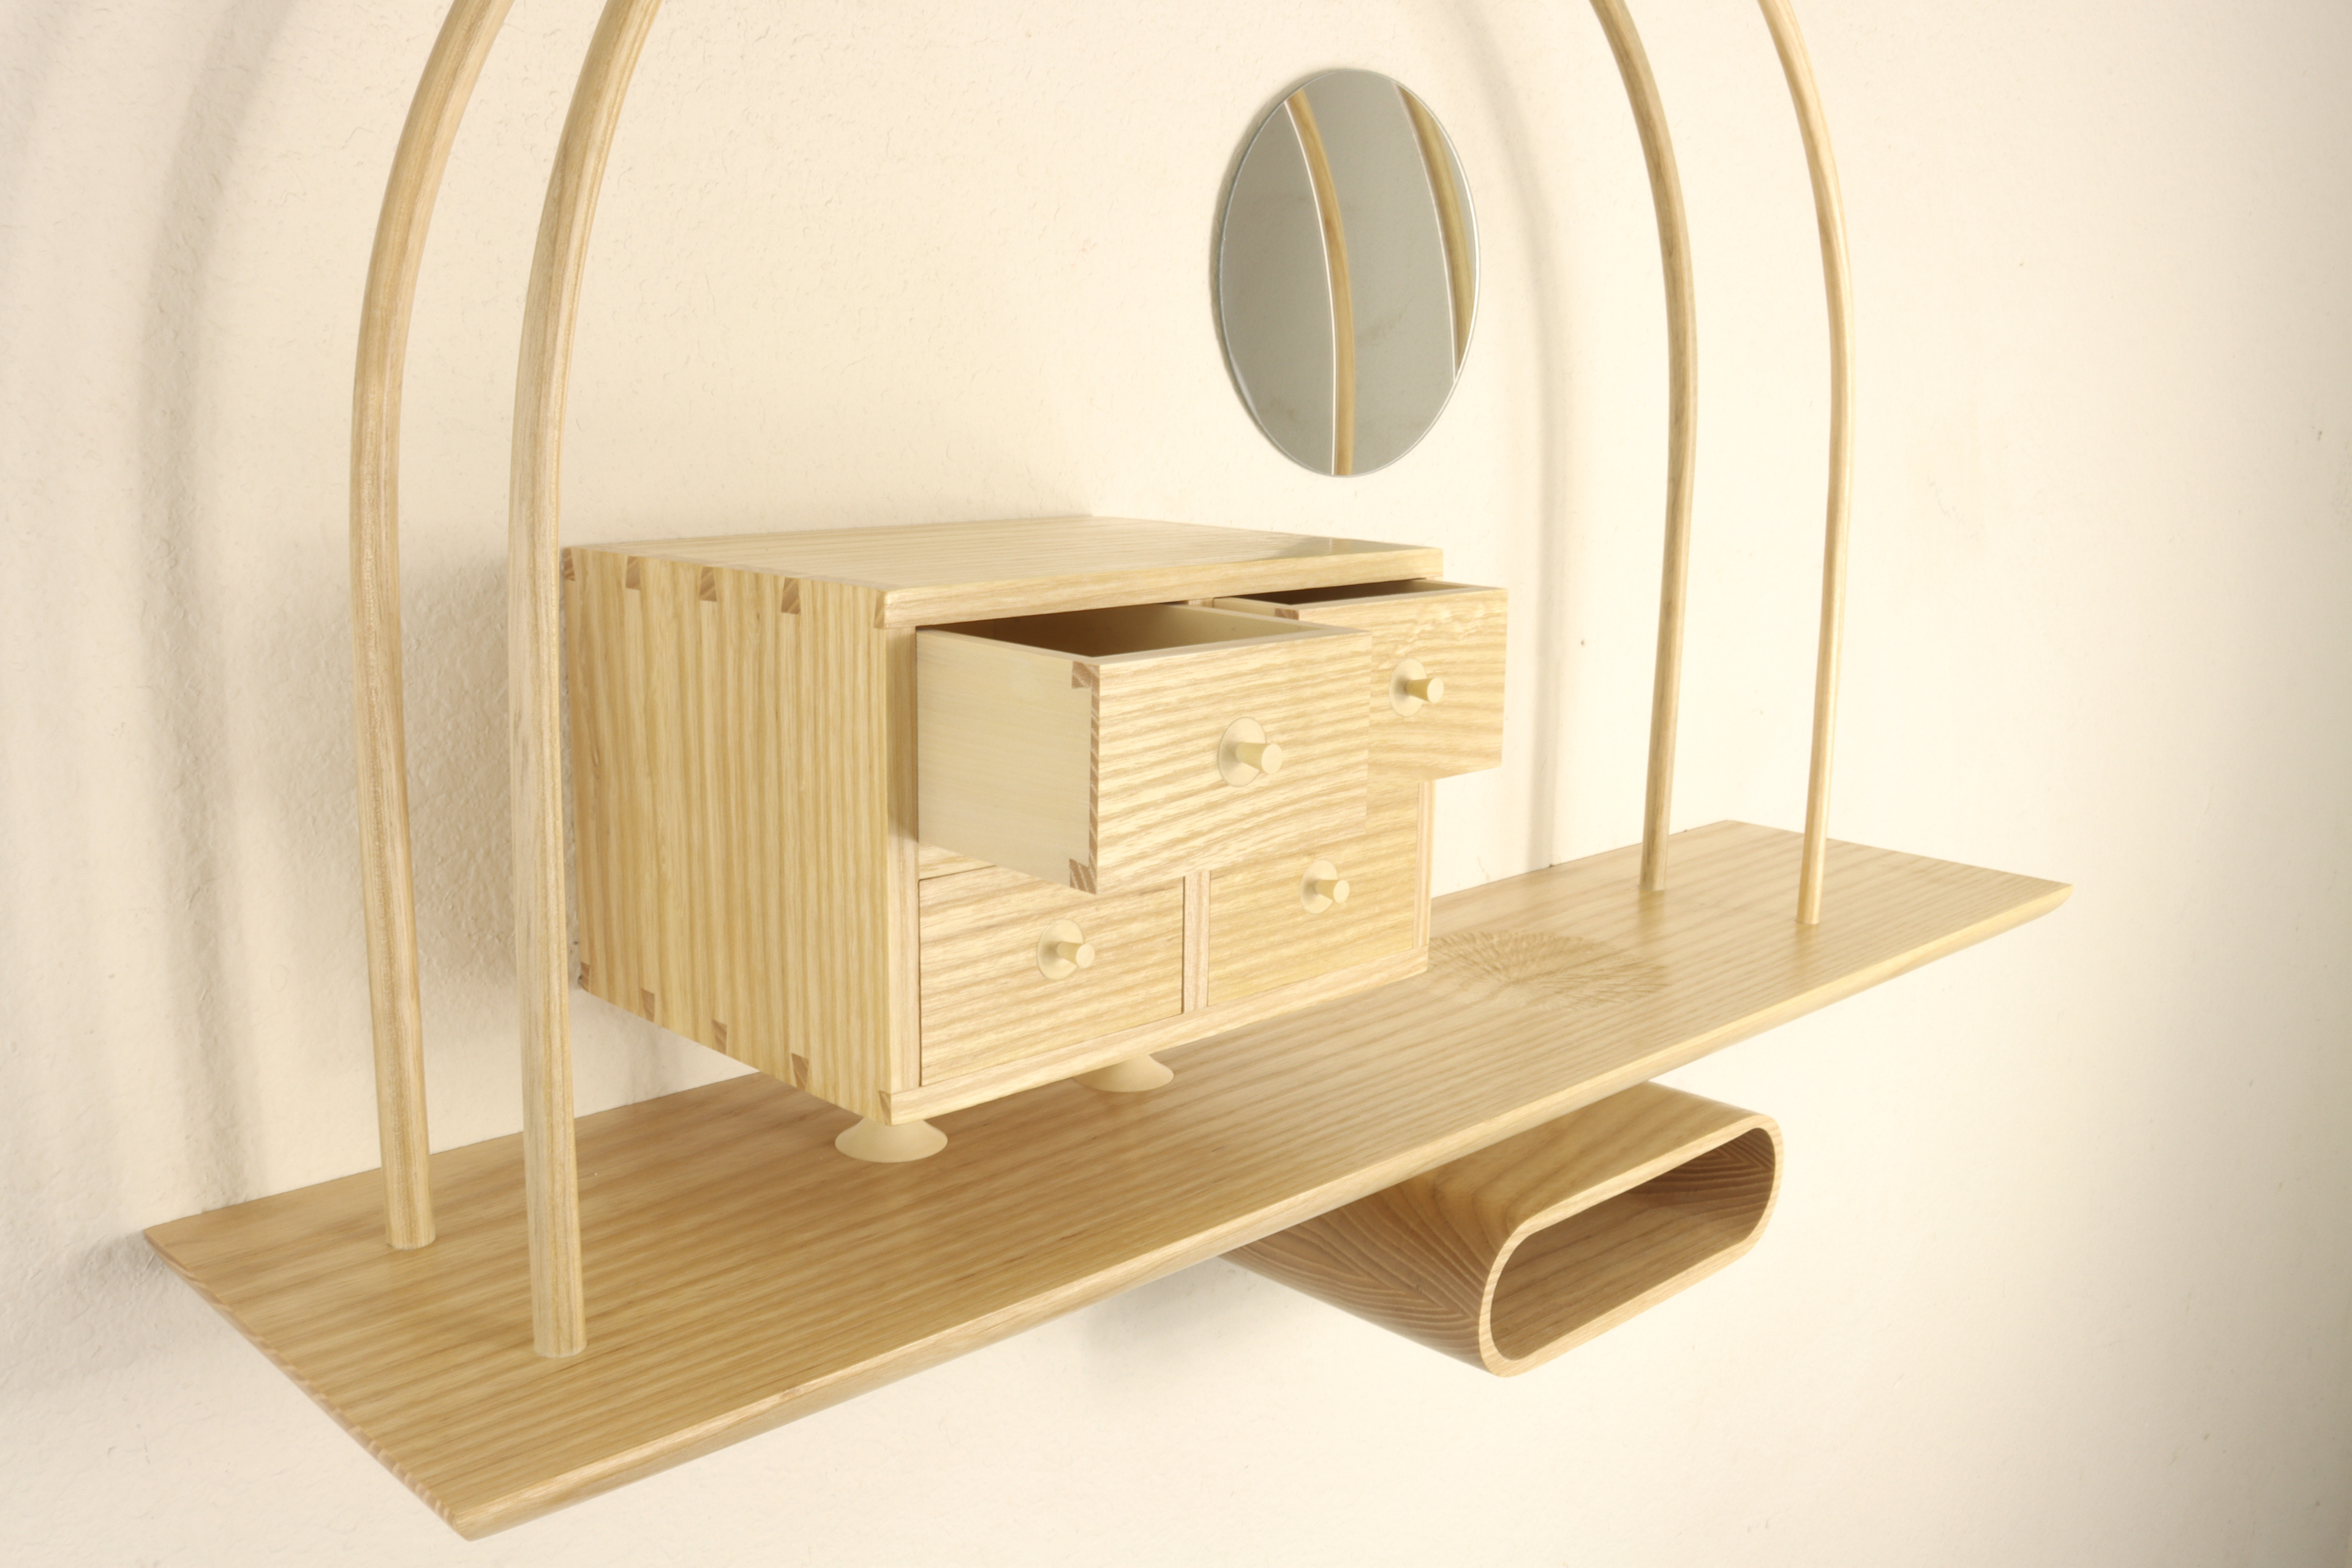
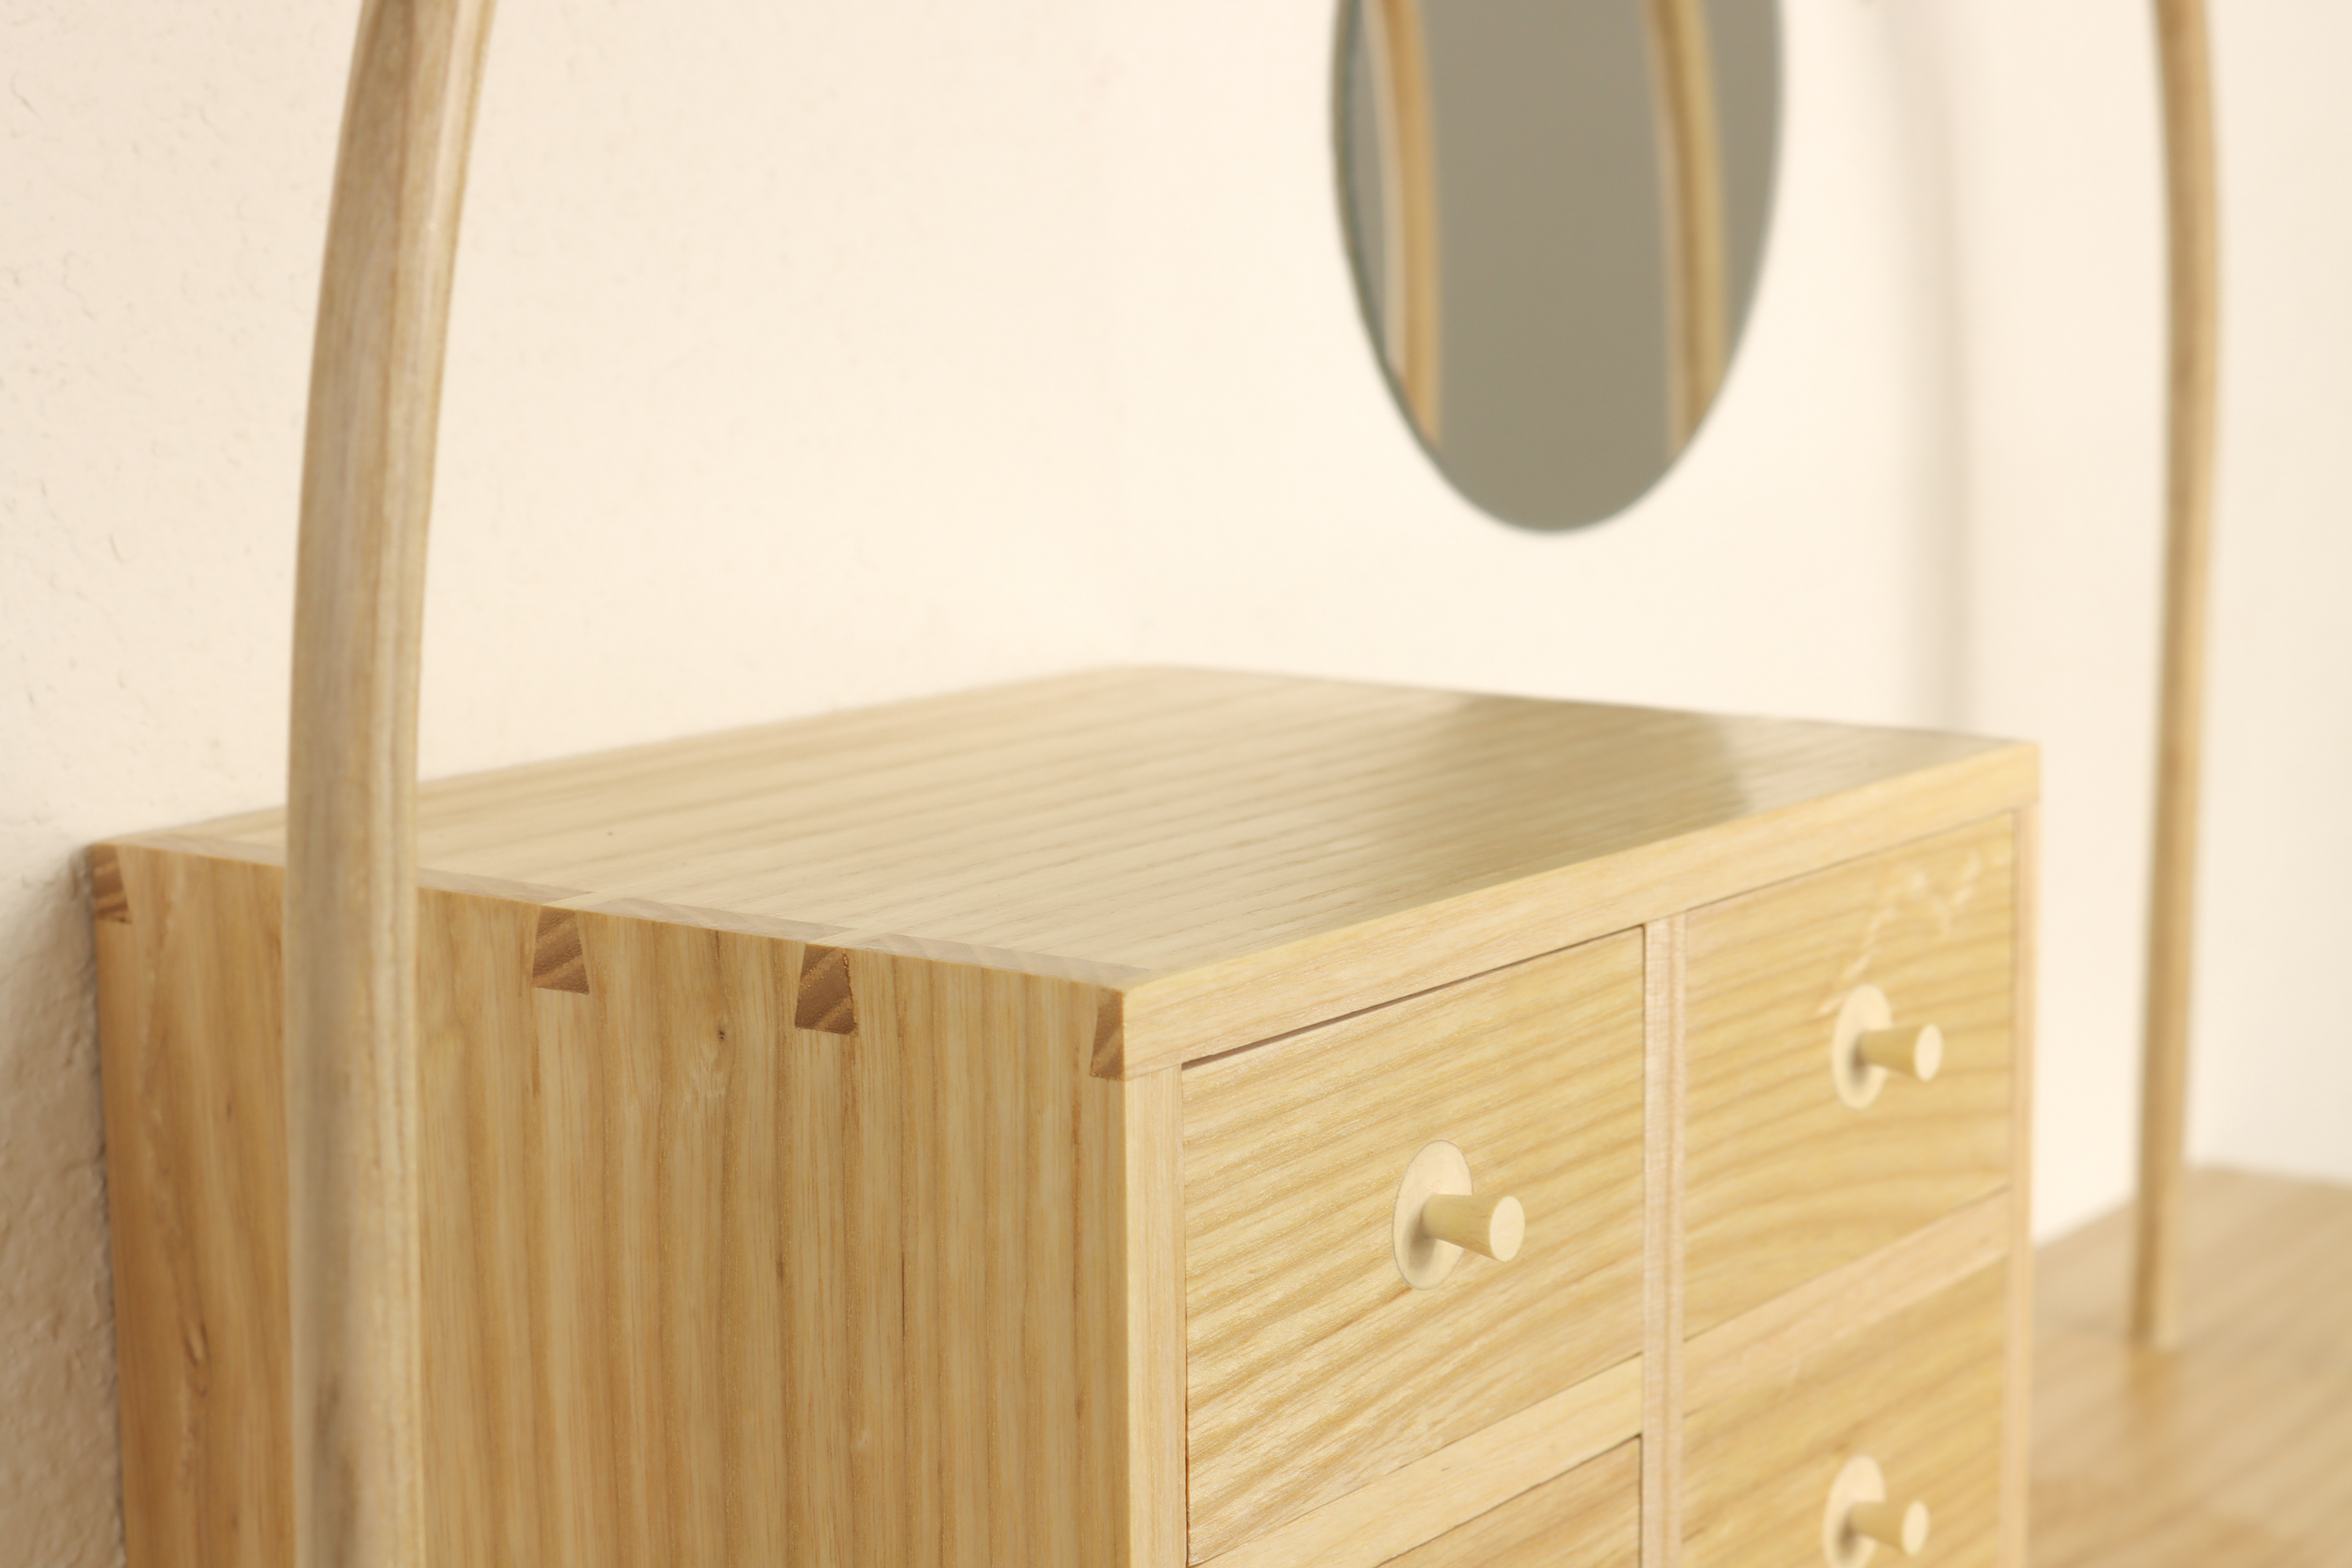
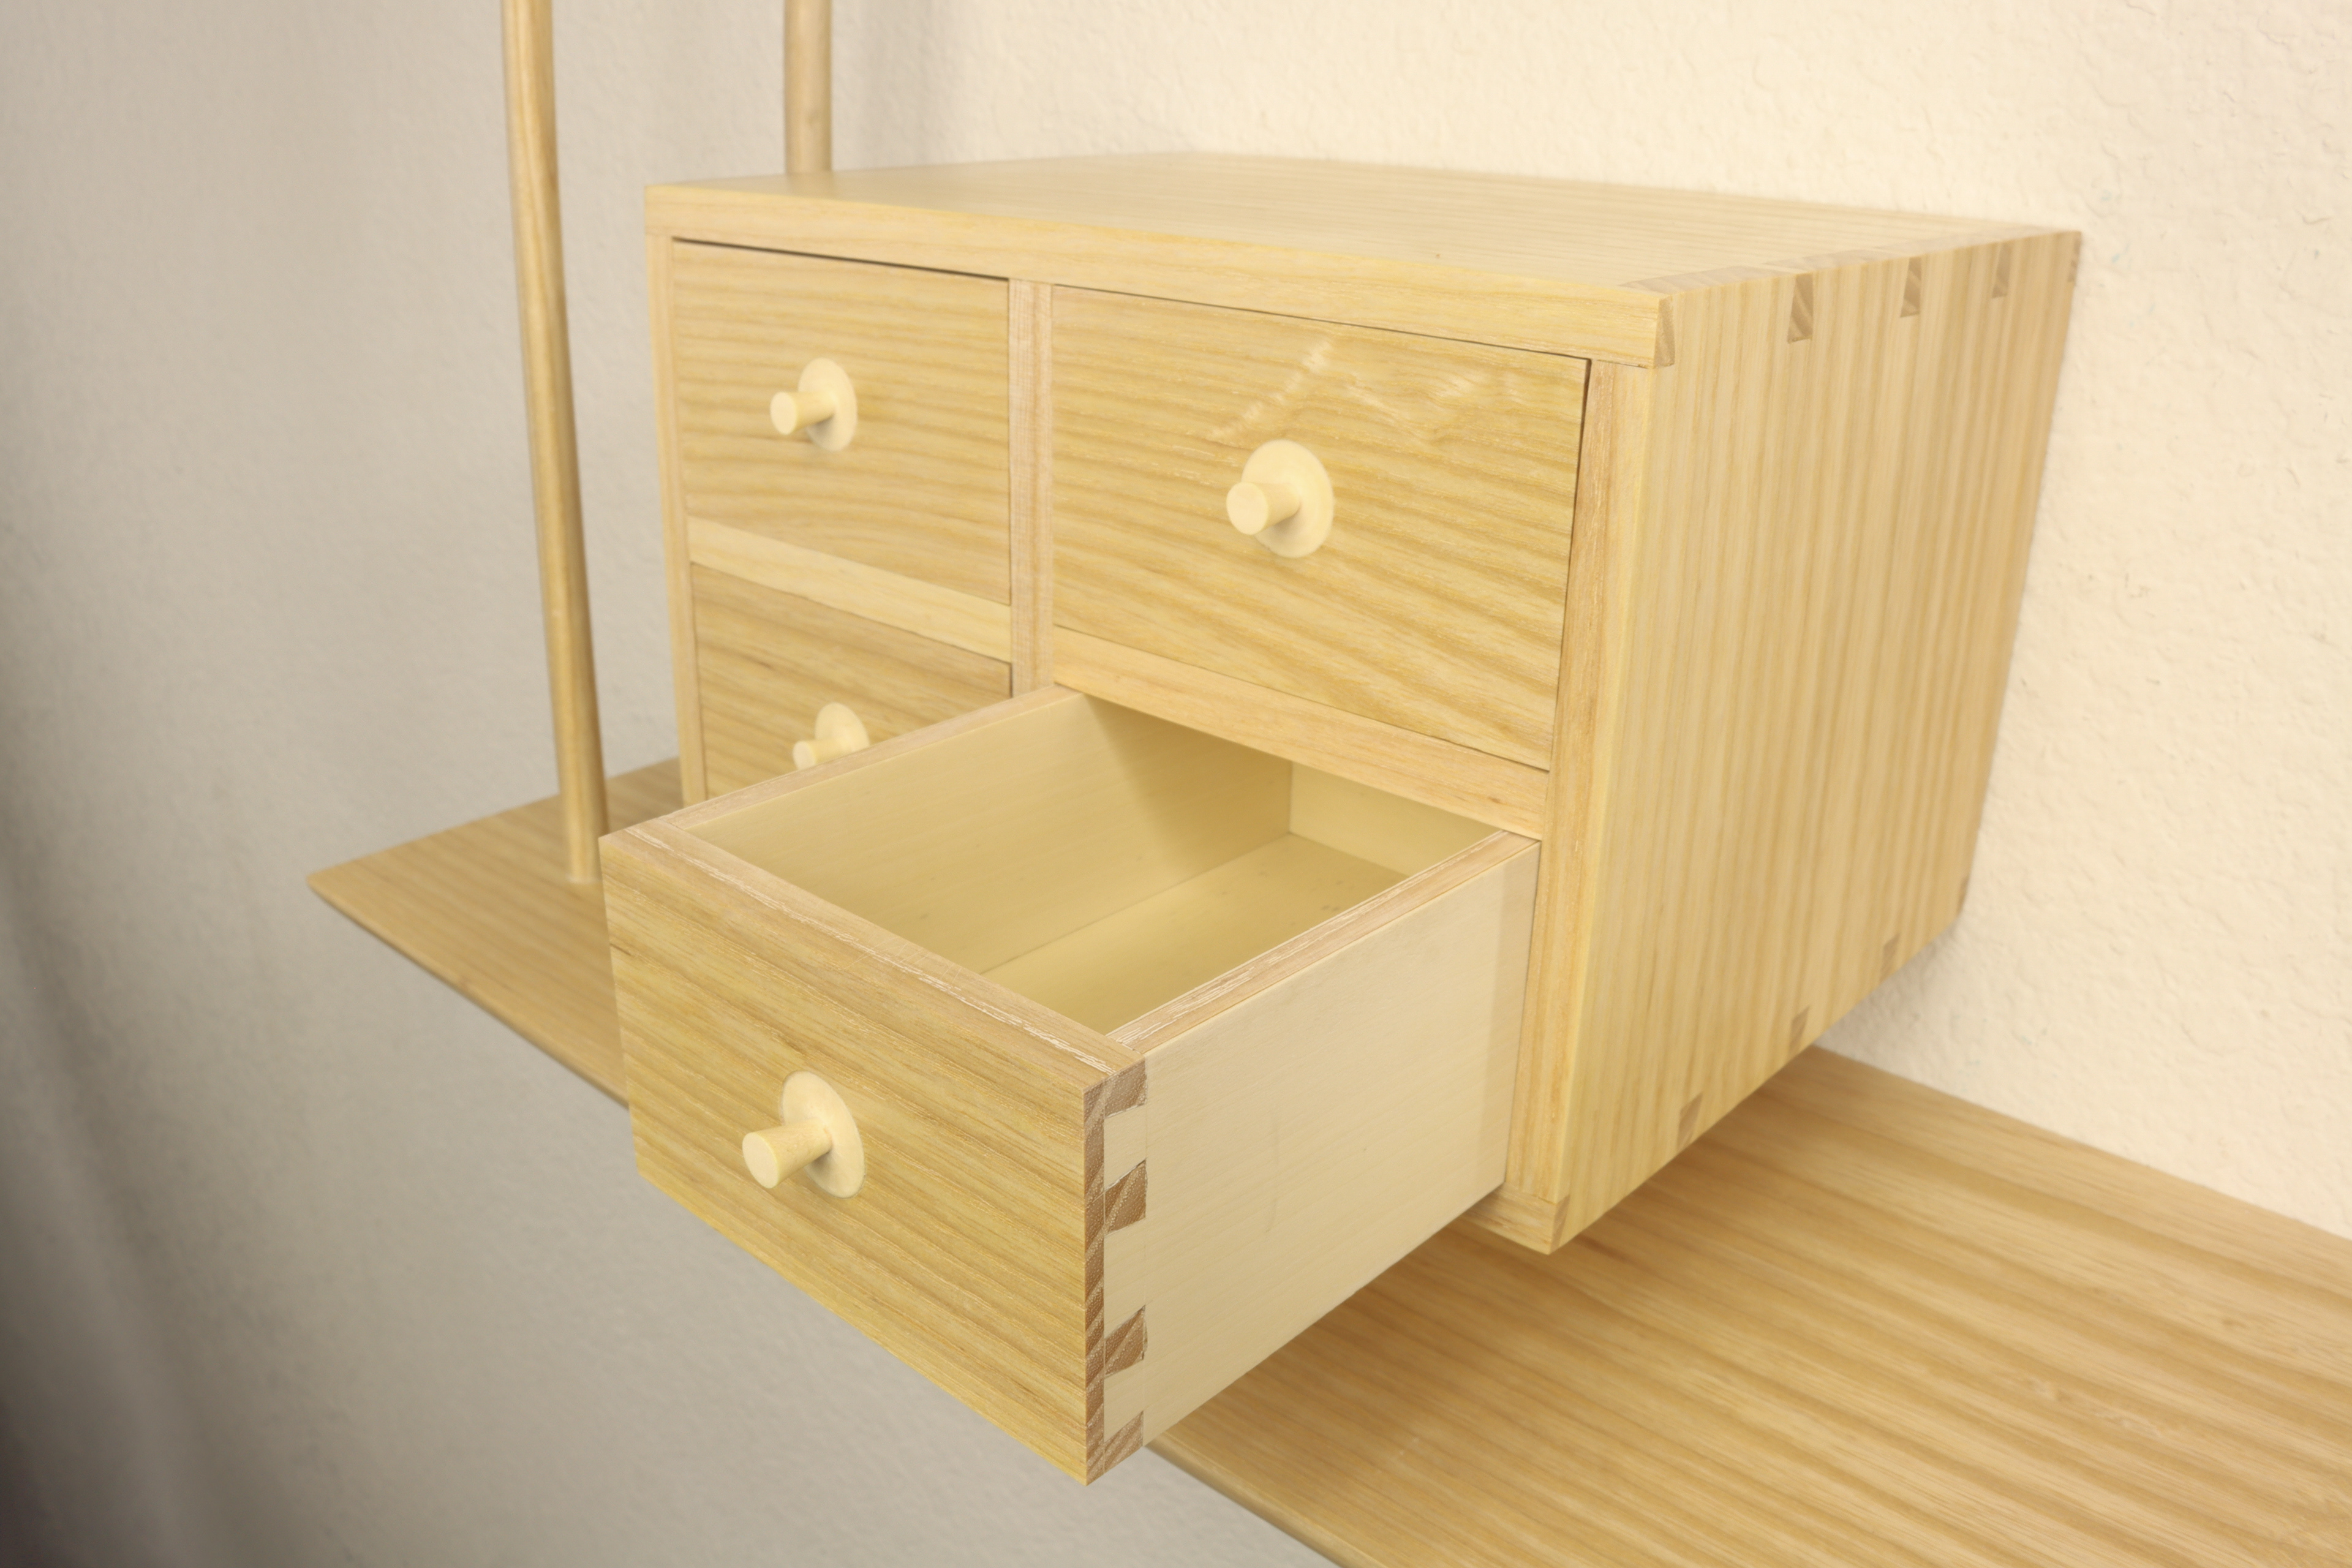
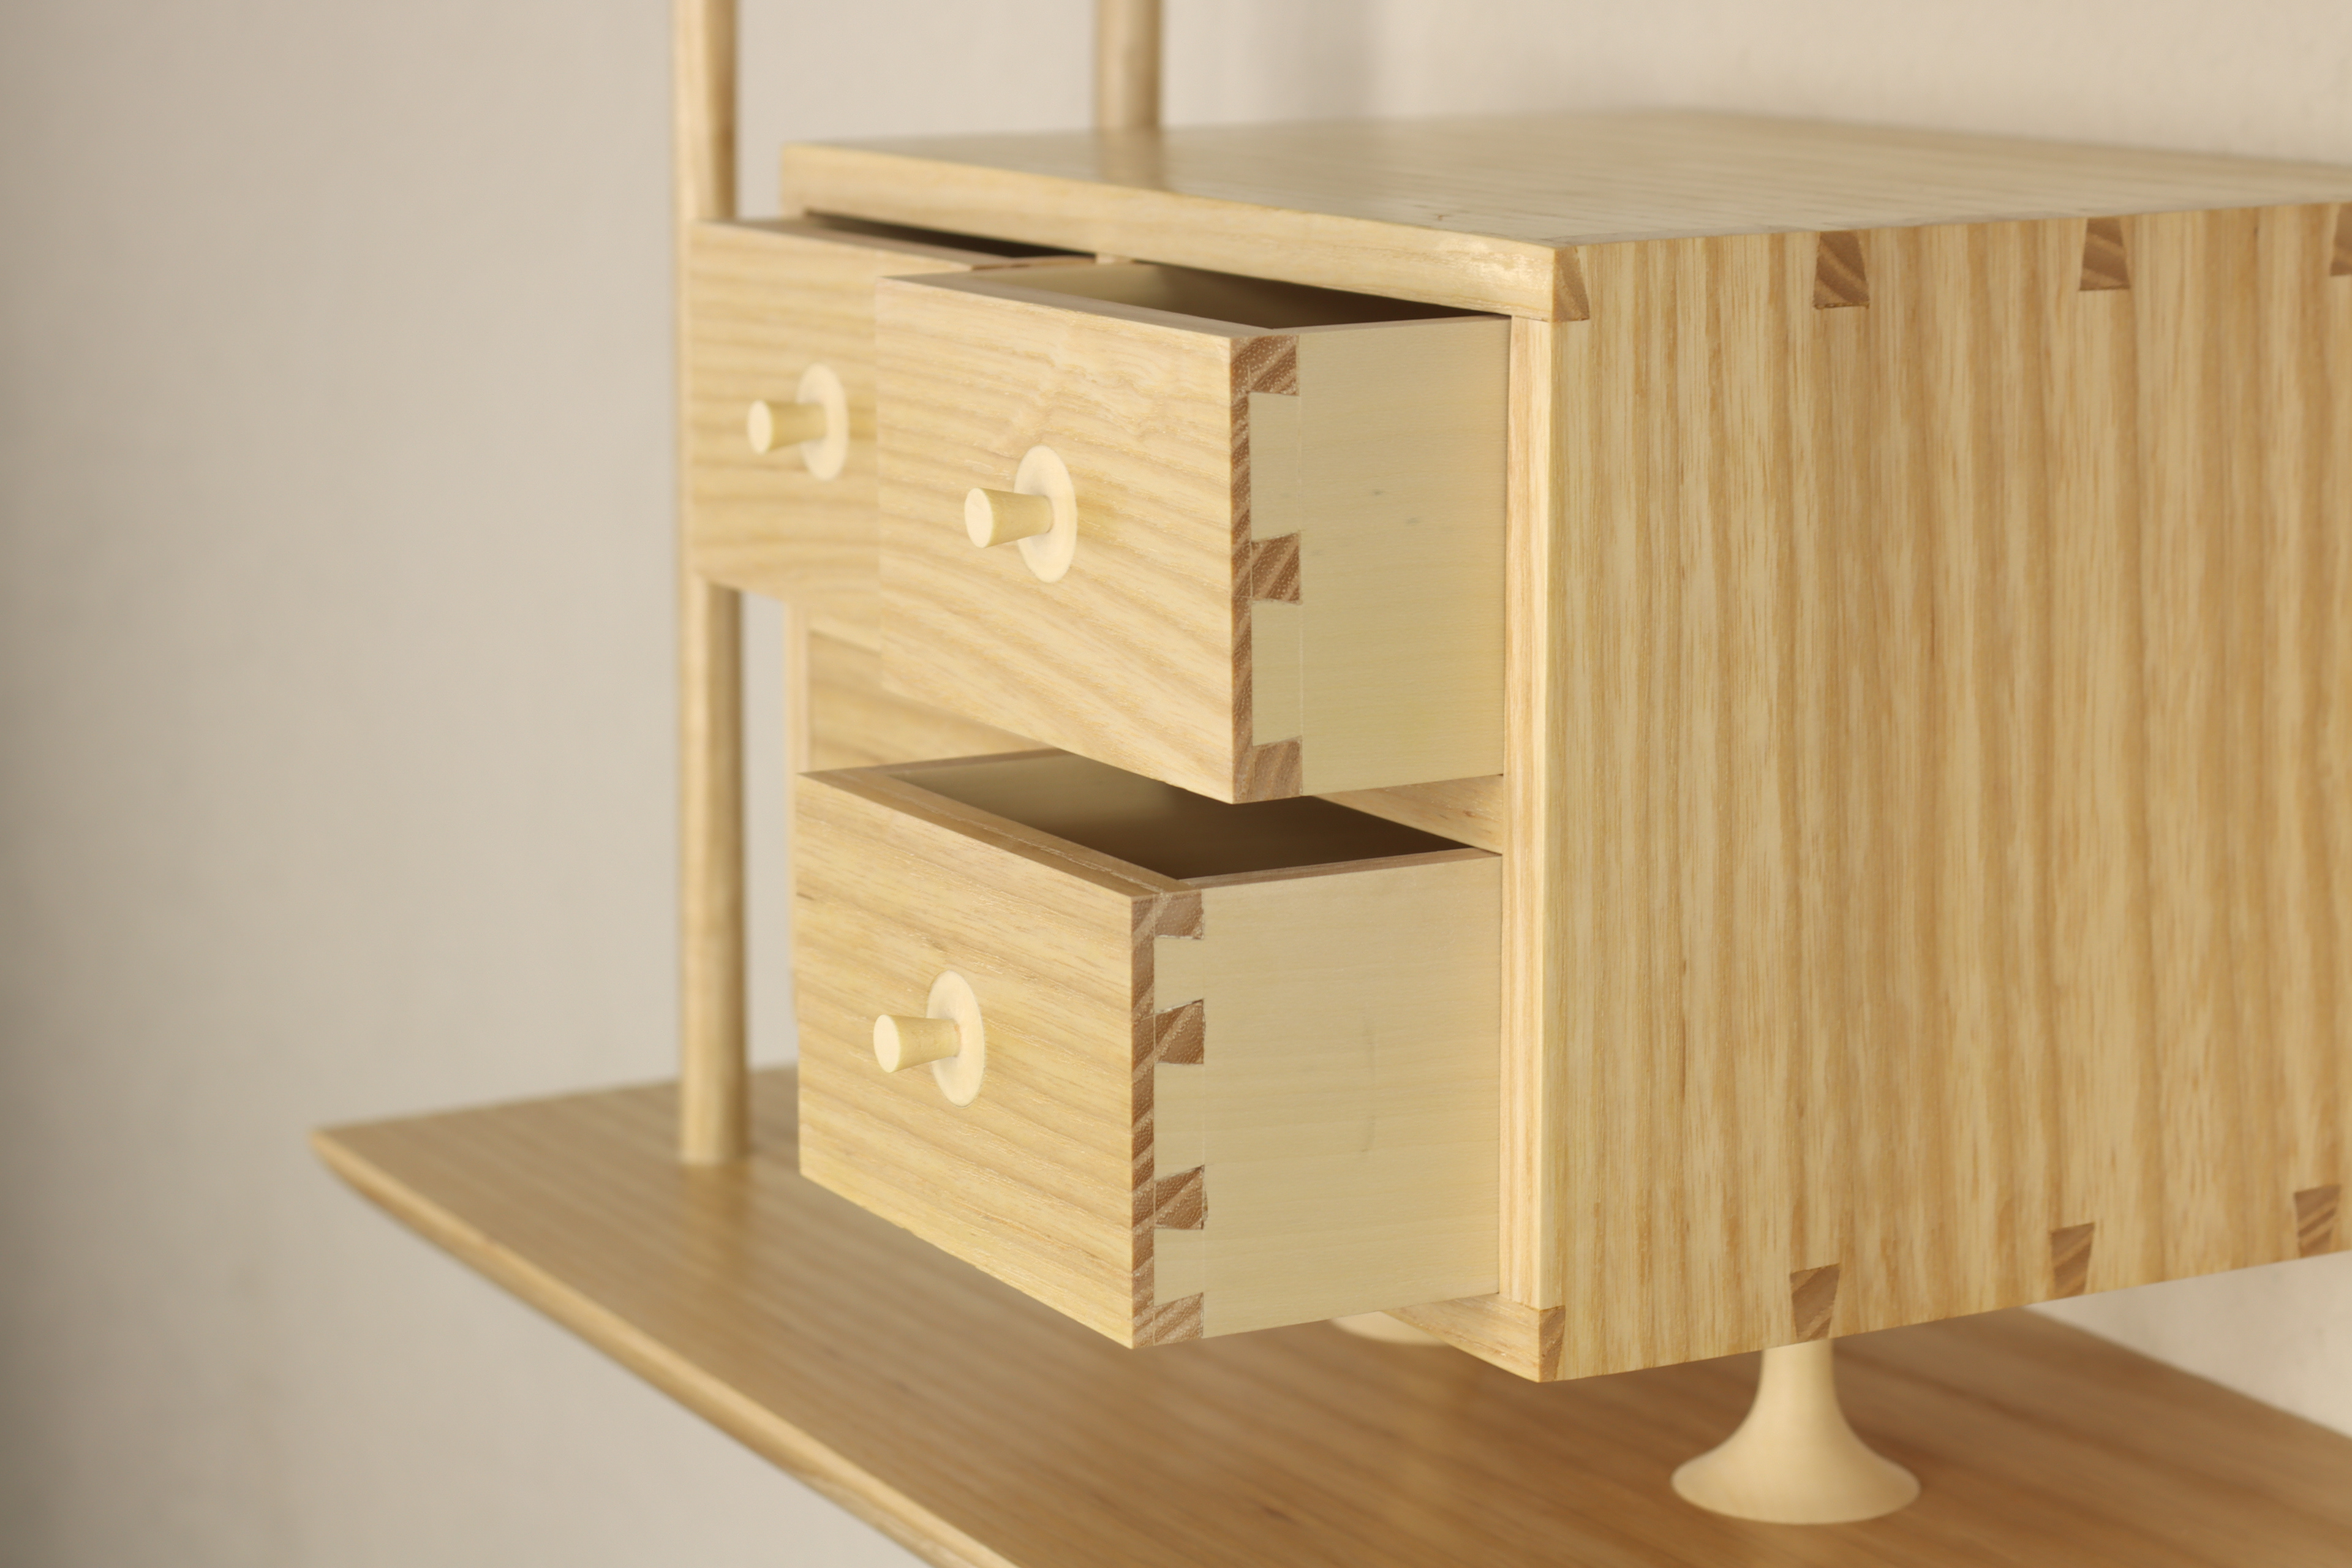
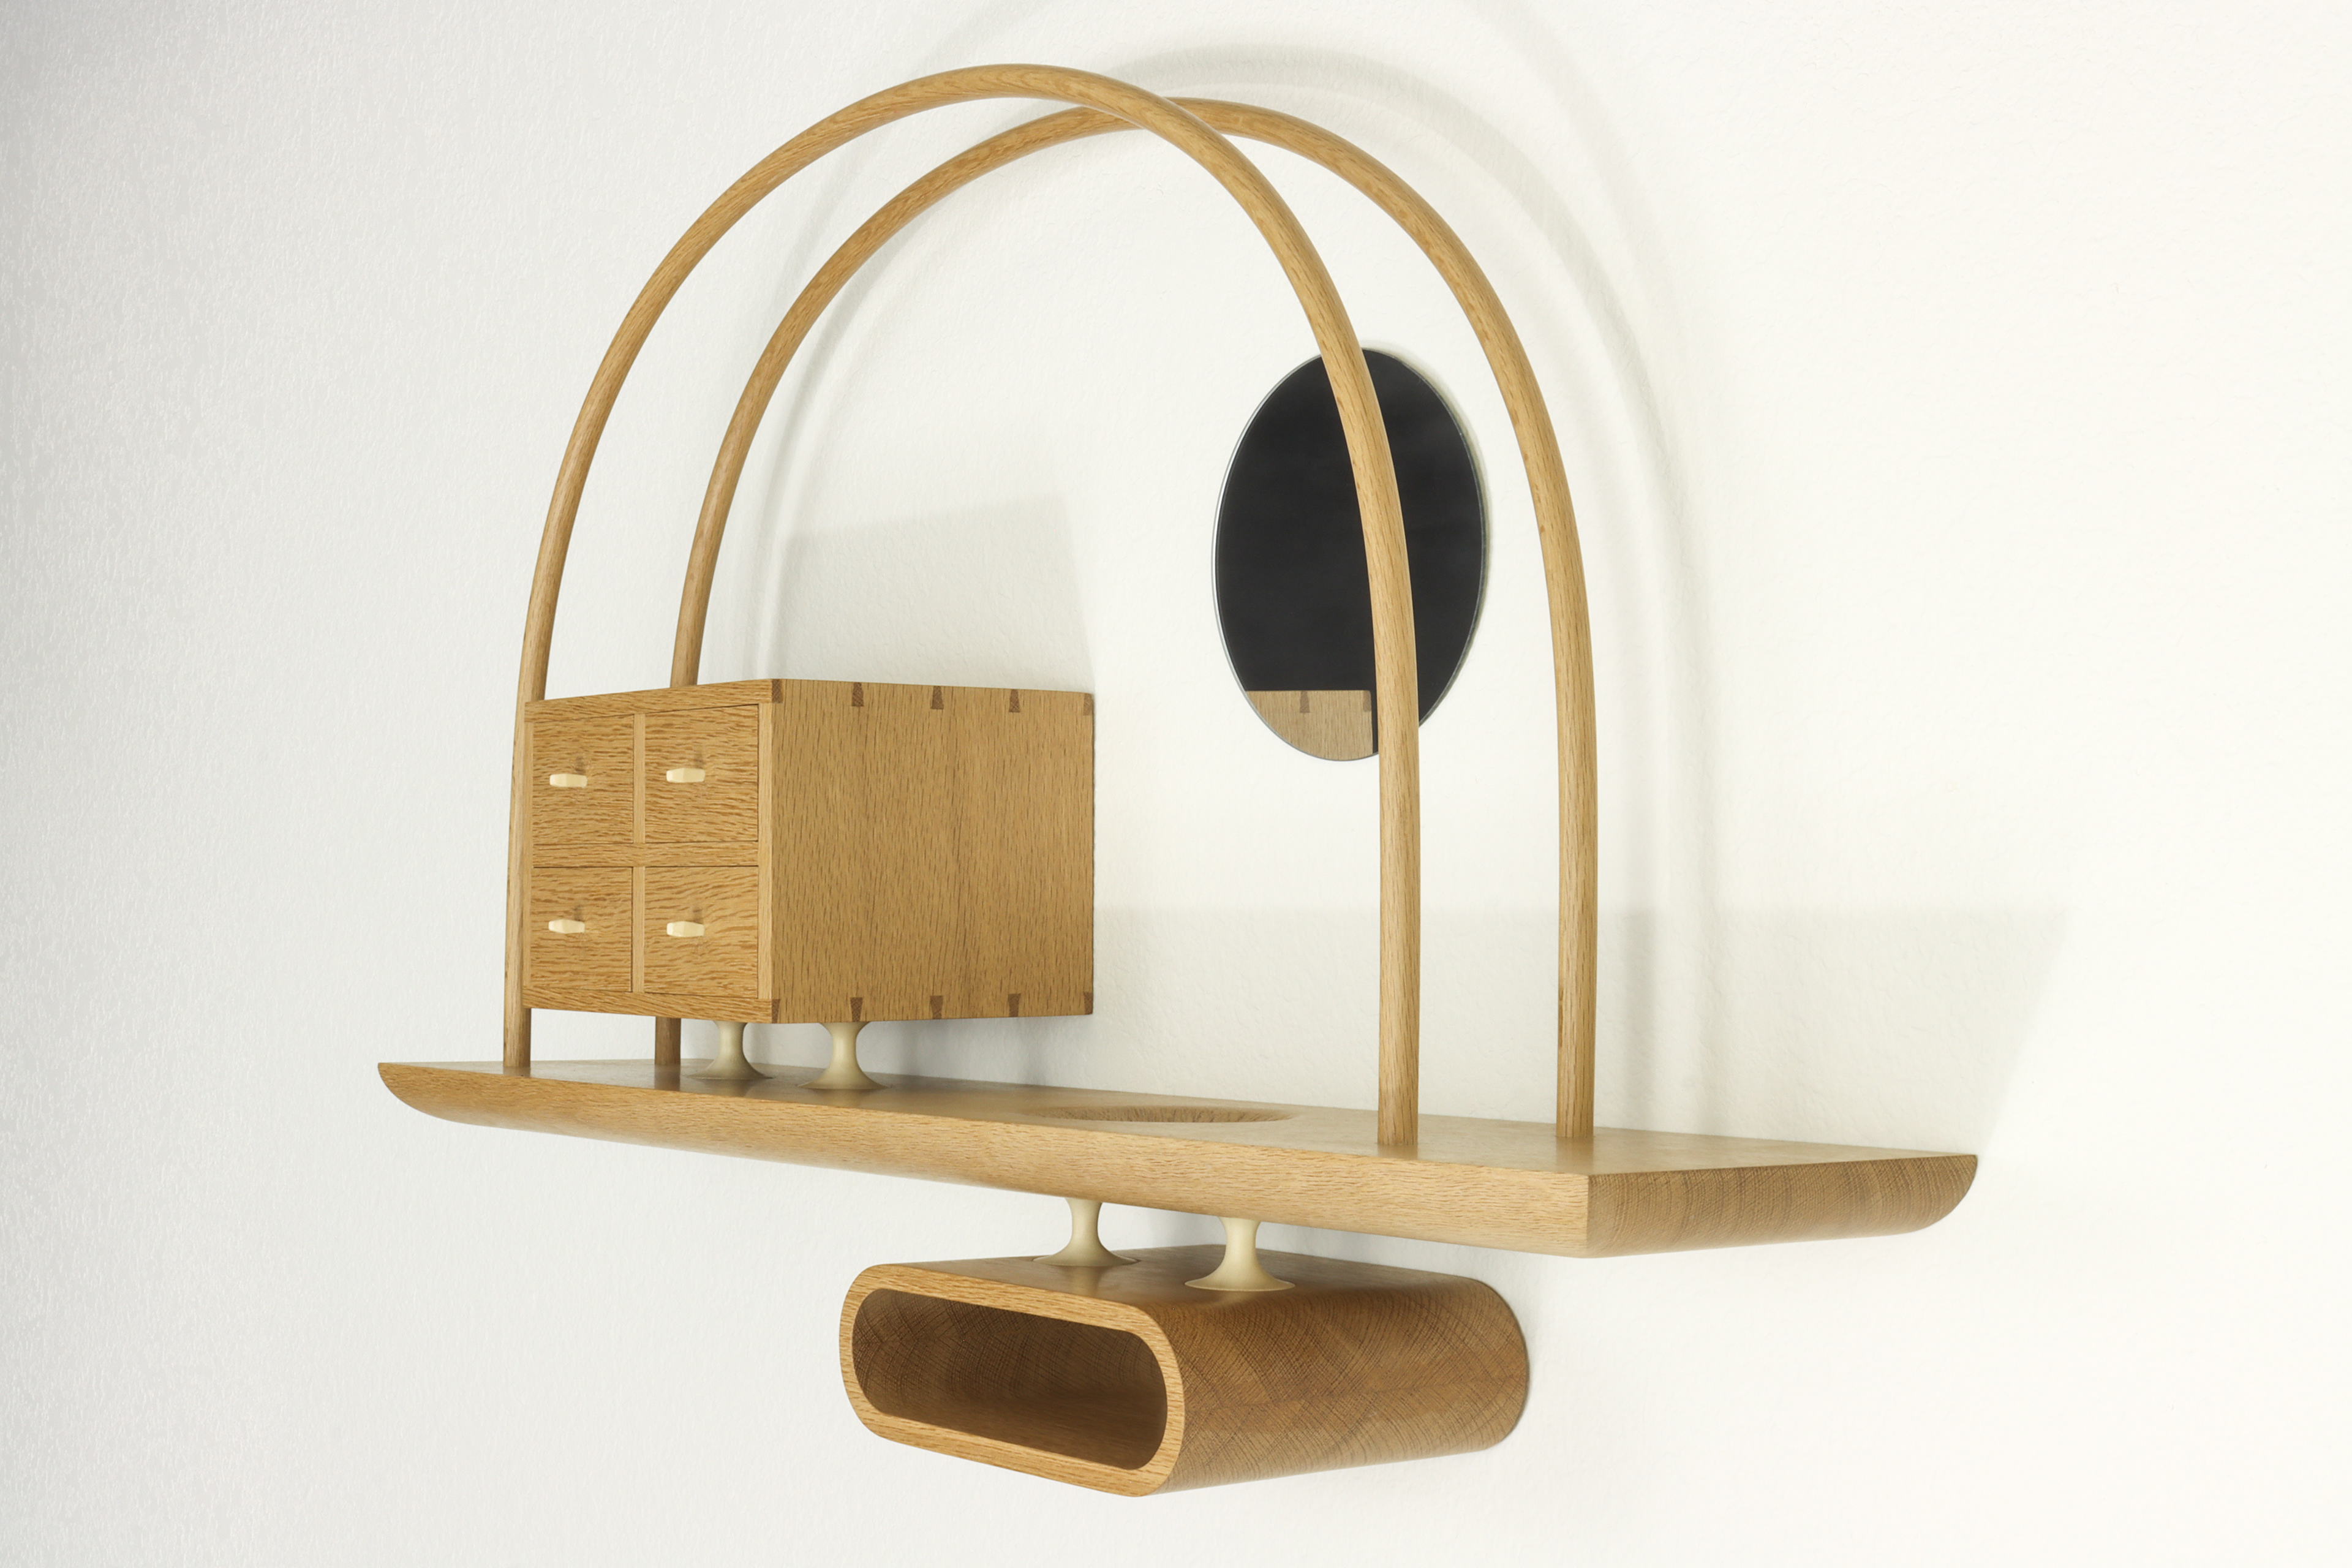
Final Images


Construction Methods and Techniques
Woods used: Ash, Holly
Arches:
The arches on this piece were made out of steam-bent Ash. I calculated the bend length of the piece, and cut a little oversized. After soaking in a mixture of water and ammonia for a day, I placed the pieces in a steam chamber for 30 minutes. Afterwards, I bent them around a CNC cut form to dry. I shaped them into a dowelled profile on the router, and refined with a spokeshave and card scraper.
Shelf:
After cutting and milling the shelf to size, I drilled appropriate sized holes to receive the Holly stanchions (Discussed below) and the bent arches. Keyhole slots were routed in the back edge for future wall mounting. I then laid out guide lines to form the edge profile. The profile was achieved through a #4 style hand plane and a generic spokeshave, then blended with a Krenov style smoothing plane.
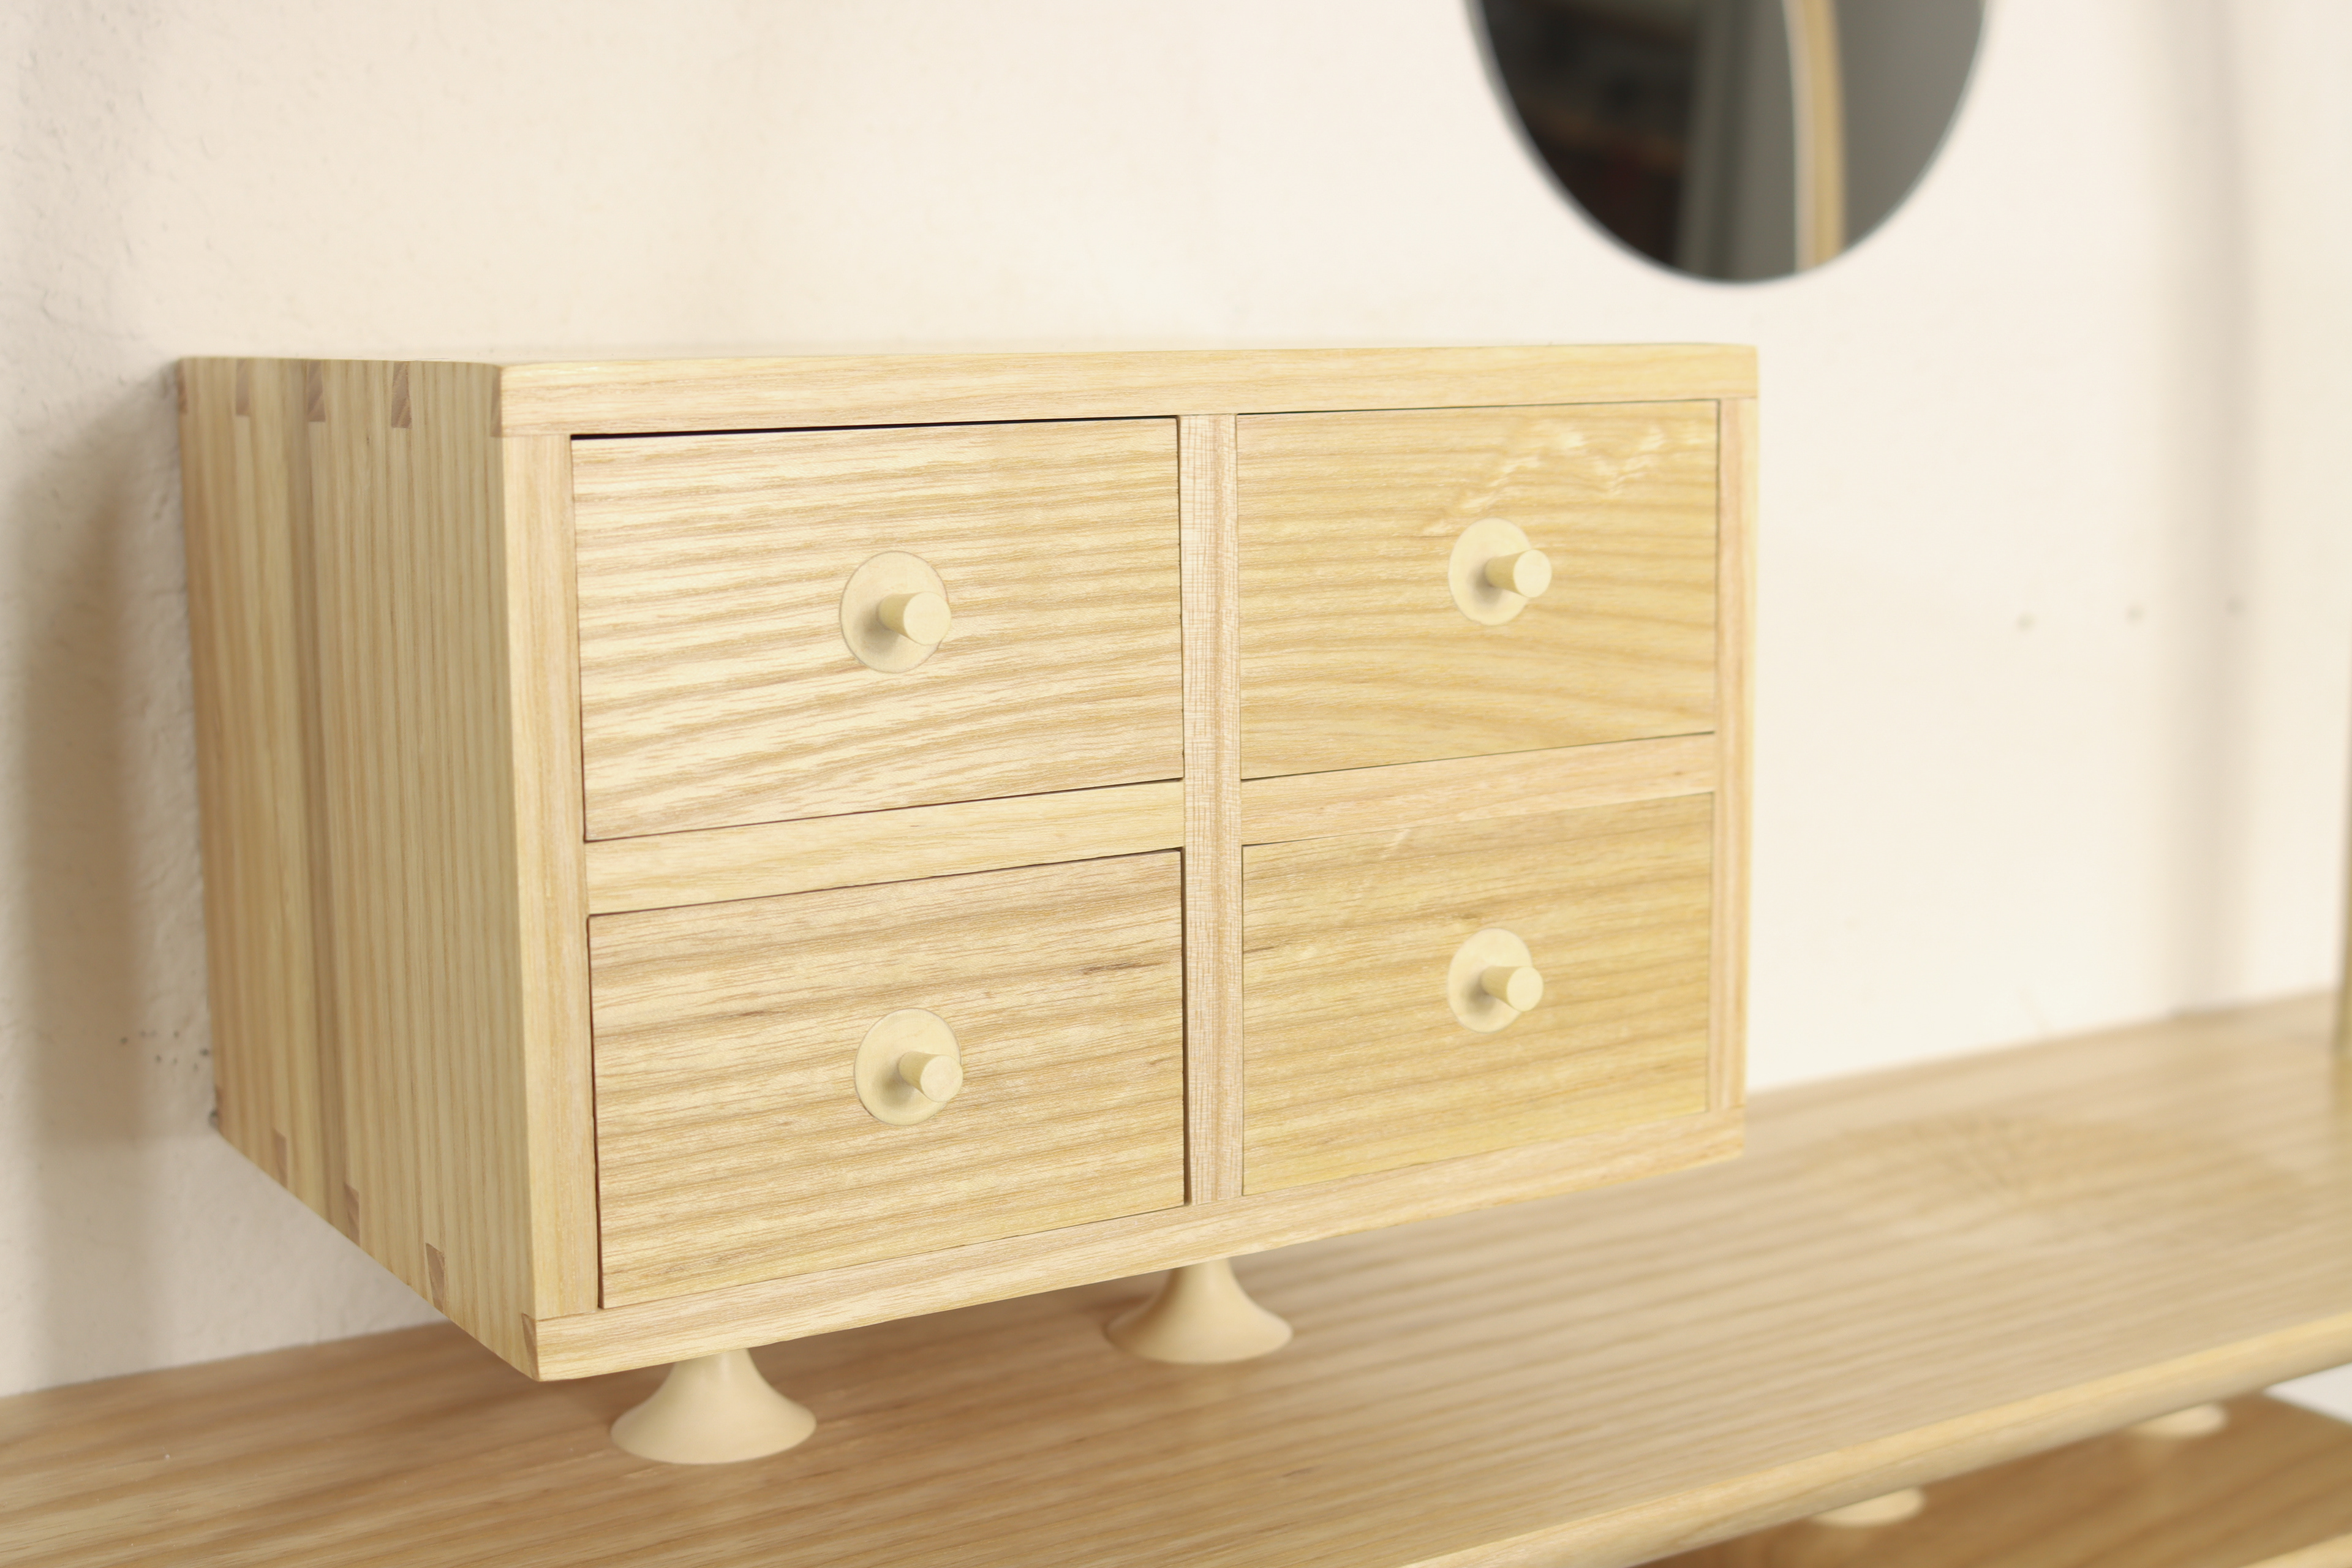
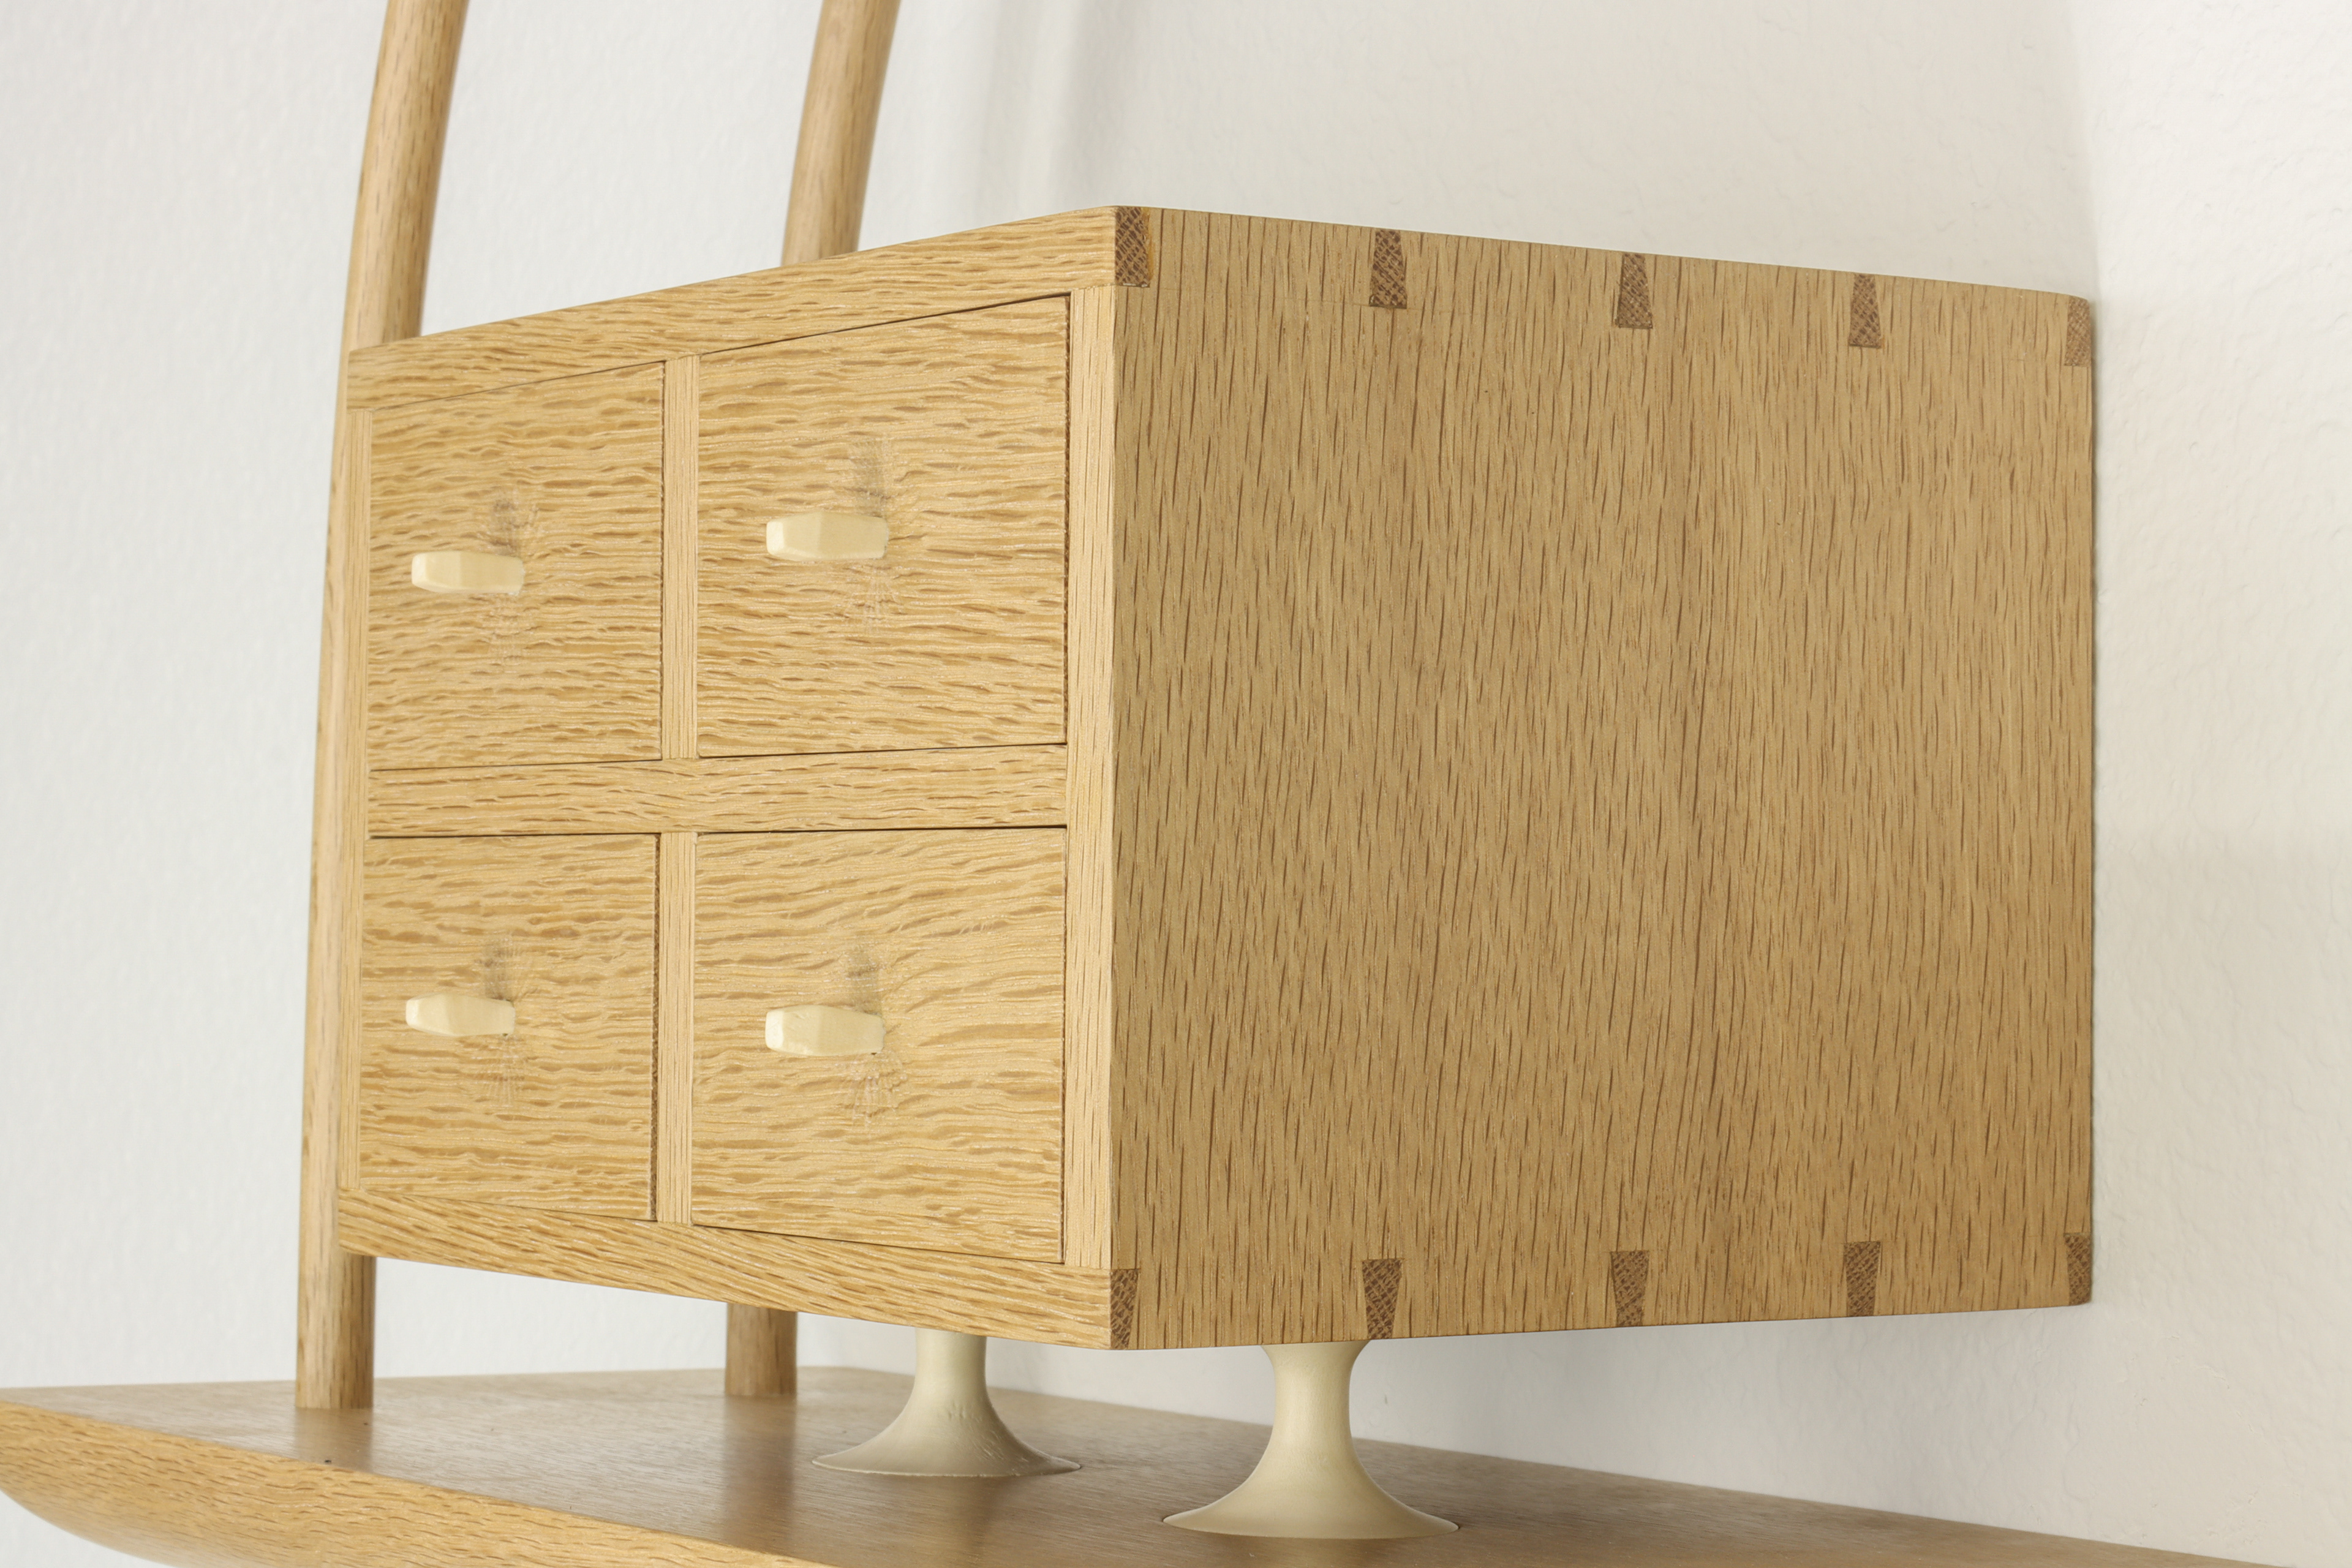
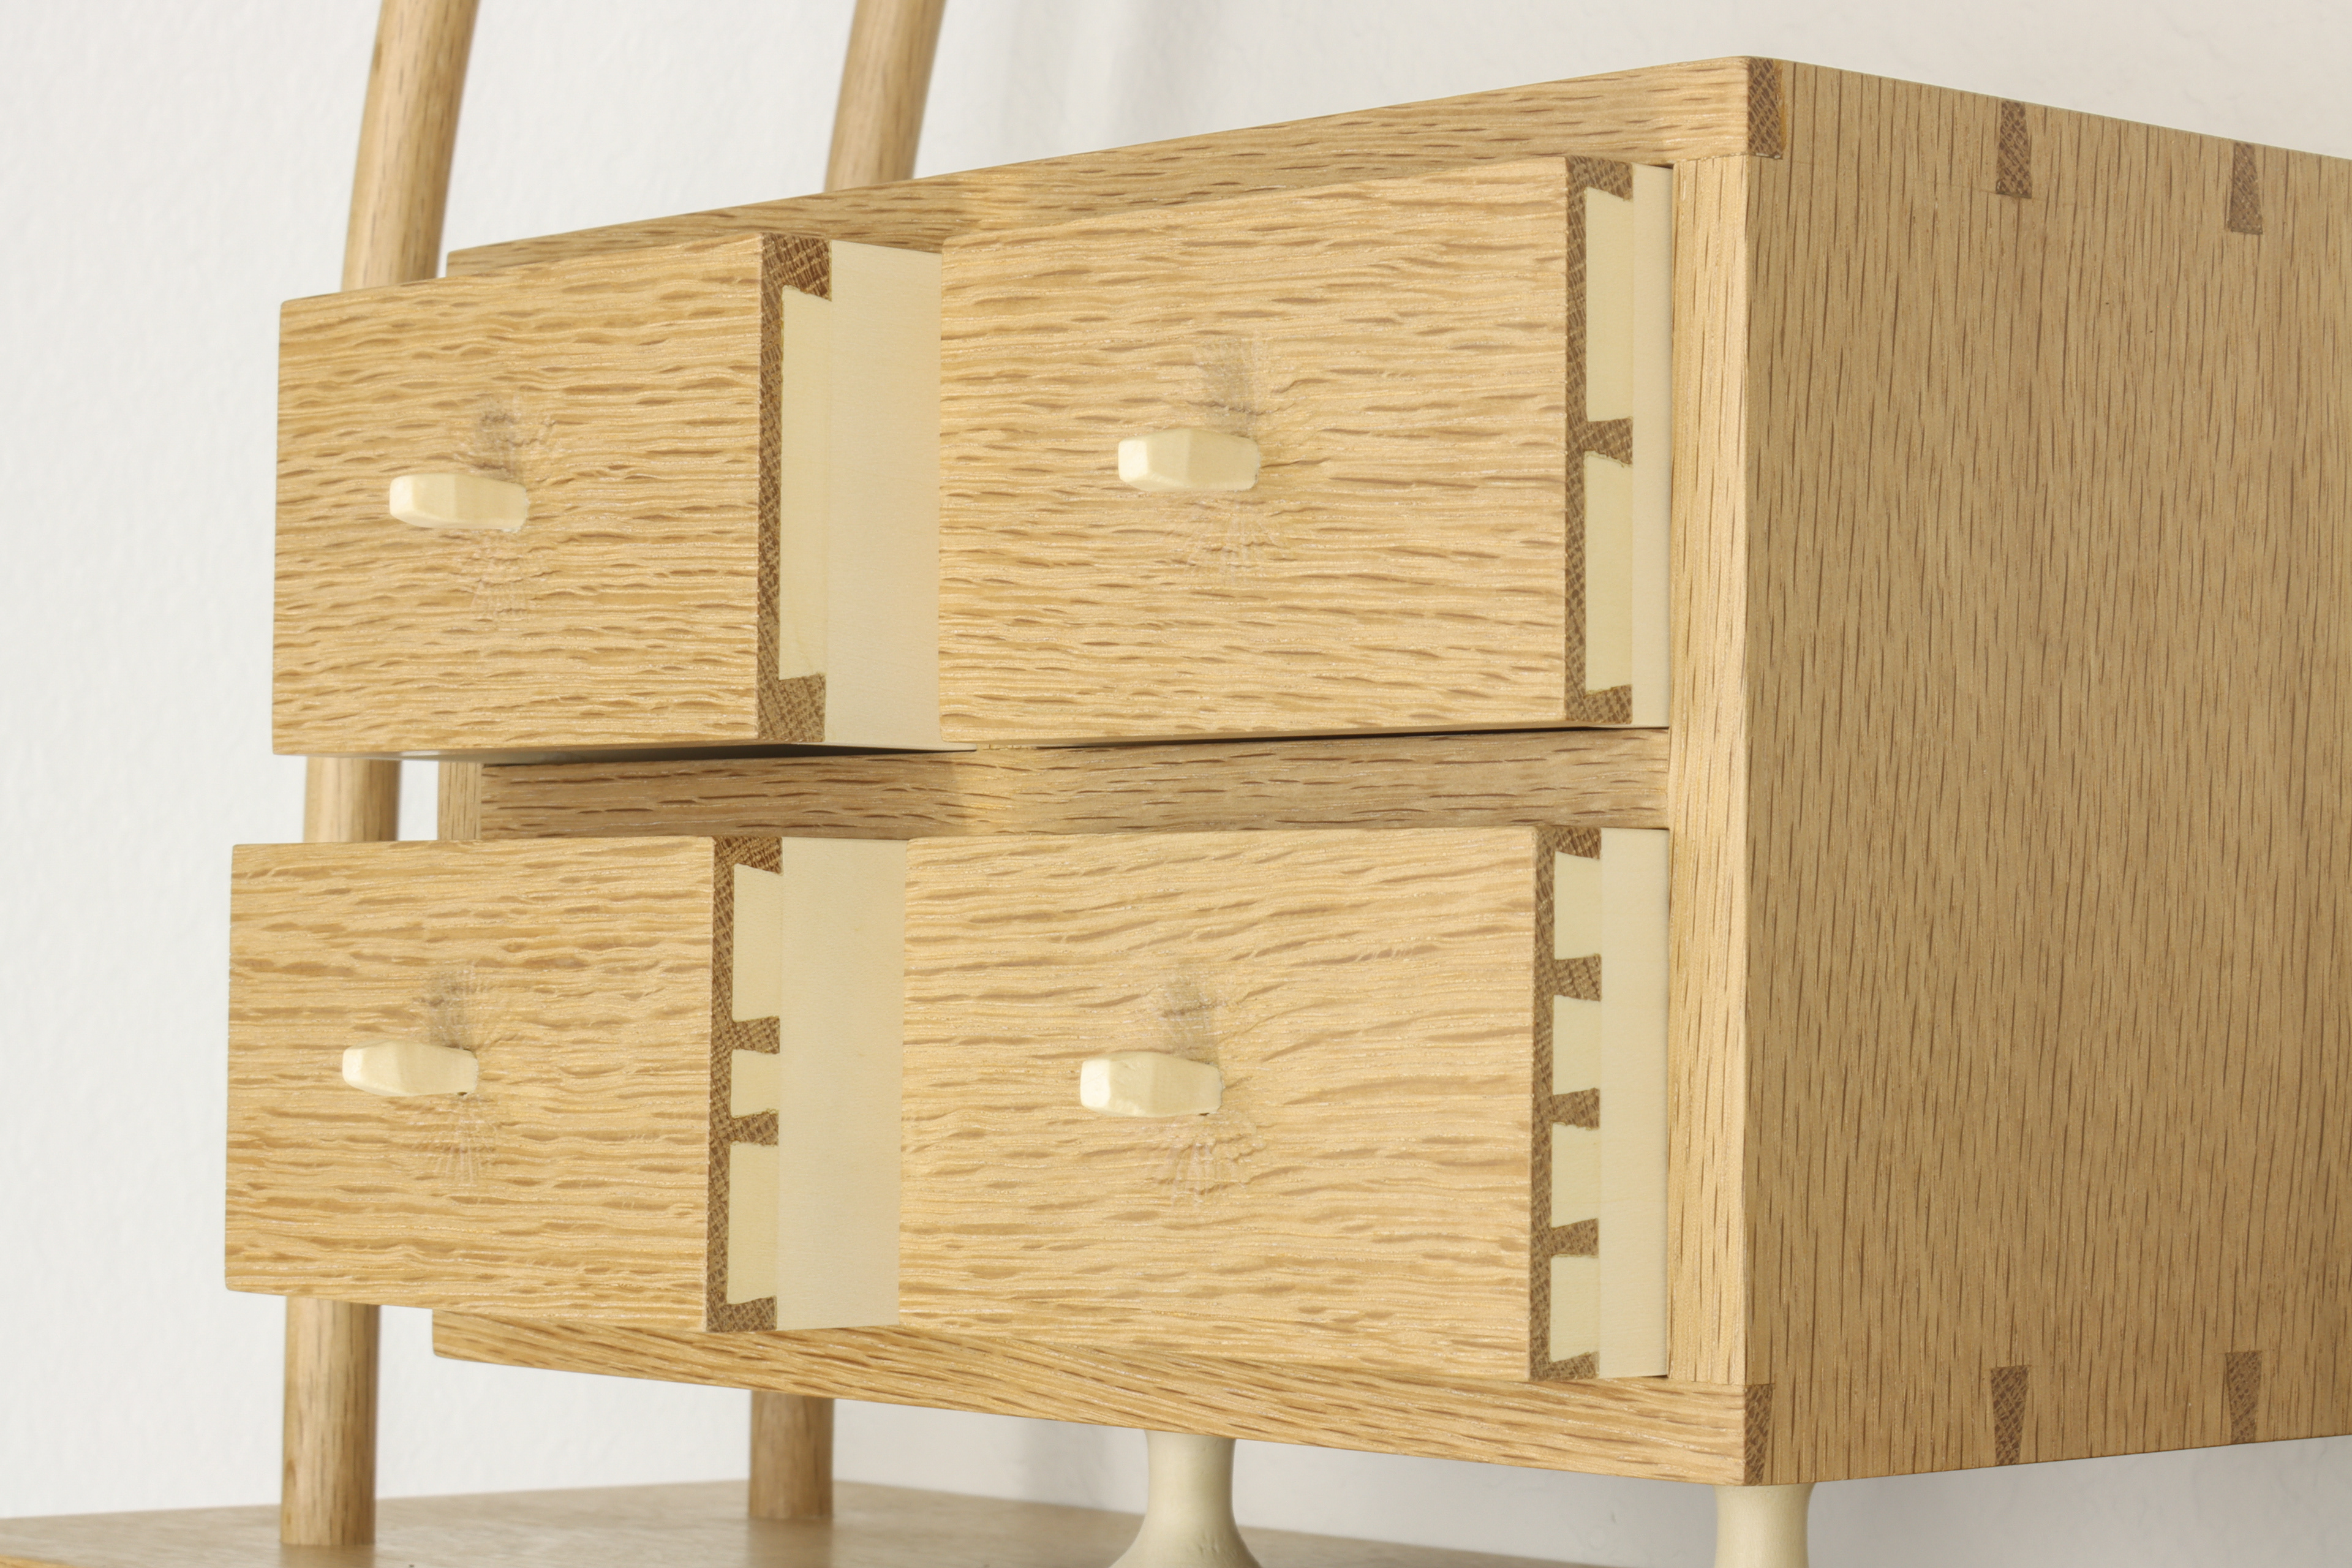
Drawers:
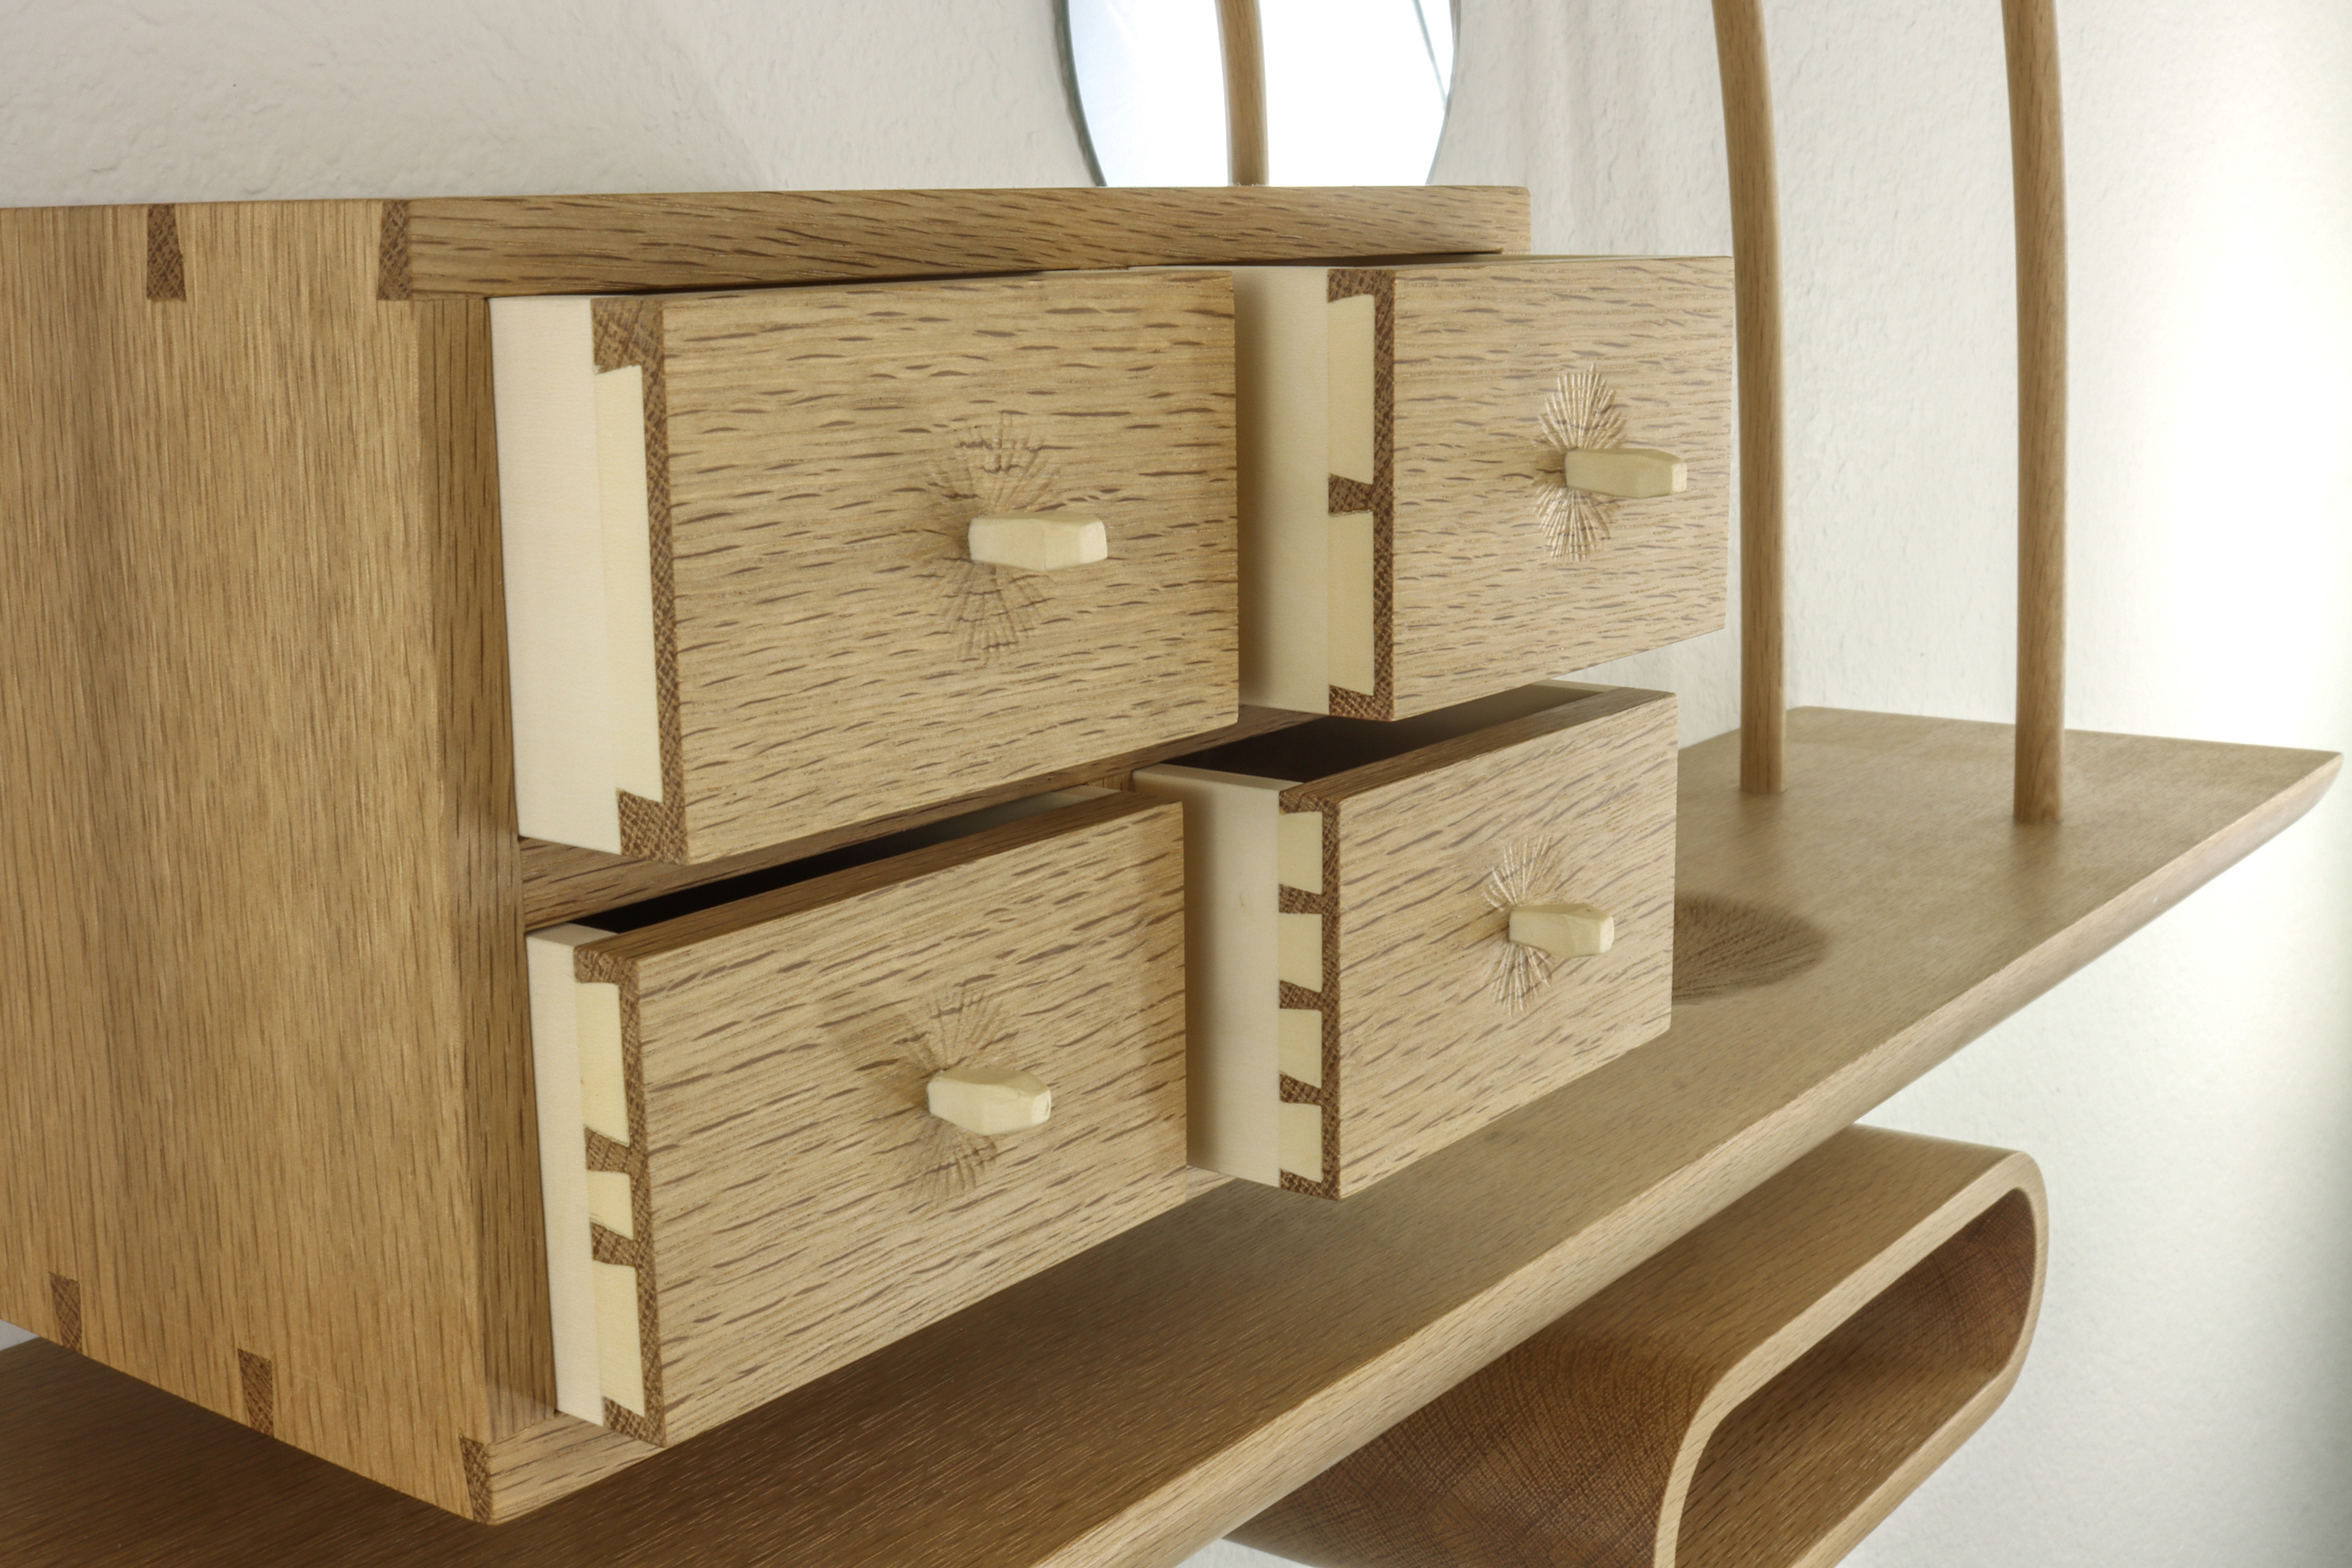
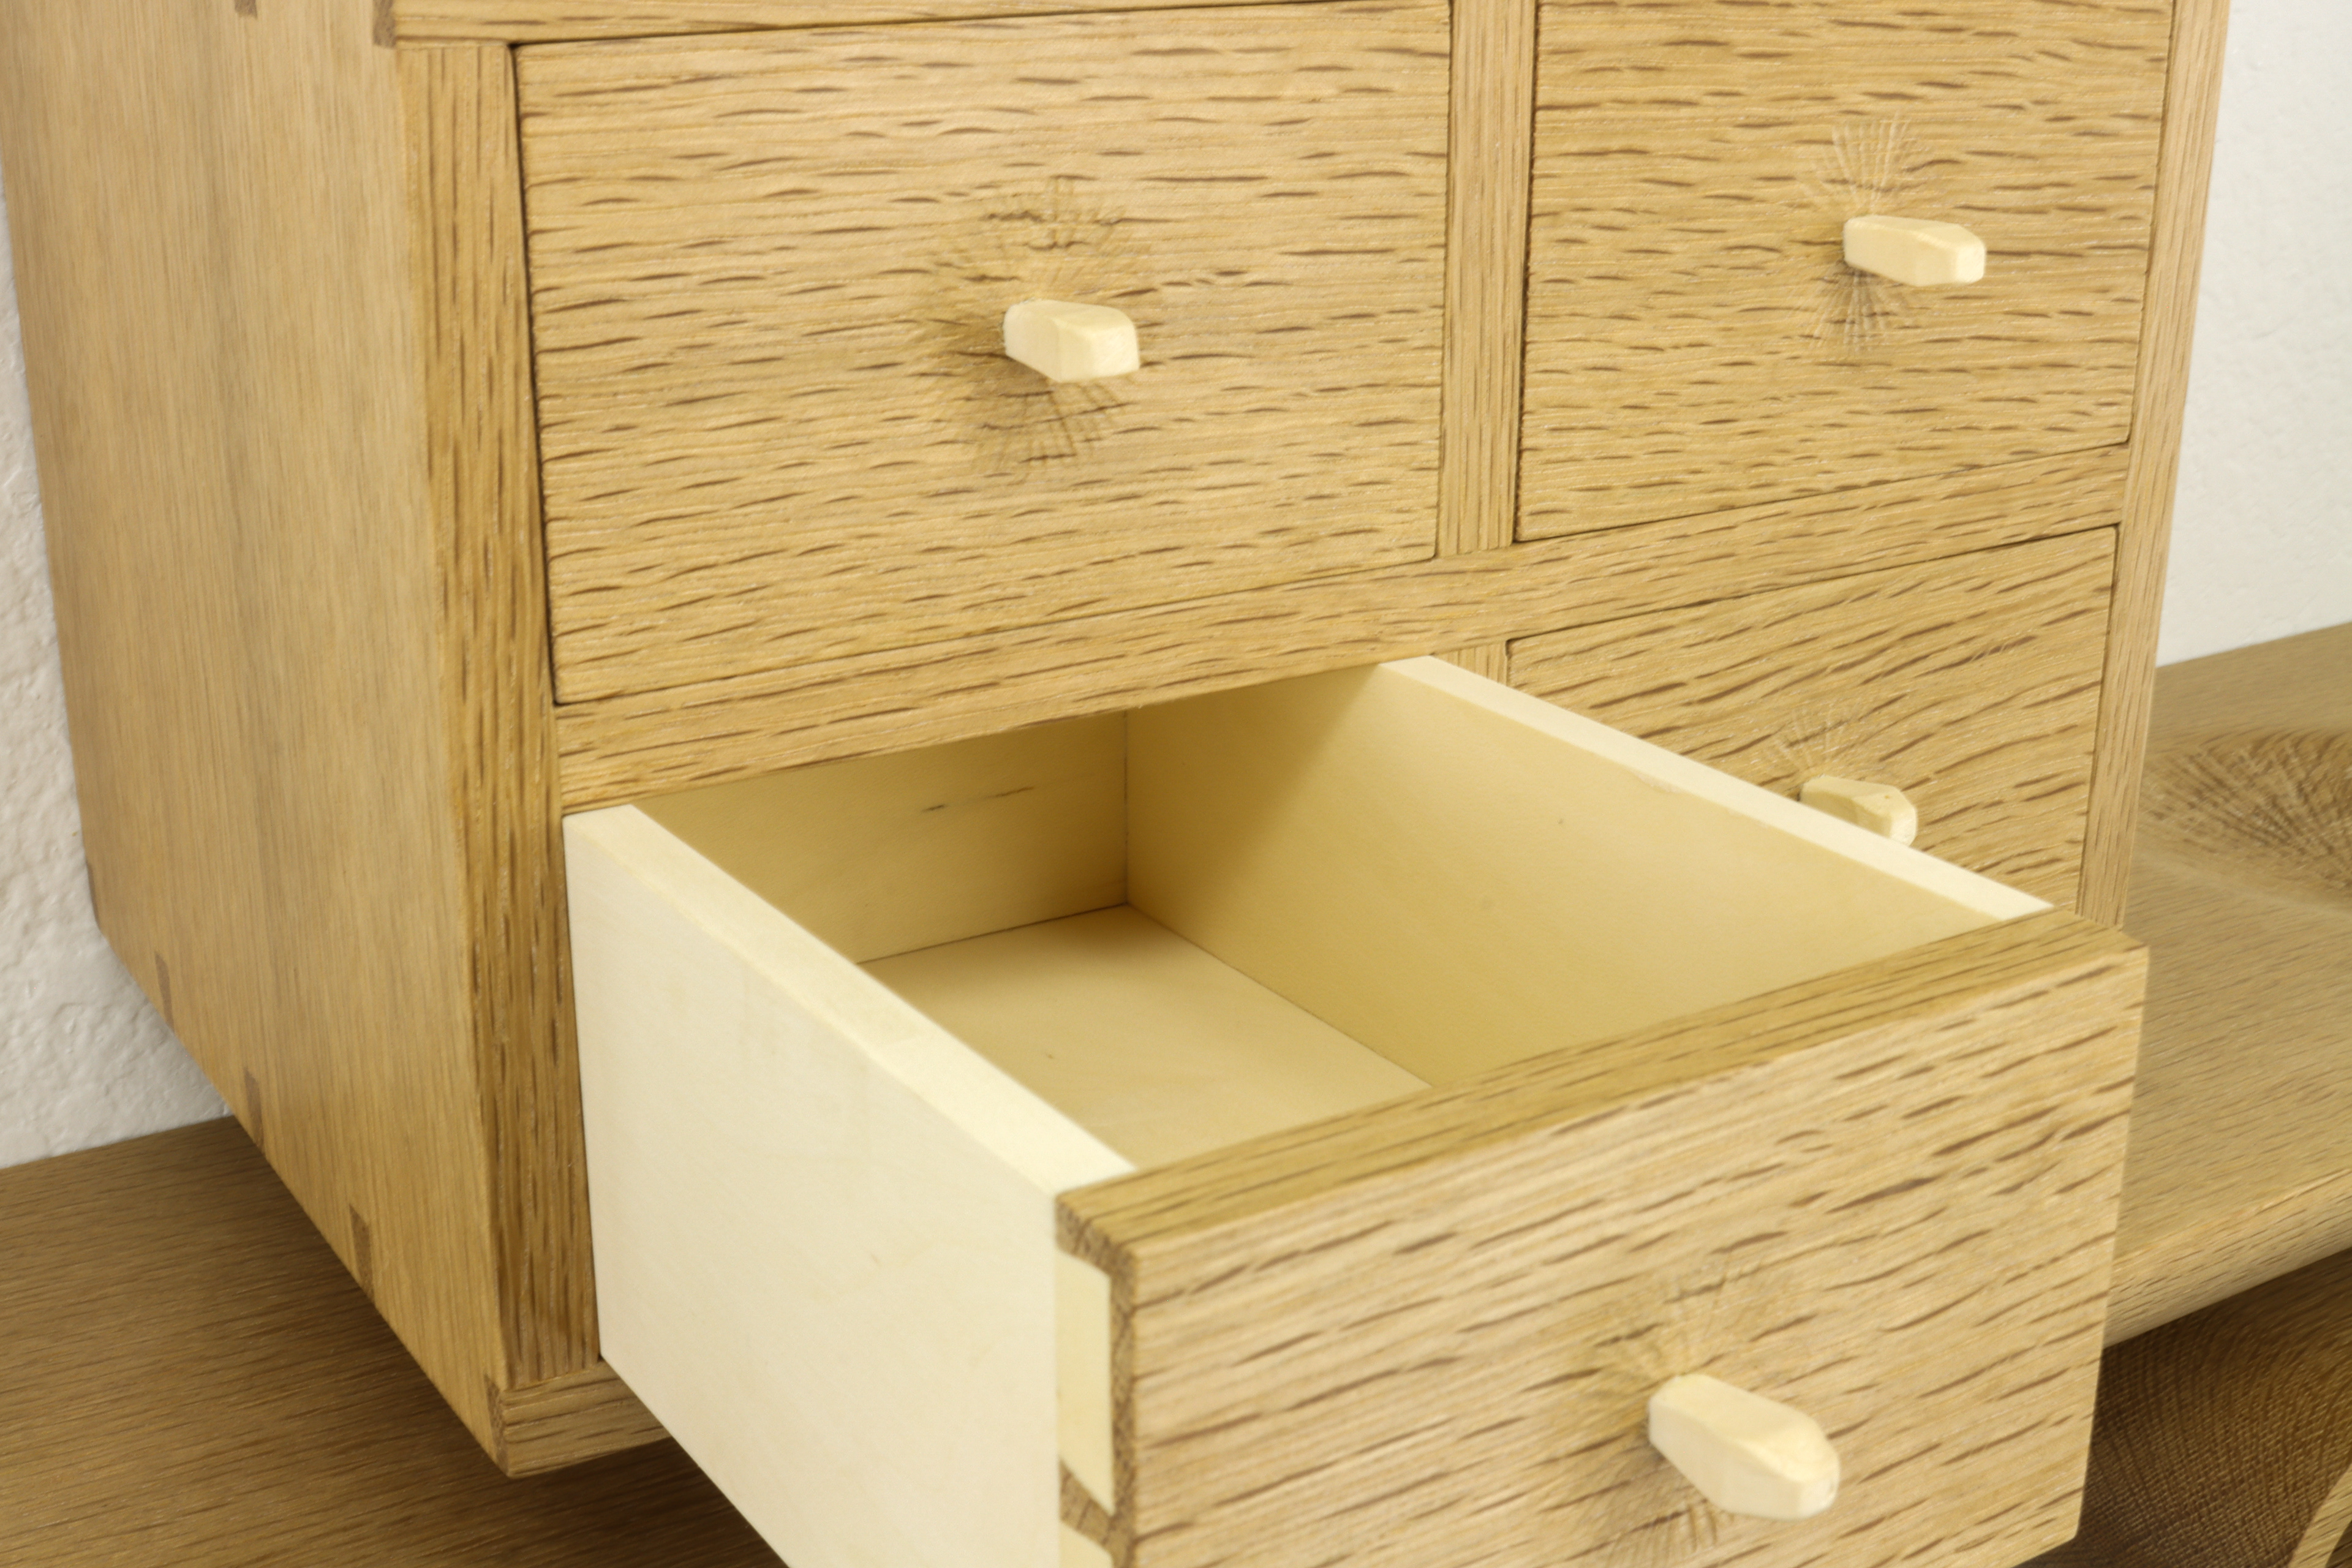
The drawers are made out of a shop-made laminate consisting of 1/32" Holly veneer, sandwiched between a 3/16" Ash core. The drawer cases are made of solid Ash. The bottom of the drawers are locked in with stopped dados, routed in each of the sides. The sides are through-dovetailed to the backside, all hand cut. The sides are attached to the face with half blind dovetails. Each drawer has a different pattern and layout of dovetails, but they are all cut to the same 8 degree angle. Drawers are piston fit.
Drawer Knobs:
The drawer knobs are turned on the lathe and made from Holly. Holes are drilled into the face with a forstner bit and the knobs are inlaid flush with the surface.
Drawer Case:
The case construction that holds the drawers is made out of Ash. Hand cut dovetails join the four sides together. The back panel is made out of the Holly-Ash laminate, and locked in with stopped dados, made on the router table. The drawer enclosures are also secured with stopped dado's, the dividers that form the enclosures have cut shoulders that fit into the narrower dado slots.
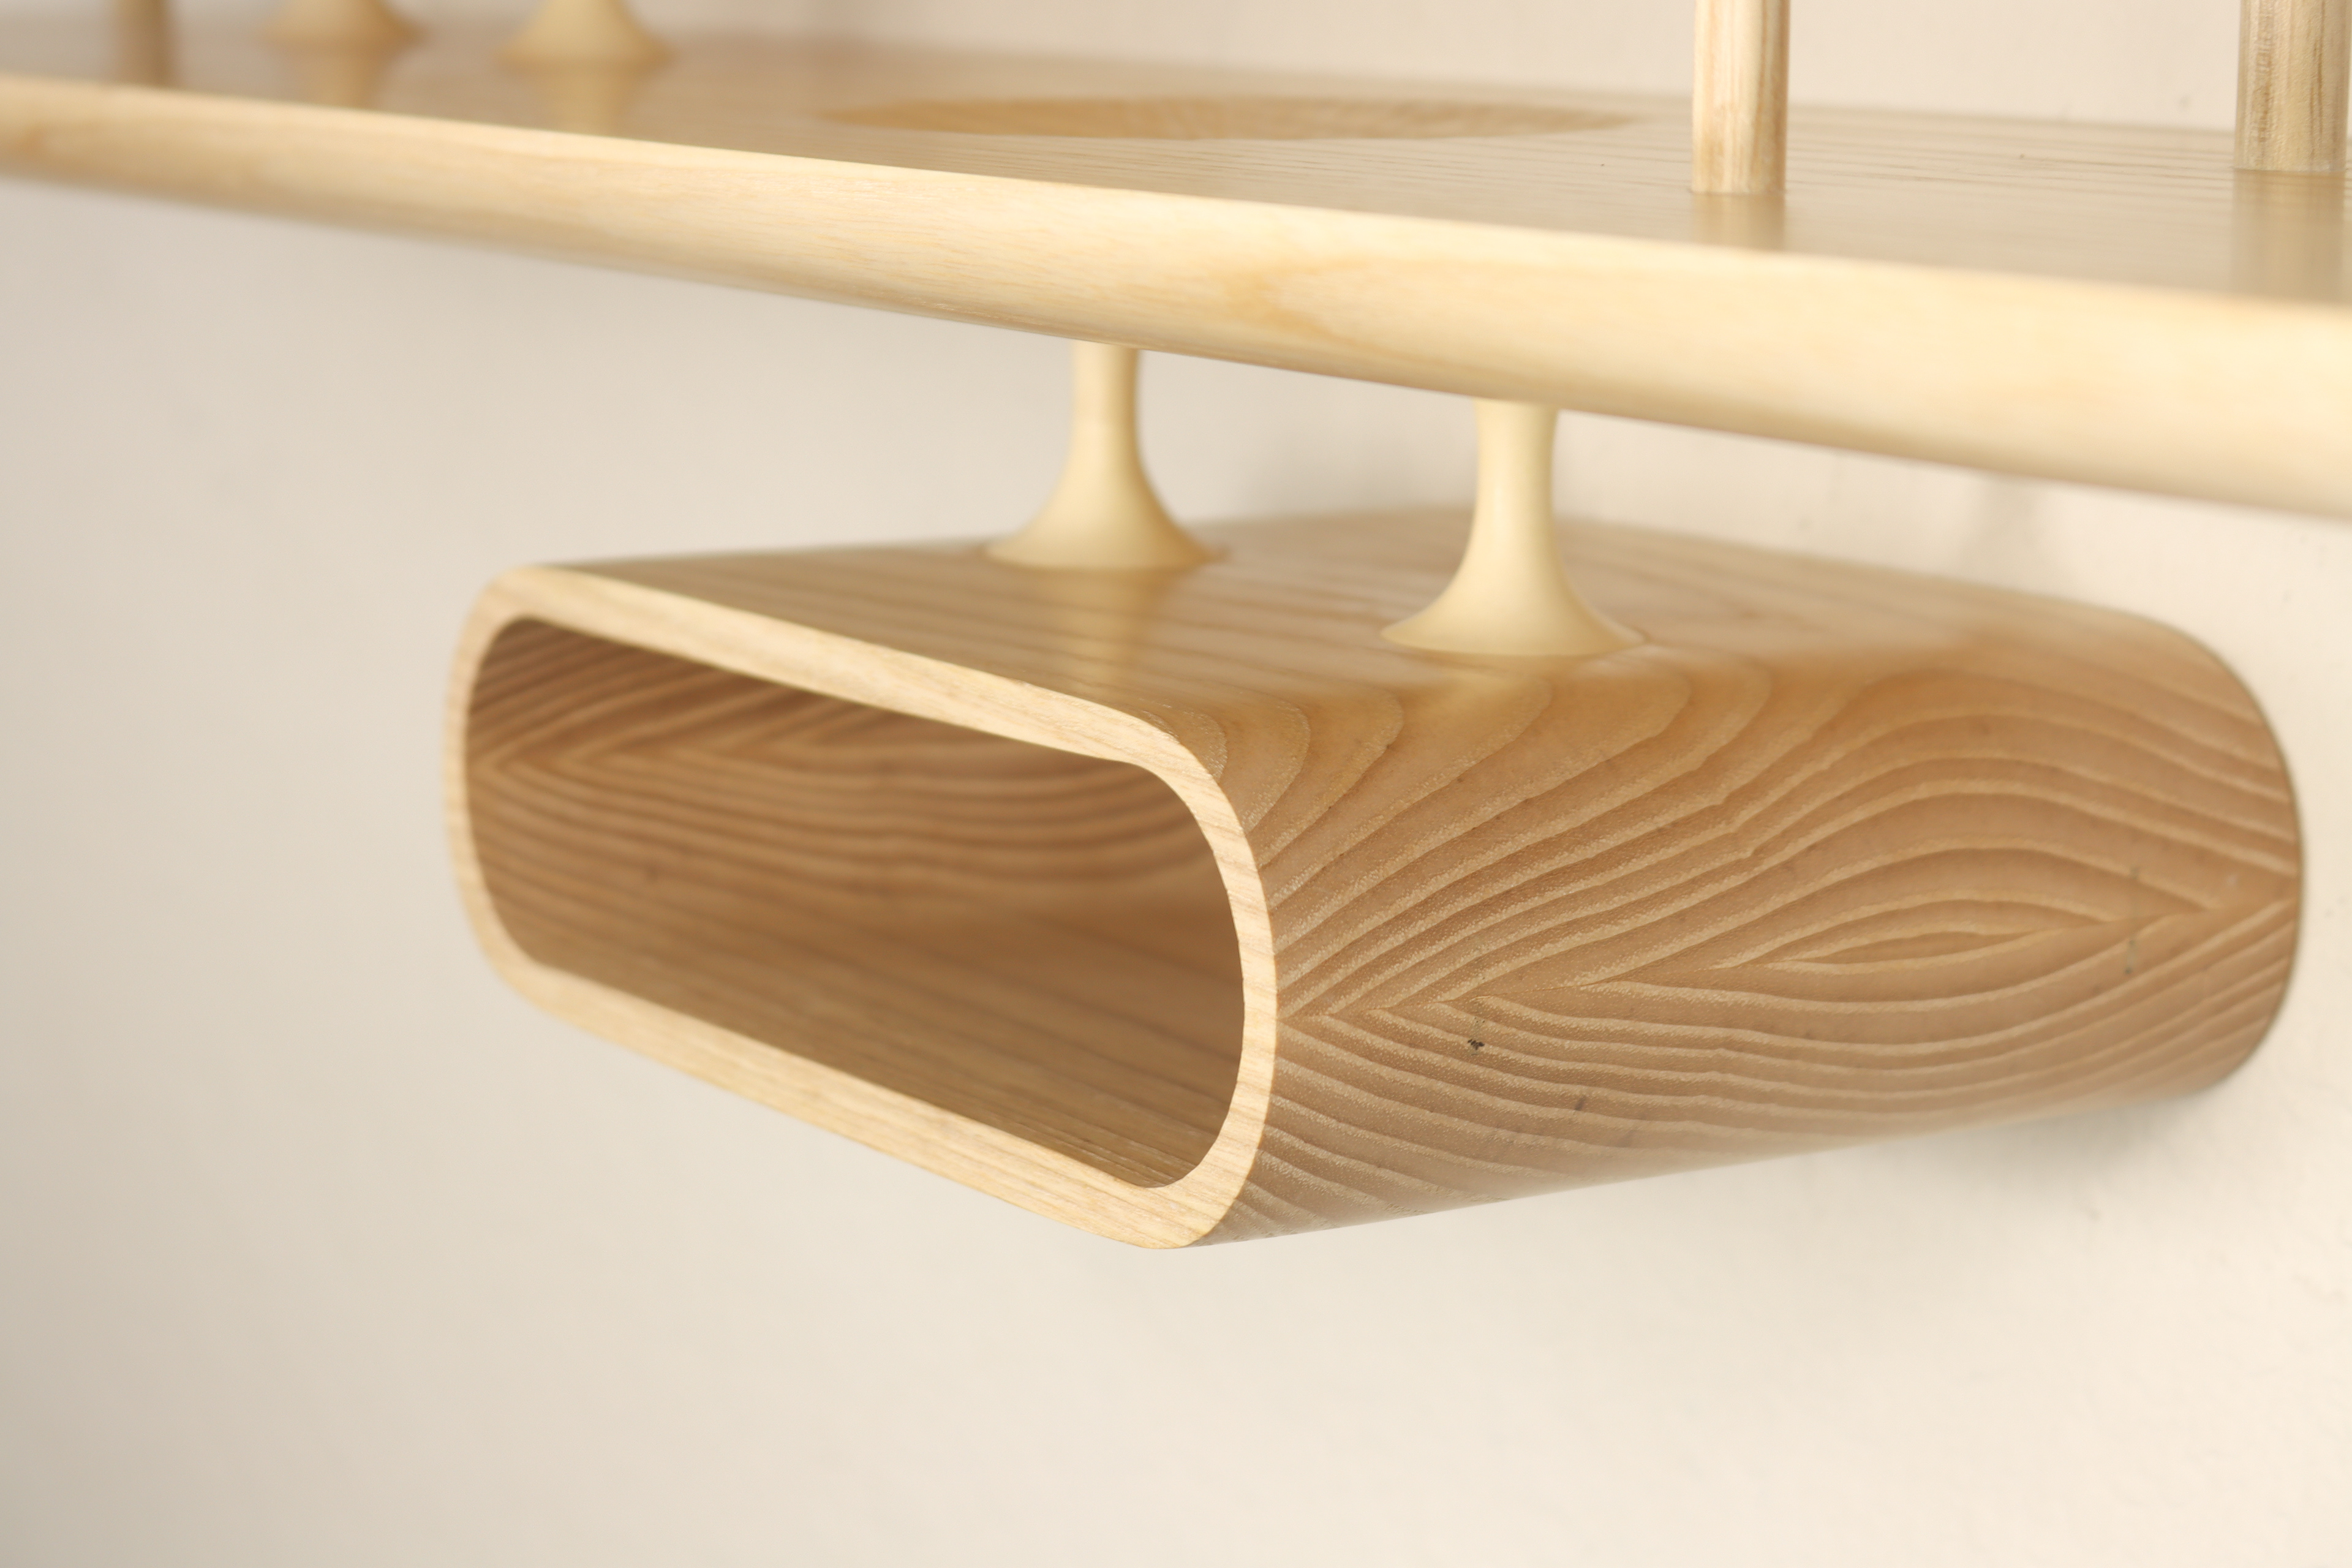
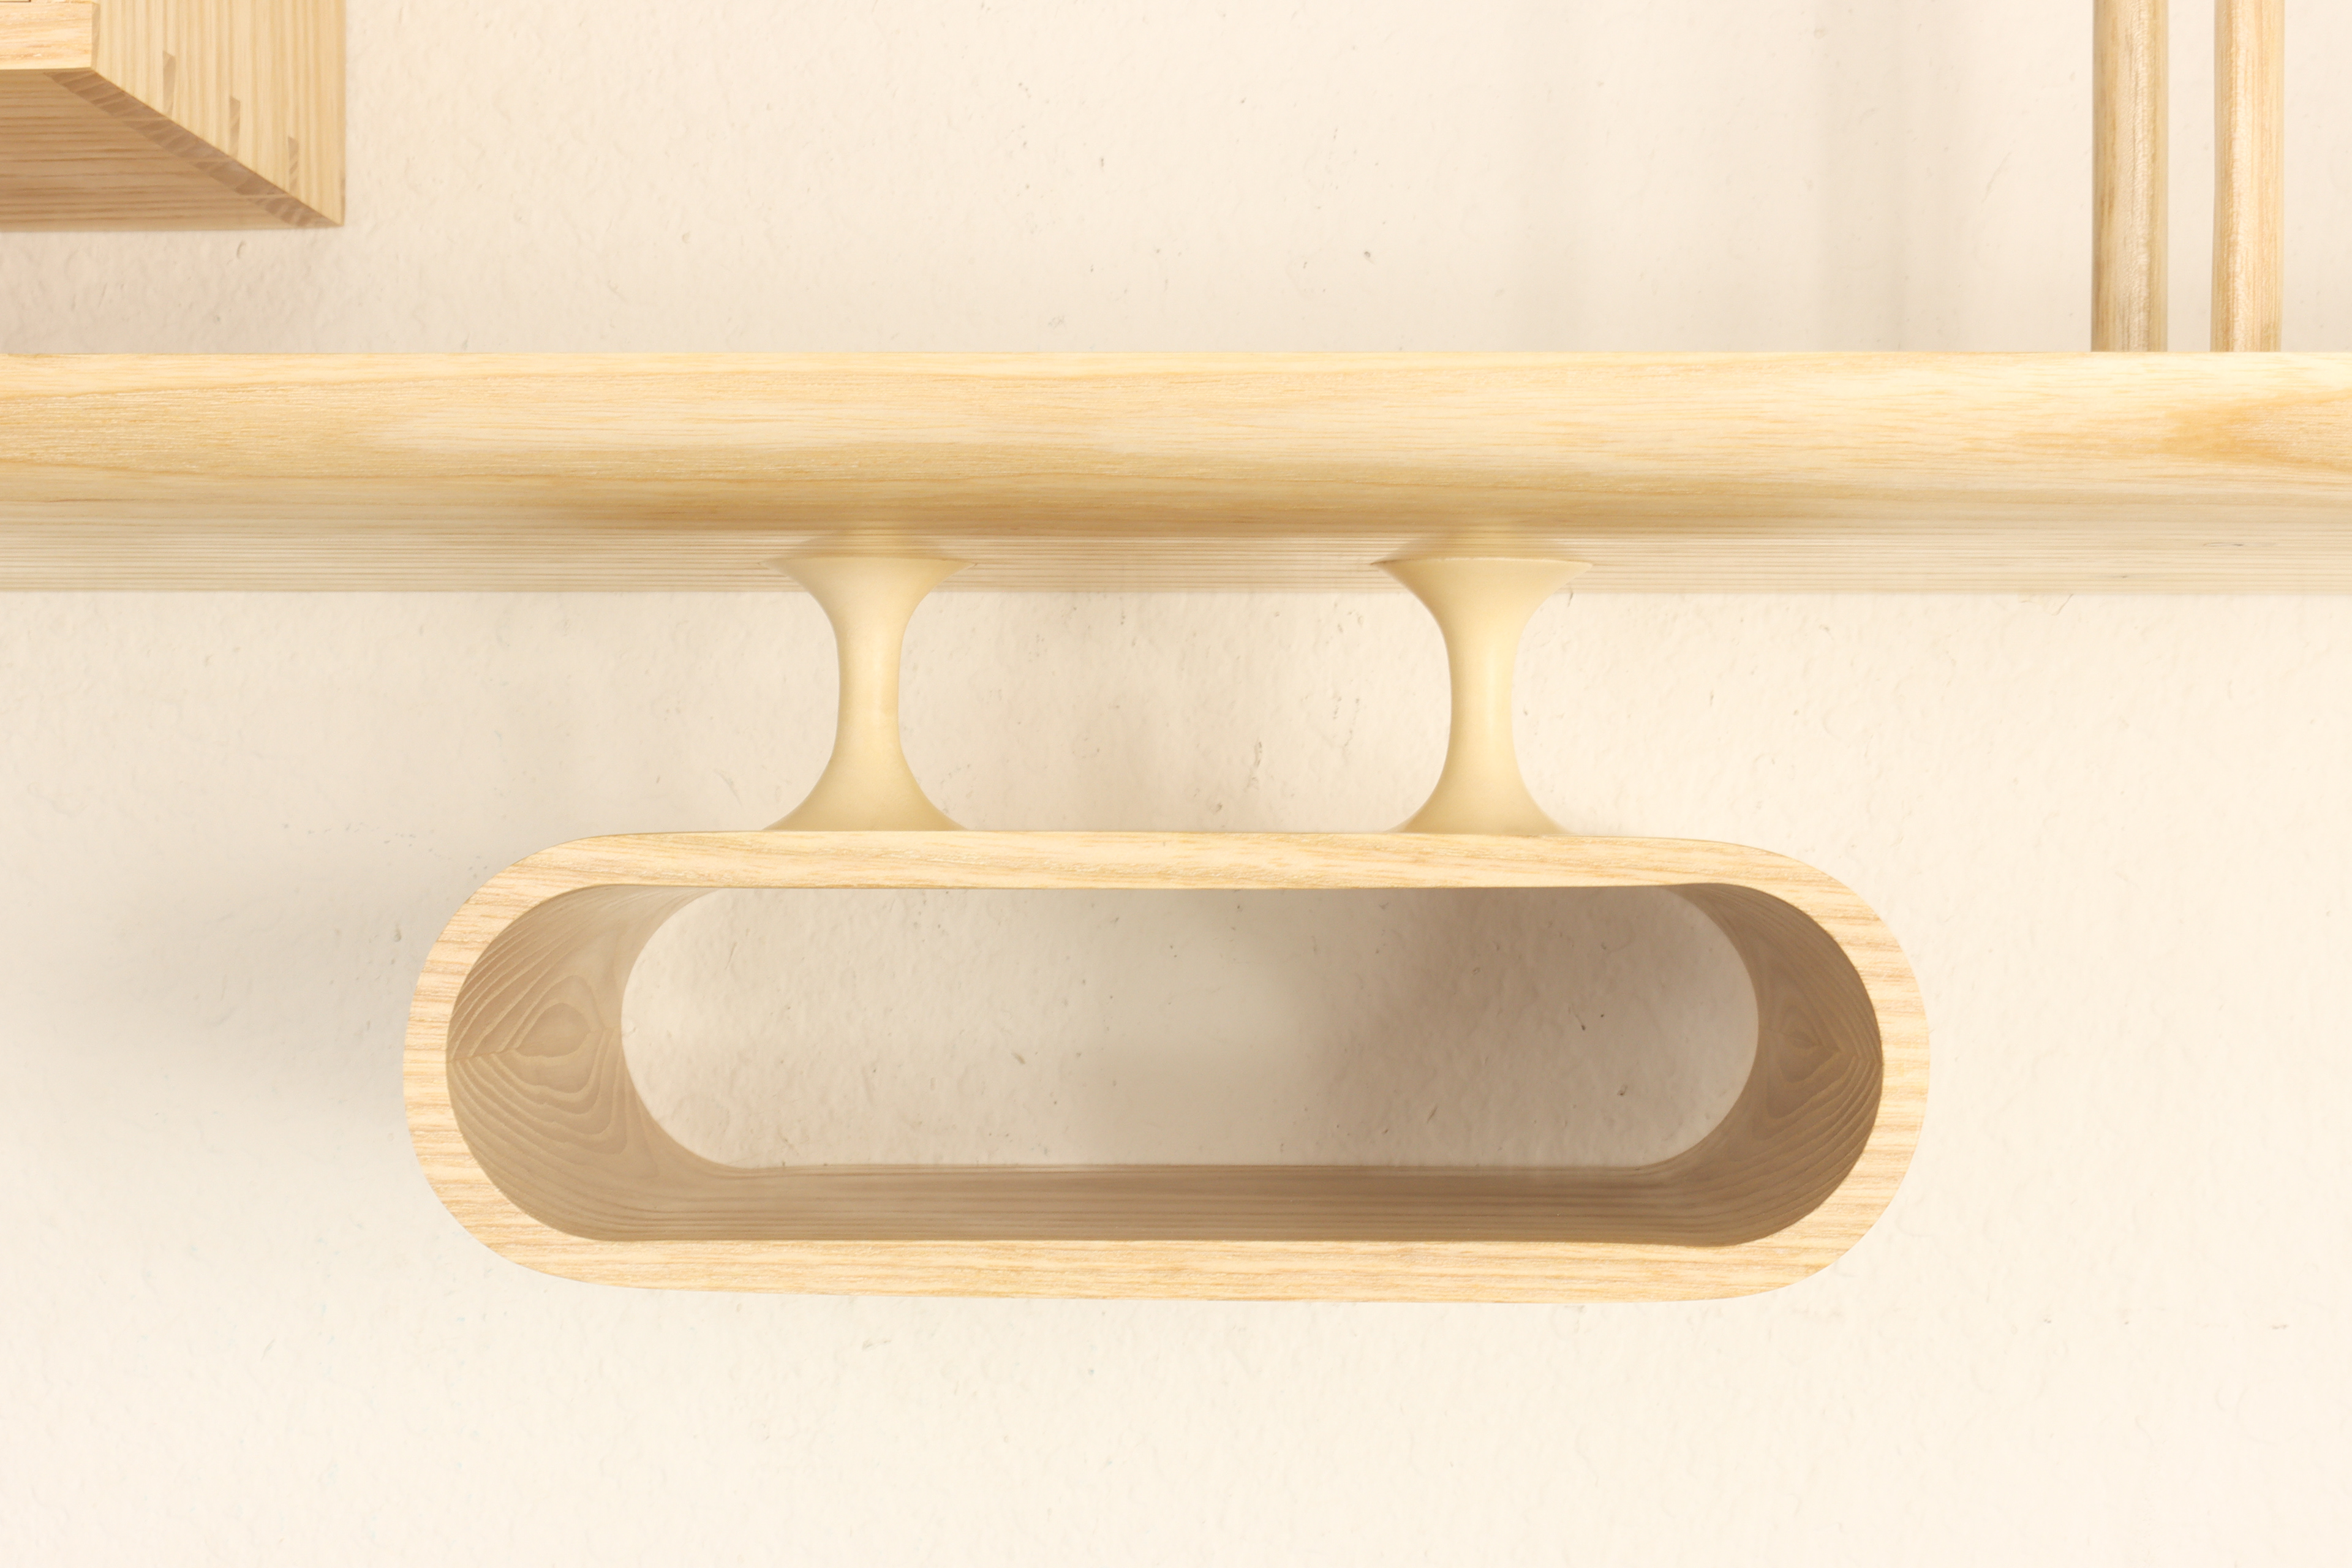
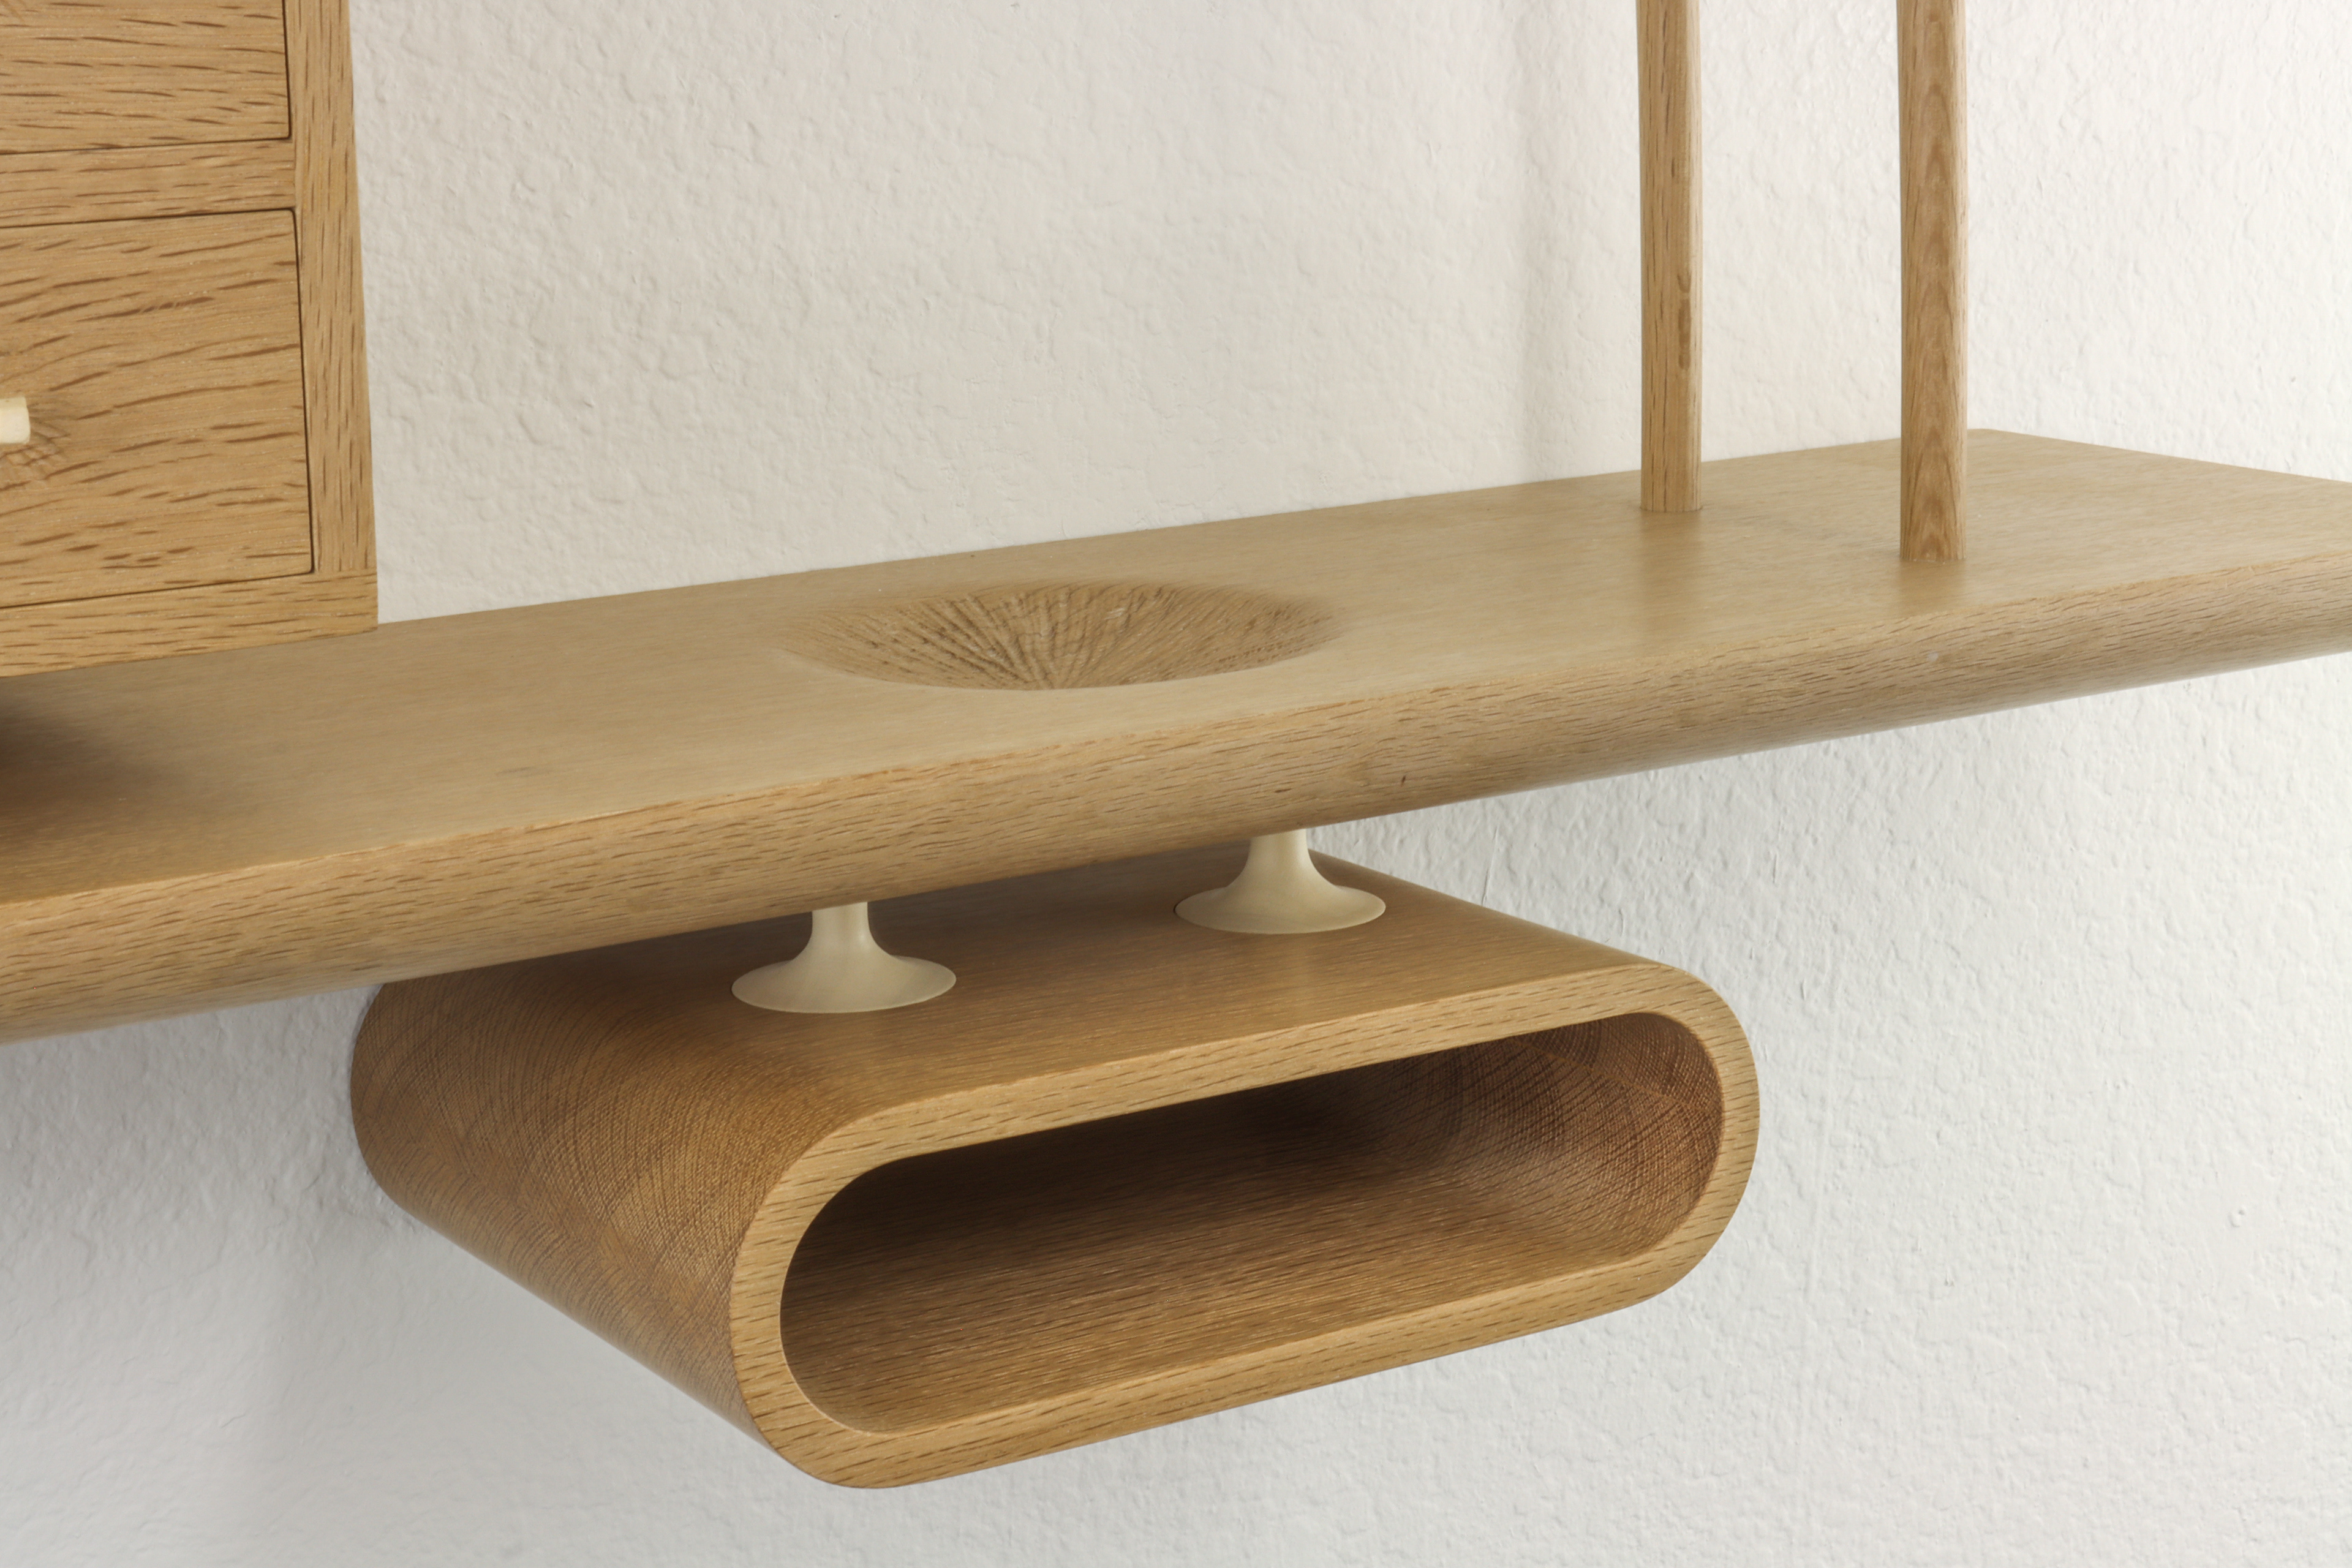
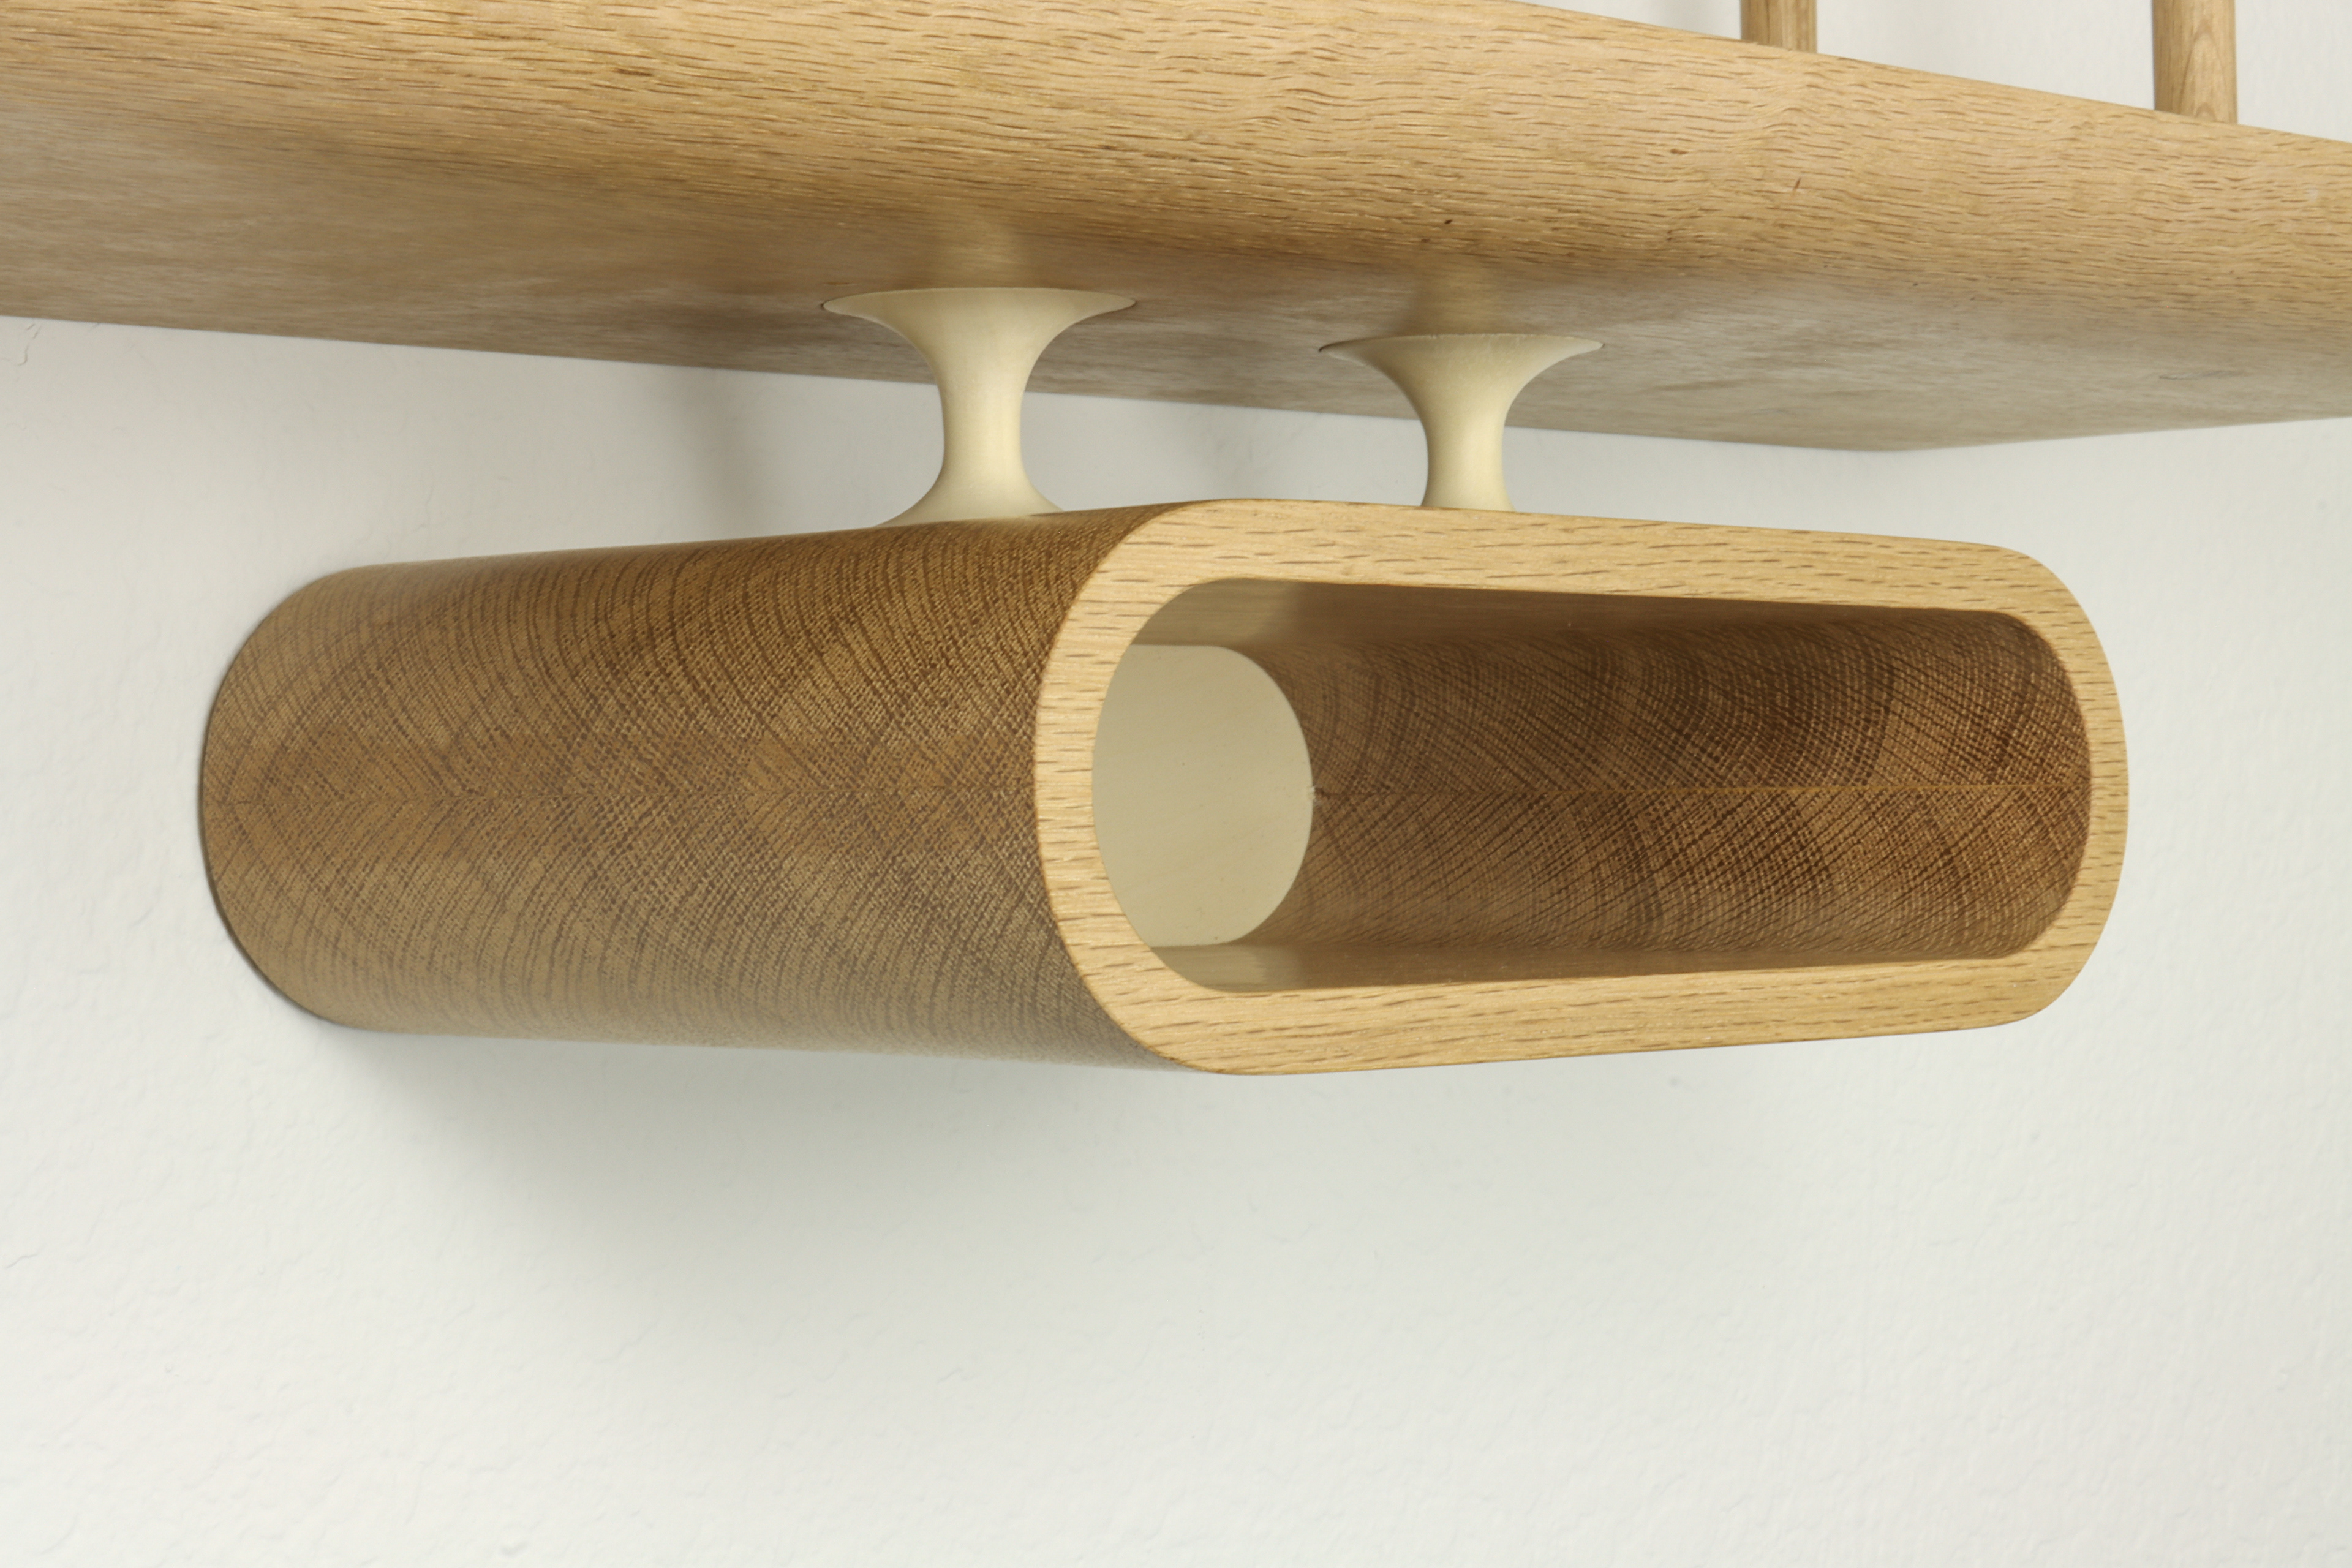
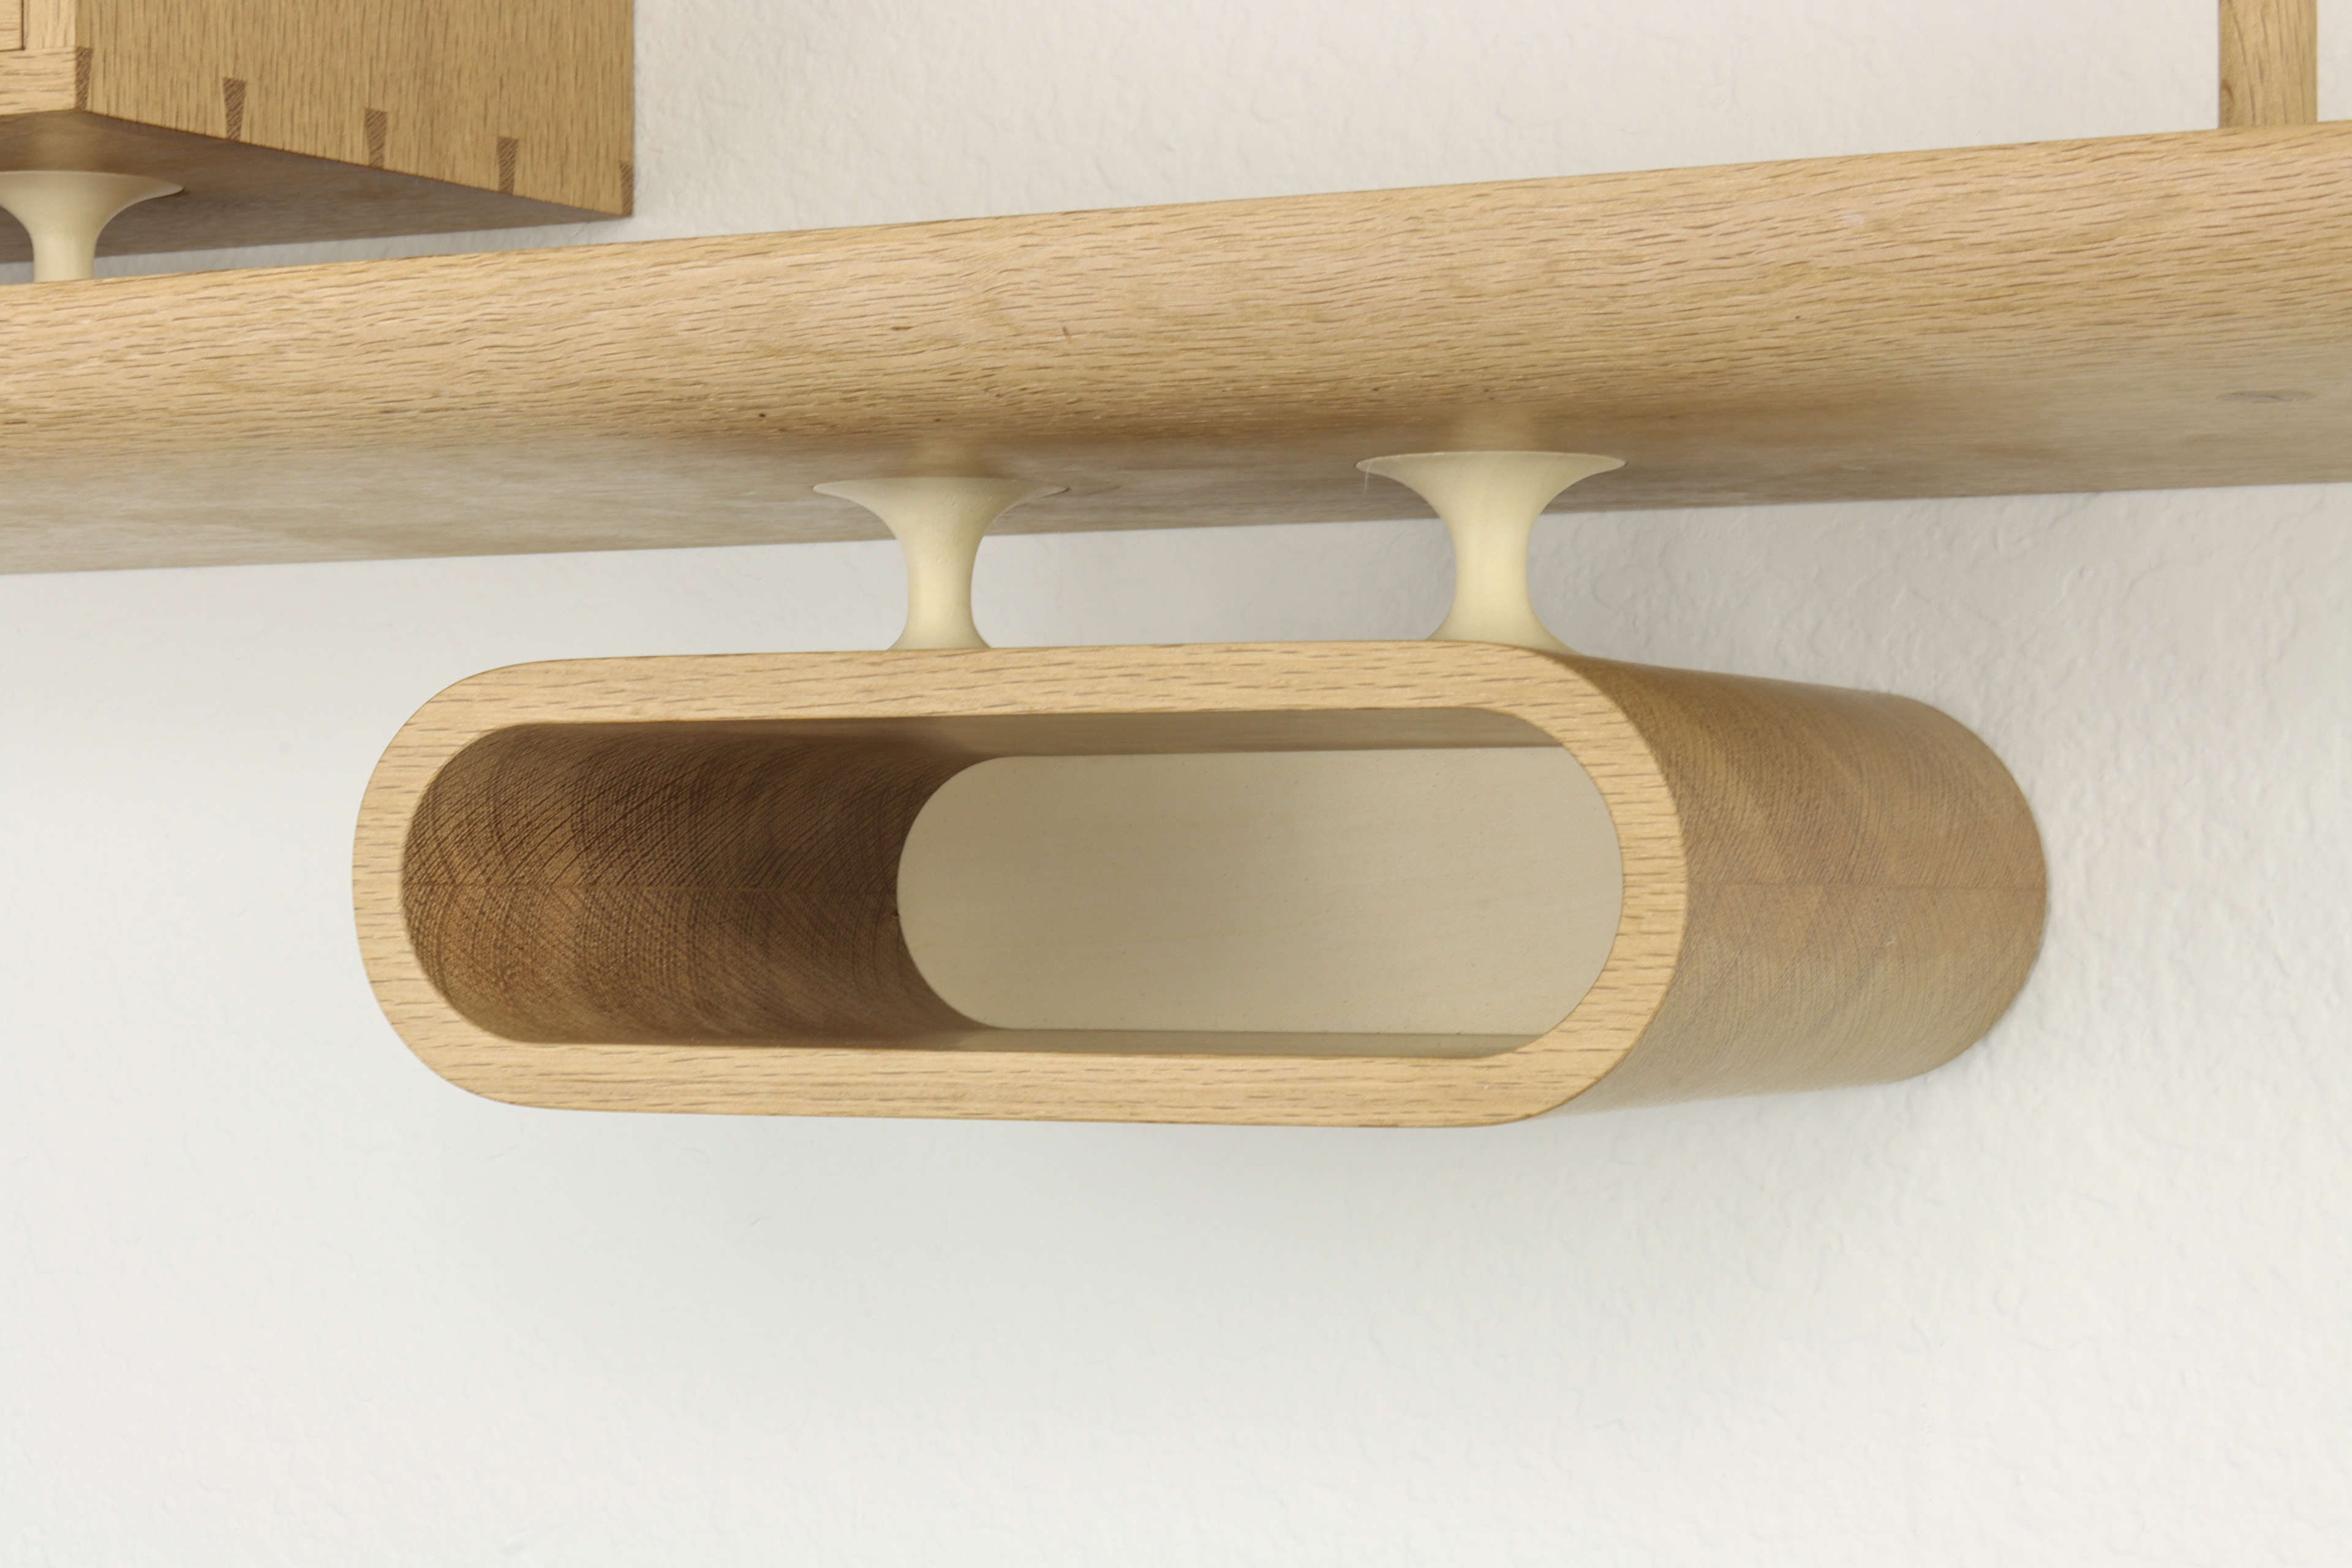
Under Shelf Tray:
The under shelf tray is made out of Ash. This was completely designed and milled on the CNC. Two pieces of Ash were milled identically, then later glued together and sanded. The tray was the result of countless hours of modeling in Sketchup, Rhino and VCarve, a prototype, and several full scale attempts. The CNC milling consisted of 8 cut jobs with two cuts per side, per piece. This was a two sided cut job, which added great complexity to the process. All in, this aspect of the project took around 60 hours. Great thanks goes out to Reed Fagan, manager of the FLAB at SDSU.
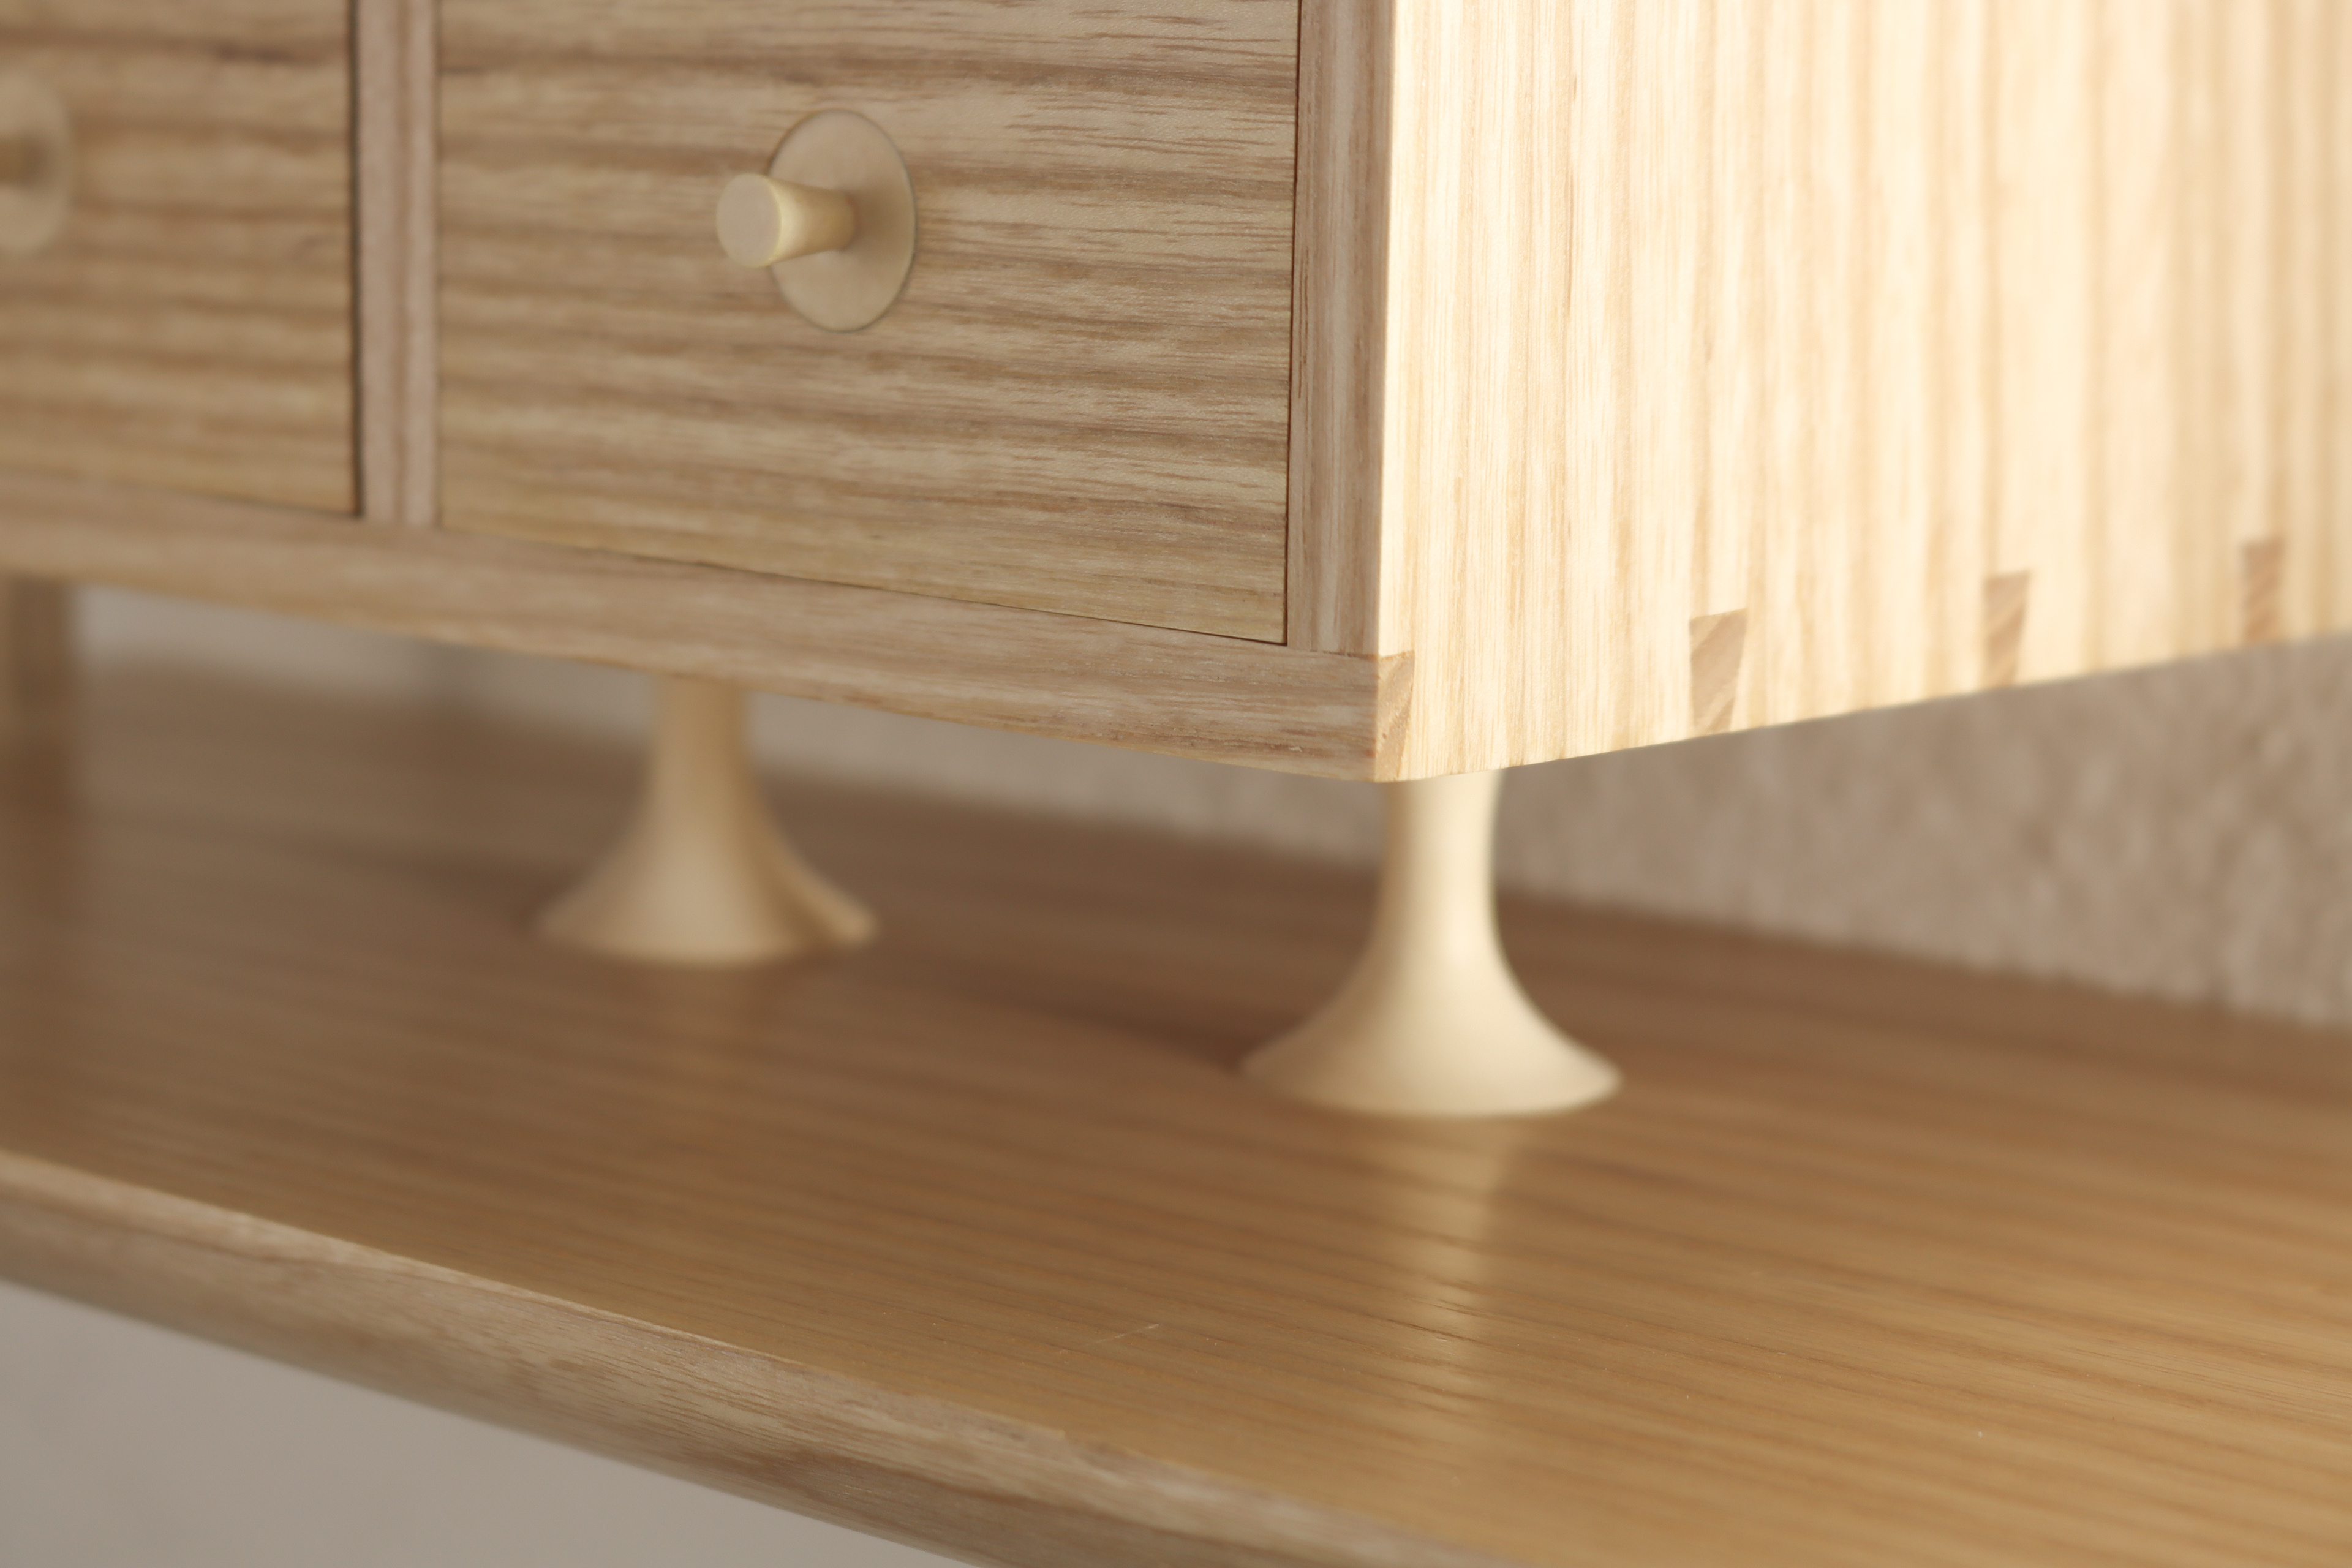
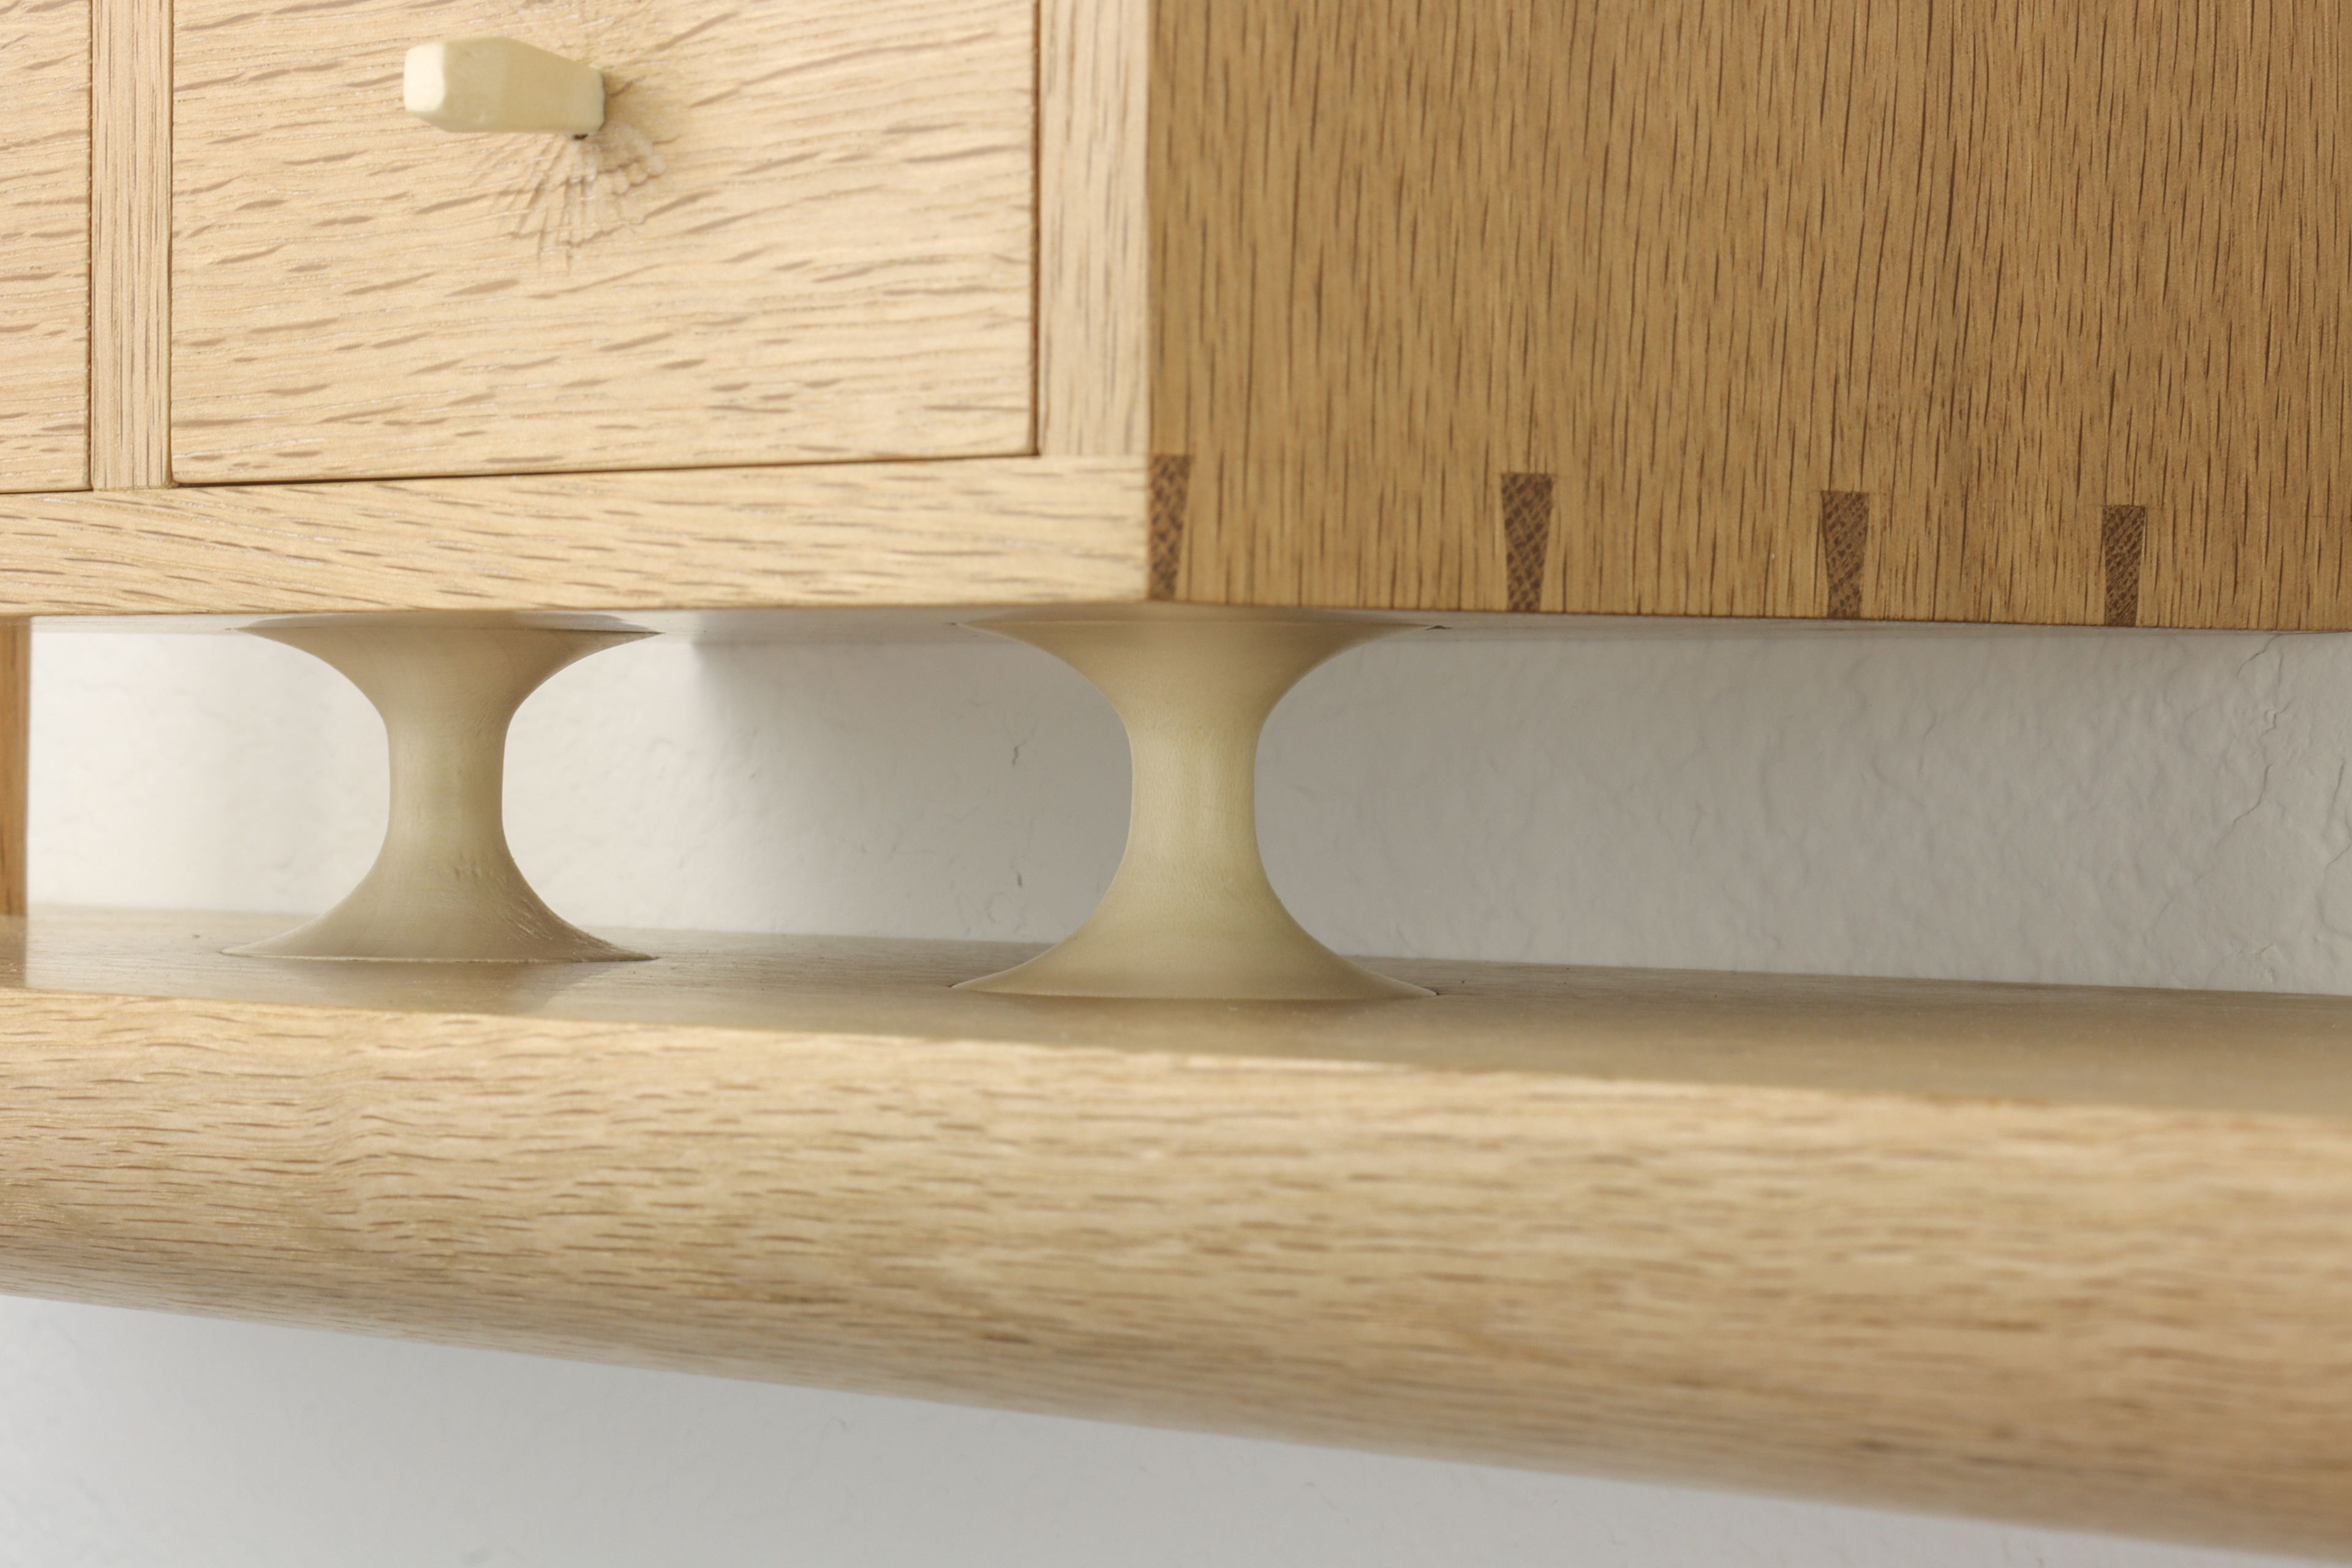
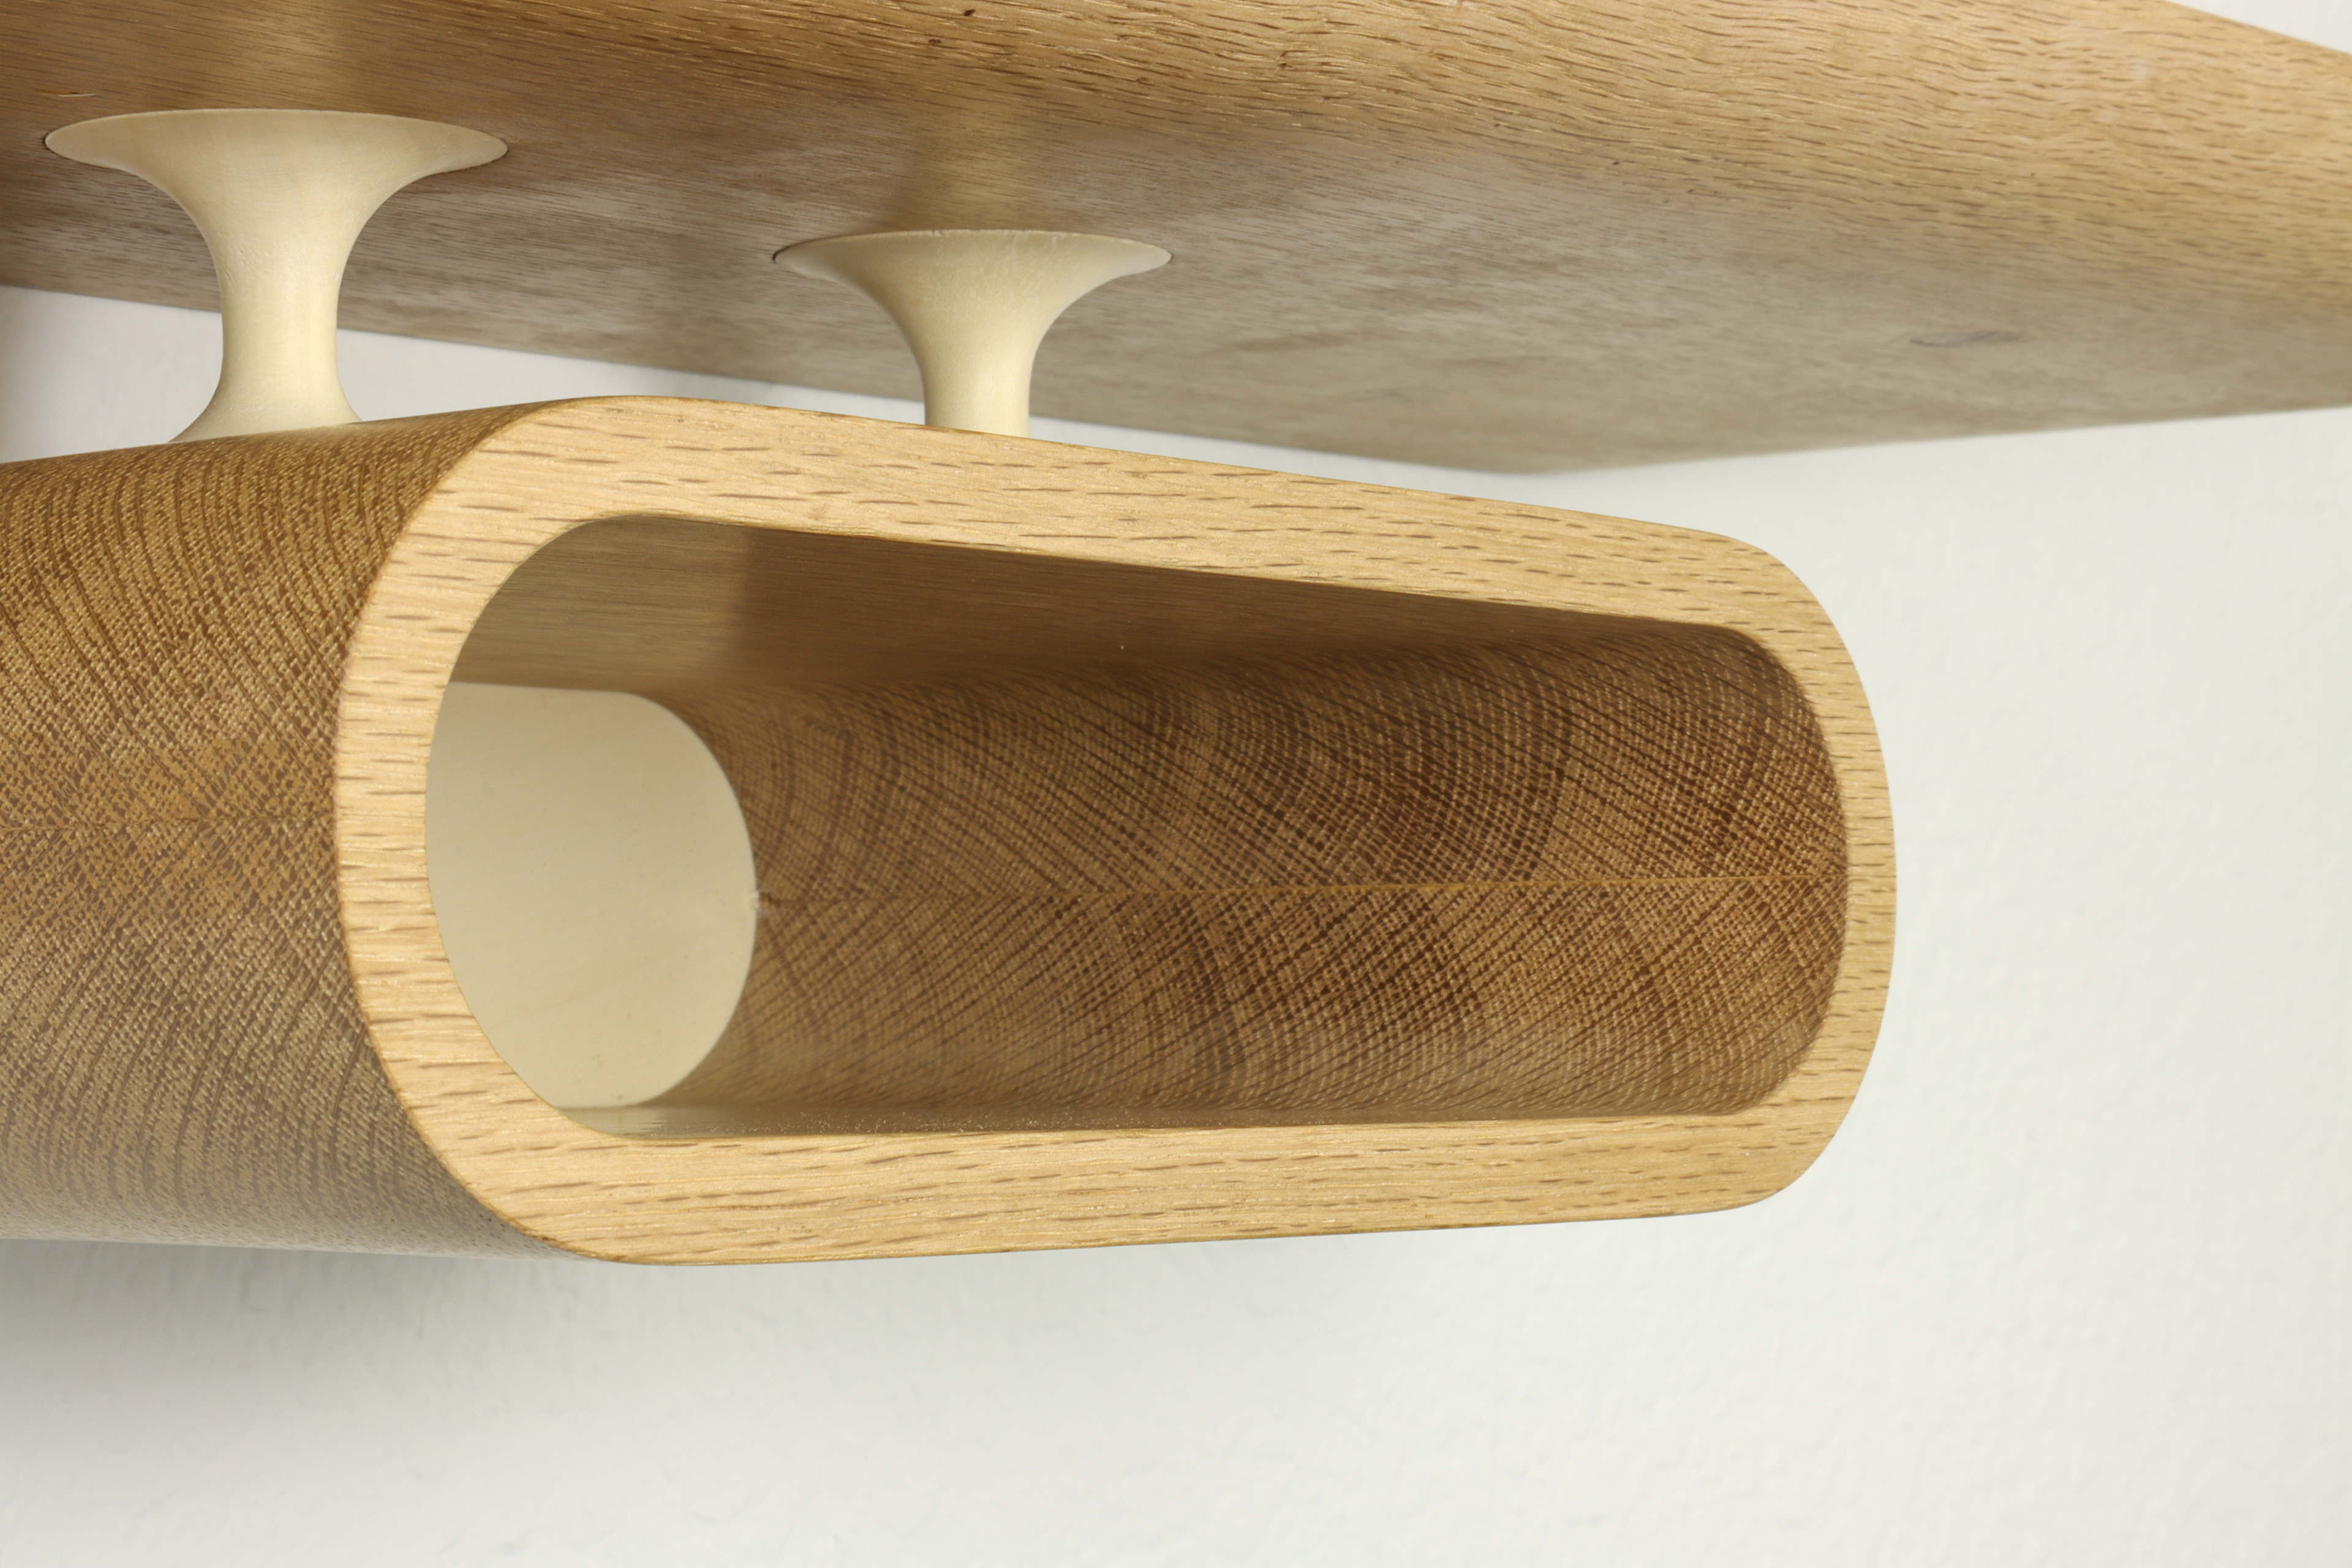
Stanchions:
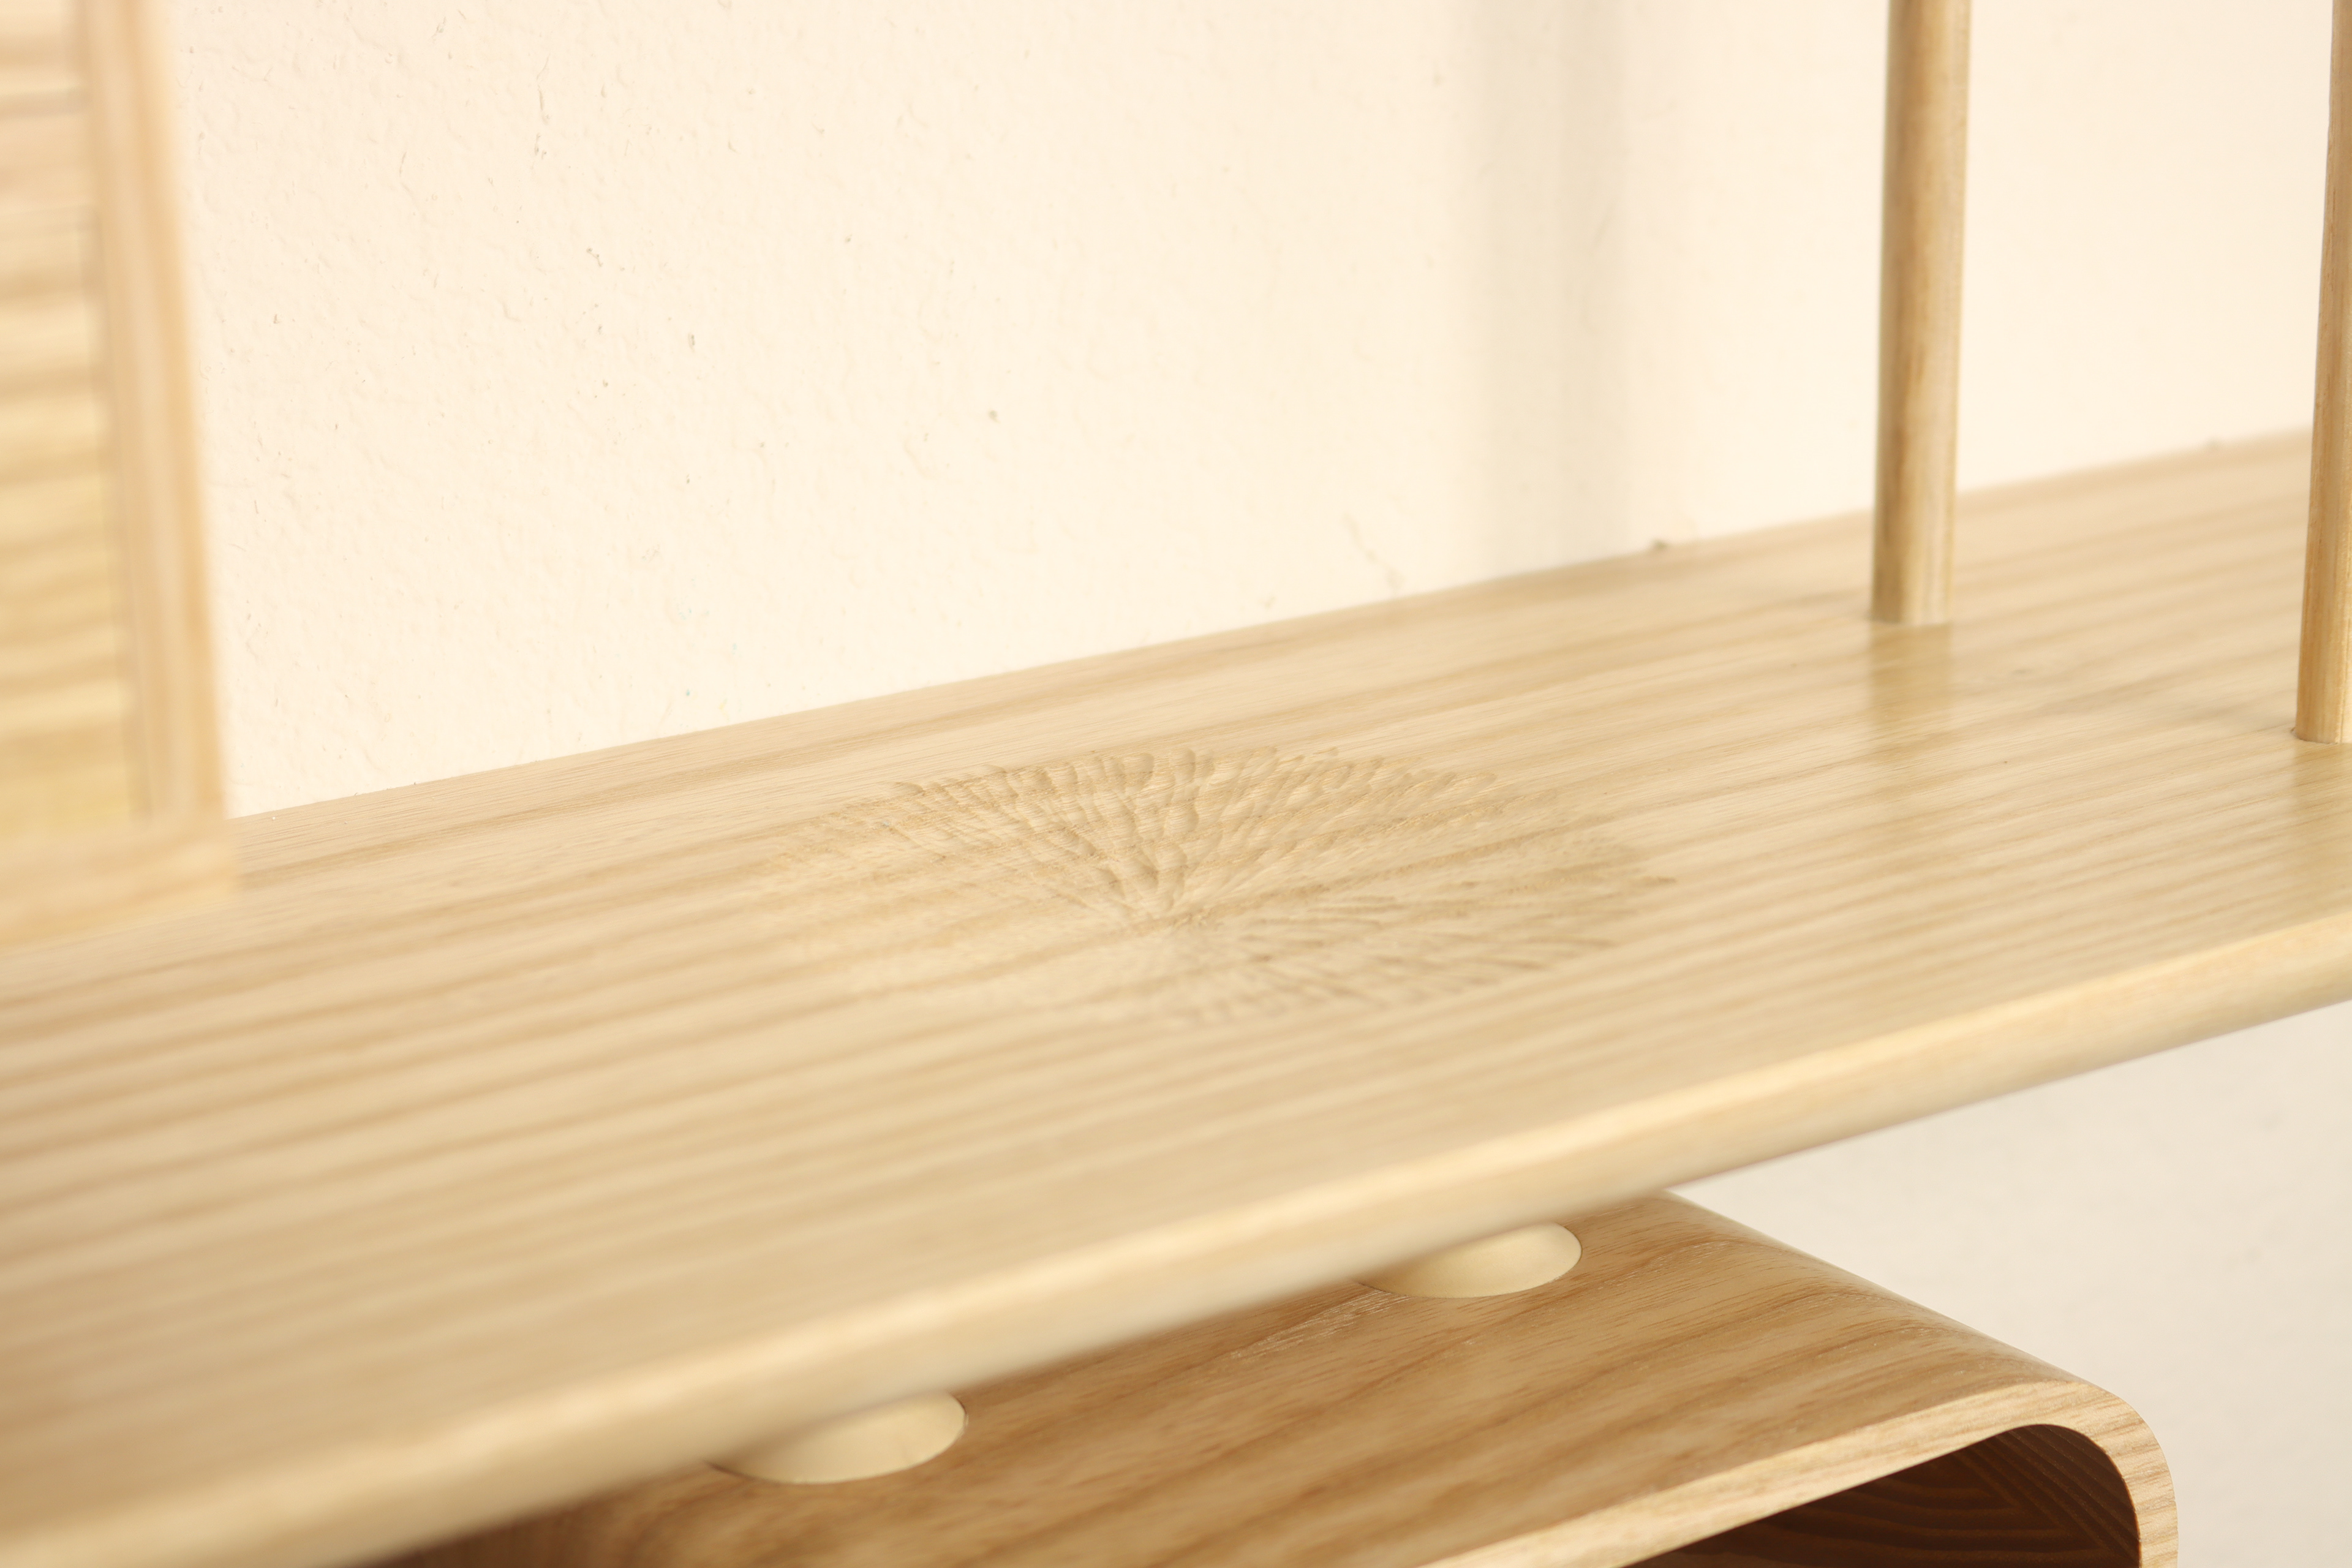
The stanchions are made out of Holly, turned on the lathe. These are the 4 white (ish) colored pieces that hold up the drawer case, and levitate the under shelf tray. A shoulder was cut into these on the lathe, and was then recessed into the holes drilled earlier on the case, tray and shelf.
Dish:
The hand carved circular dish is meant to hold small, loose items, like earrings or bracelets. Cut with Swiss Made carving gouges.
Assembly of Components
Because of the variety of components (discussed above), the assembly and glue up was very complicated. First off, because the drawers and enclosures were so small, I would not be able to apply finish to all of the interior surfaces. I had to prefinish the interior of these components before gluing up (more on the finish in the next section). After gluing up the drawers, I had to sand them to fit into their enclosures in the case. All components of the project were then prefinished prior to glue up.
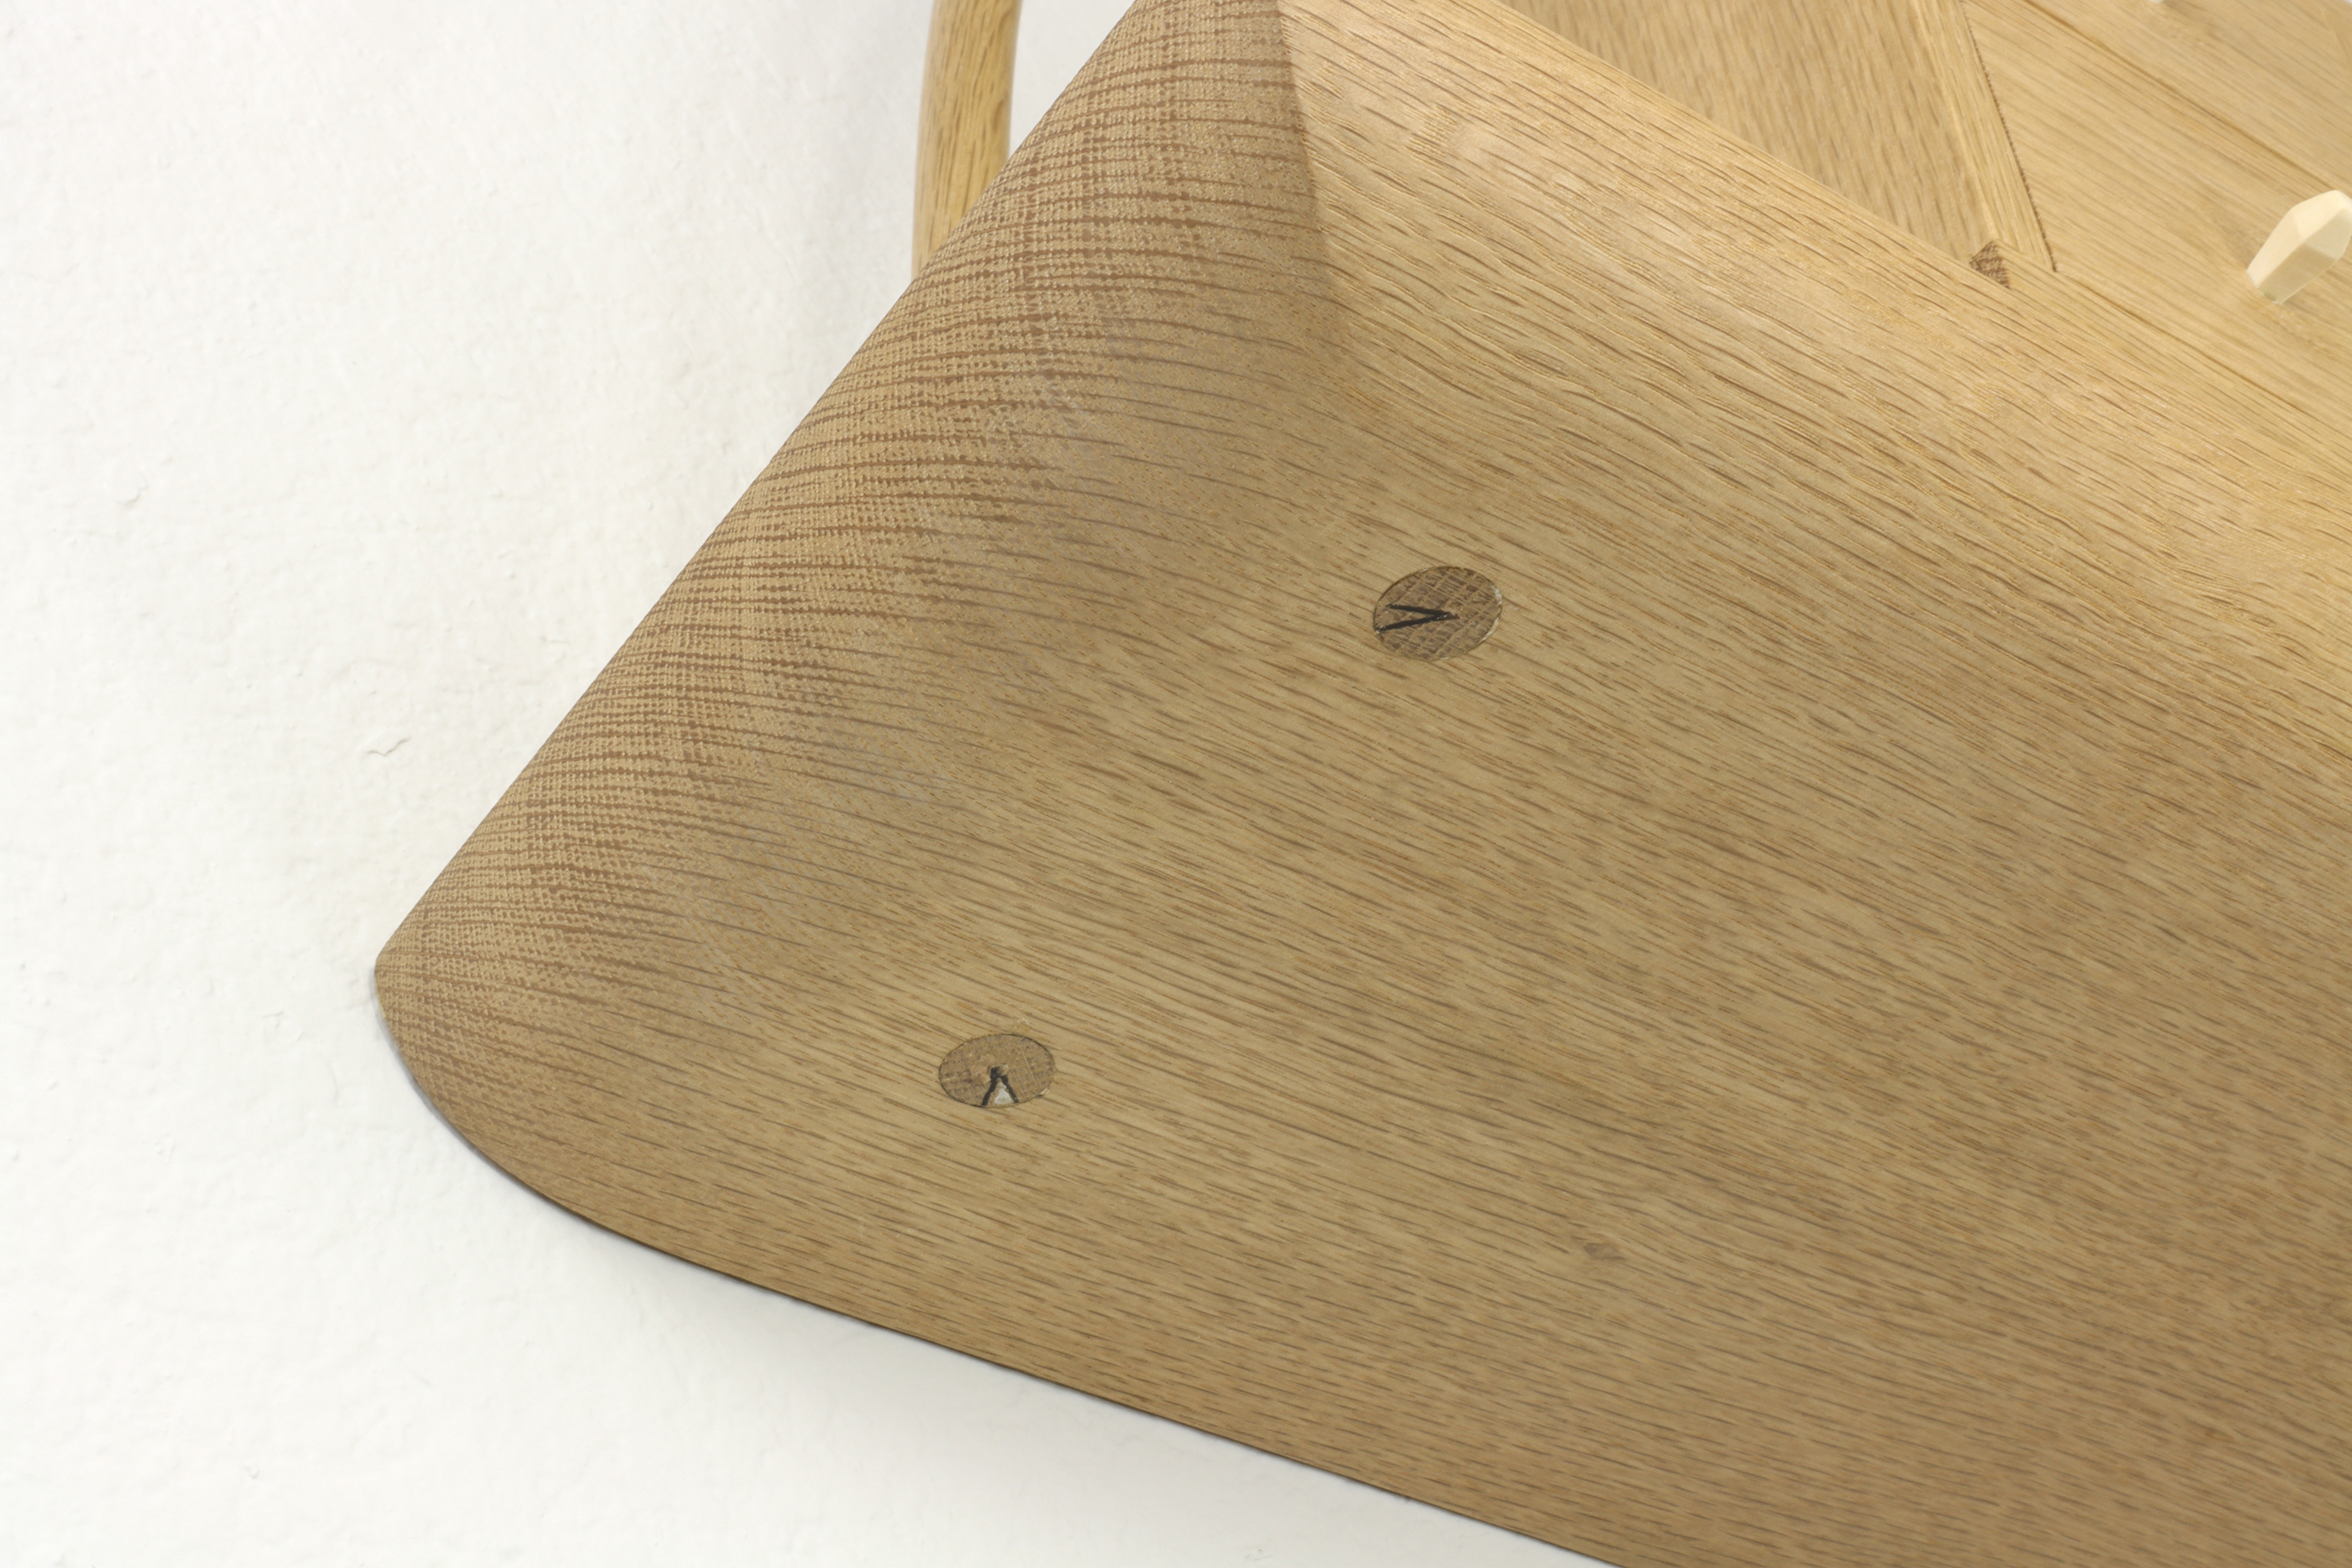
The stanchions were glued into the holes on the top of the shelf and the bottom of the case, likewise to the bottom of the shelf and tray. I then muscled in the arches to their respective holes, and pushed them through until both arches were even and aligned together in the frontal and side view. Excess of the arch protruding through the bottom was then flush cut and sanded. I then laid out the clock times on each of the protruding dowels, and woodburned the hour and minute hands. I did a little more touch up sanding after this, and did some touch up finishings on those spots as well.
A French cleat was then glued onto the back of the drawer case to support some of the weight when mounting.
Finishing
I decided to try a traditional Danish soap finish for this project. Like I mentioned above in the Design Constraints/Desires with Preliminary Drawings section, I wanted this piece to have a very subtle contrast with light colored woods. The Holly and Ash worked great for this, but I wanted to go a step further. A soap finish is very simple in terms of its ingredients - soap and water. Once applied, and the water evaporates, the soap is what is left in the grain pores of the wood. This gives the wood a slightly whiter appearance. It also makes the surface incredibly smooth and soft feeling.
Strengths of the Design
In this section, I will briefly discuss the strengths of the overall design and composition of the Wall Hanging Vanity, in other words what aspects of the initial constraints and desires I succeeded in.
I think that the overall size and shapes of the piece looks very appealing. I believe that the proportionality between each component is perfect, and the ratios between specific dimensions within the piece work well. I also enjoy how the Danish soap finish turned out, it was a lot of work, but I believe that it was worth it in the end.
My method for mounting the piece to the walls worked out perfectly. the key hole slots support the weight of the piece, while the French cleat supports the piece by holding it to the wall and prevents it from sagging.
The shelfs thickness and edge profile are perfect to me. While the shelf itself is rather thick, about 1.25", the heavy hand-shaped round over visually de-weights the shelf. The 1/8" flat on the leading edge of the round over helps to establish visual clarity, as well as support the integrity of the pointed edges.
For the drawers, I like the variety of the dovetails I did. I think that it not only shows off my dovetail skills, but it also breaks through the conformity to patterns that this piece is all about, which I actually really enjoy.
I love the hand carved dish in the top of the shelf. It is very functional, yet minimal.
These are all things I would like to keep the same on the next version of the piece that I will create.
Weaknesses of the Design
While this project has many strengths, there are also a fair amount of weaknesses to the design; things that I feel could use improvement, or flat out change.
One of the most important things that needs to be addressed is the piston fit drawers. As I mentioned in the sections above, the drawers sides are made from Holly and Ash laminate. For small piston fit drawers, often times a little bit of sanding is required to get a perfect fit. While I knew this, I believed it would not be a problem. However, the Holly veneers were 1/32" thick, this means that I only have roughly 1/64" on each side to sand away in order to fine tune the drawer fit. On two of these drawers, it worked out great. On the other two, I had to sand through almost the entire 1/32" veneer to get the fit just right. Now I know why I have never seen a veneered drawer side in fine furniture construction before. The original purpose of this was to same money on materials; Holly is VERY expensive. But for next time, I need to either use a different wood, or just bite the bullet and do solid Holly construction.
Another problem I faced was that the drawer case didn't glue up entirely square. the enclosure dividers that I installed did not stay square throughout the glue up. This contributed to the problem discussed above, a well as led to some gaps around the drawer faces. On this same topic, I felt that the case construction material was too thick. I used 3/8" Ash for the outsides and dividers, I think 5/16" would adequately de-weight this component (visually).
For the arches, I was not able to get a completely uniform shape and surface. I think that either purchasing dowels in the selected wood, to producing shop-made dowels would be best. This way I could bend the dowels instead of square stock. This would not only cut down my time, but it would also reduce the possibility of splitting when steam bending, and reduce surfacing later on.
I like the shape and look of the under shelf tray, however, I would like to attempt it again. This try took many hours of modeling and prototyping to achieve, and it still wasn't perfect. I would like to spend more time modeling with these programs, and learn more about the limitations of the CNC to try and achieve better results with this complicated form. Originally, there was also going to be a Holly/Ash laminate backing to this tray. However, because of the inconsistencies in wall thickness of the piece, I could not safely route in a rabbit to receive the backing without tearing up the edges. So now, the "back" of this tray is currently the wall. By spending more time with this shape on the modeling programs and CNC, I would hope to eliminate this secondary problem.
The Holly stanchions served to raised the components up off of the shelf in an interesting and unique way. I love the overall look that I achieved with this. However, I think that the curve of the stanchion should bend more with the flat shelf. To do this, I would need to get larger dimensioned Holly turning stock, so I have more room to flatten out the curve. In addition, lowering the height of the stanchion (the gap between the shelf and drawers/tray), would allow for a sharper curve that wouldn't need as much material to blend from curved to flat.
I like the circular mirror on this piece. It is minimal, yet useful. But, in my opinion it looks like an afterthought, even though it was literally one of the first components in my design sketches. I think that creating a frame for this mirror out of matching wood may help in this regard. Possibly adding some carved details to it as well.
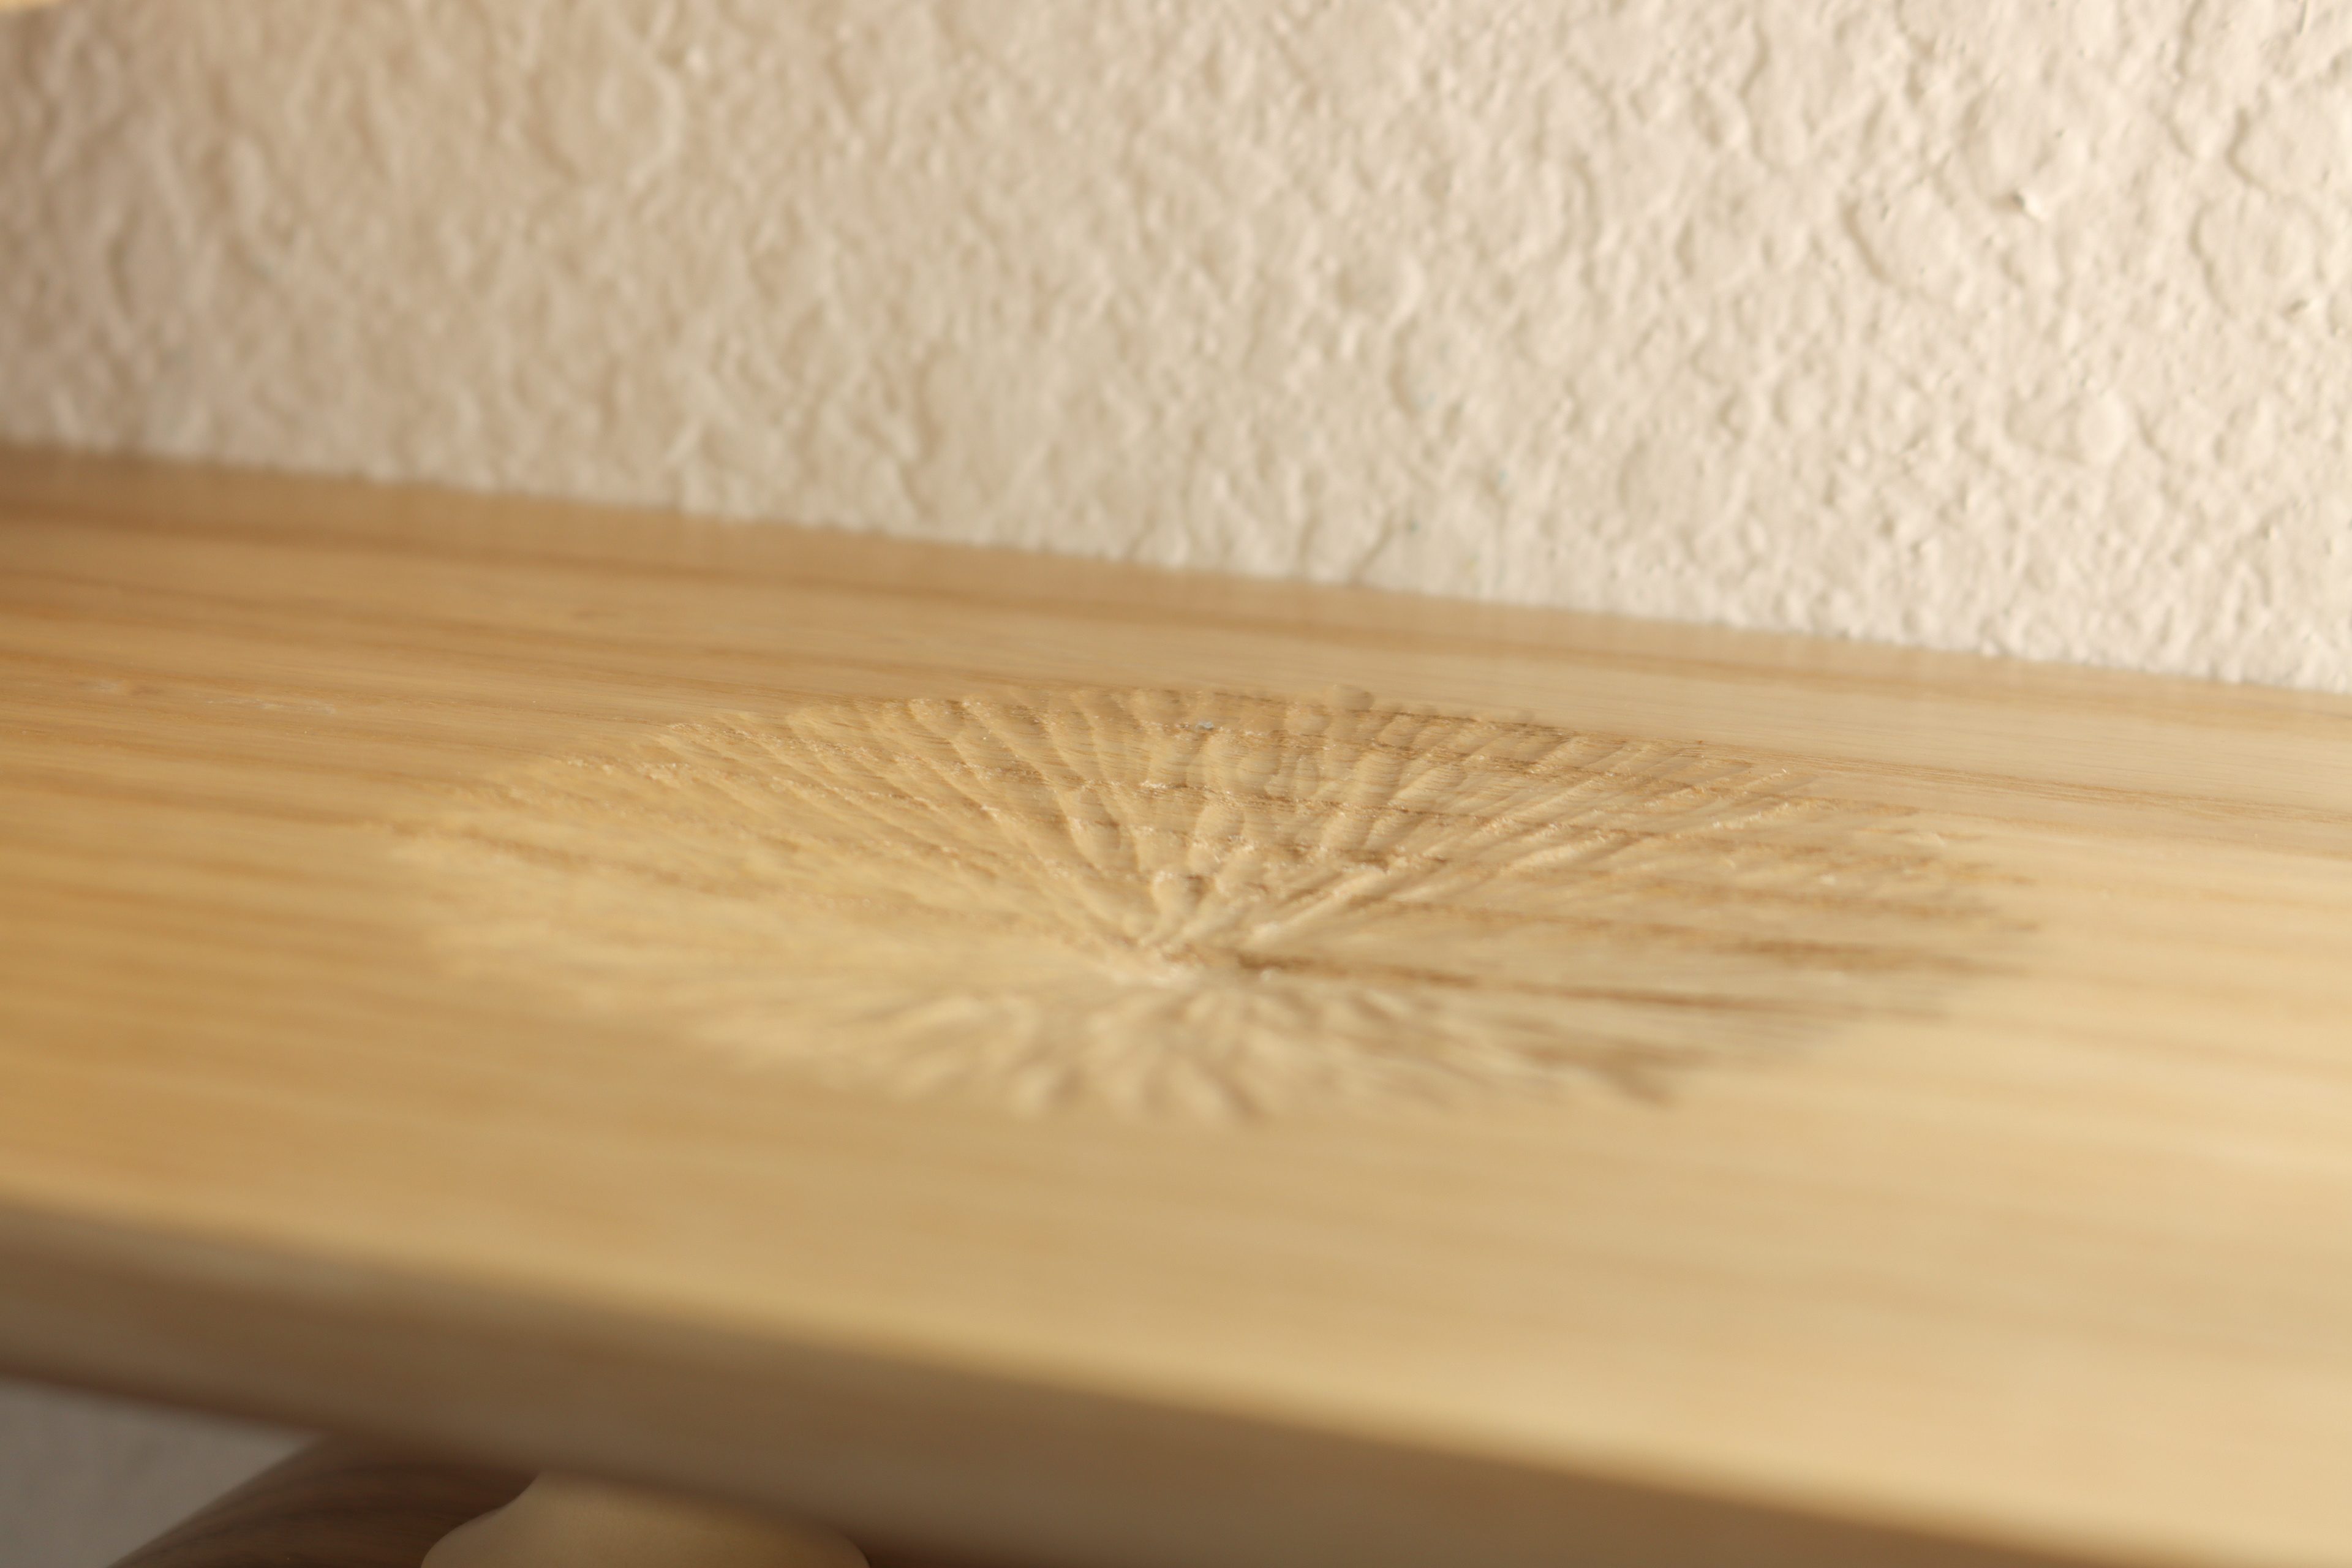
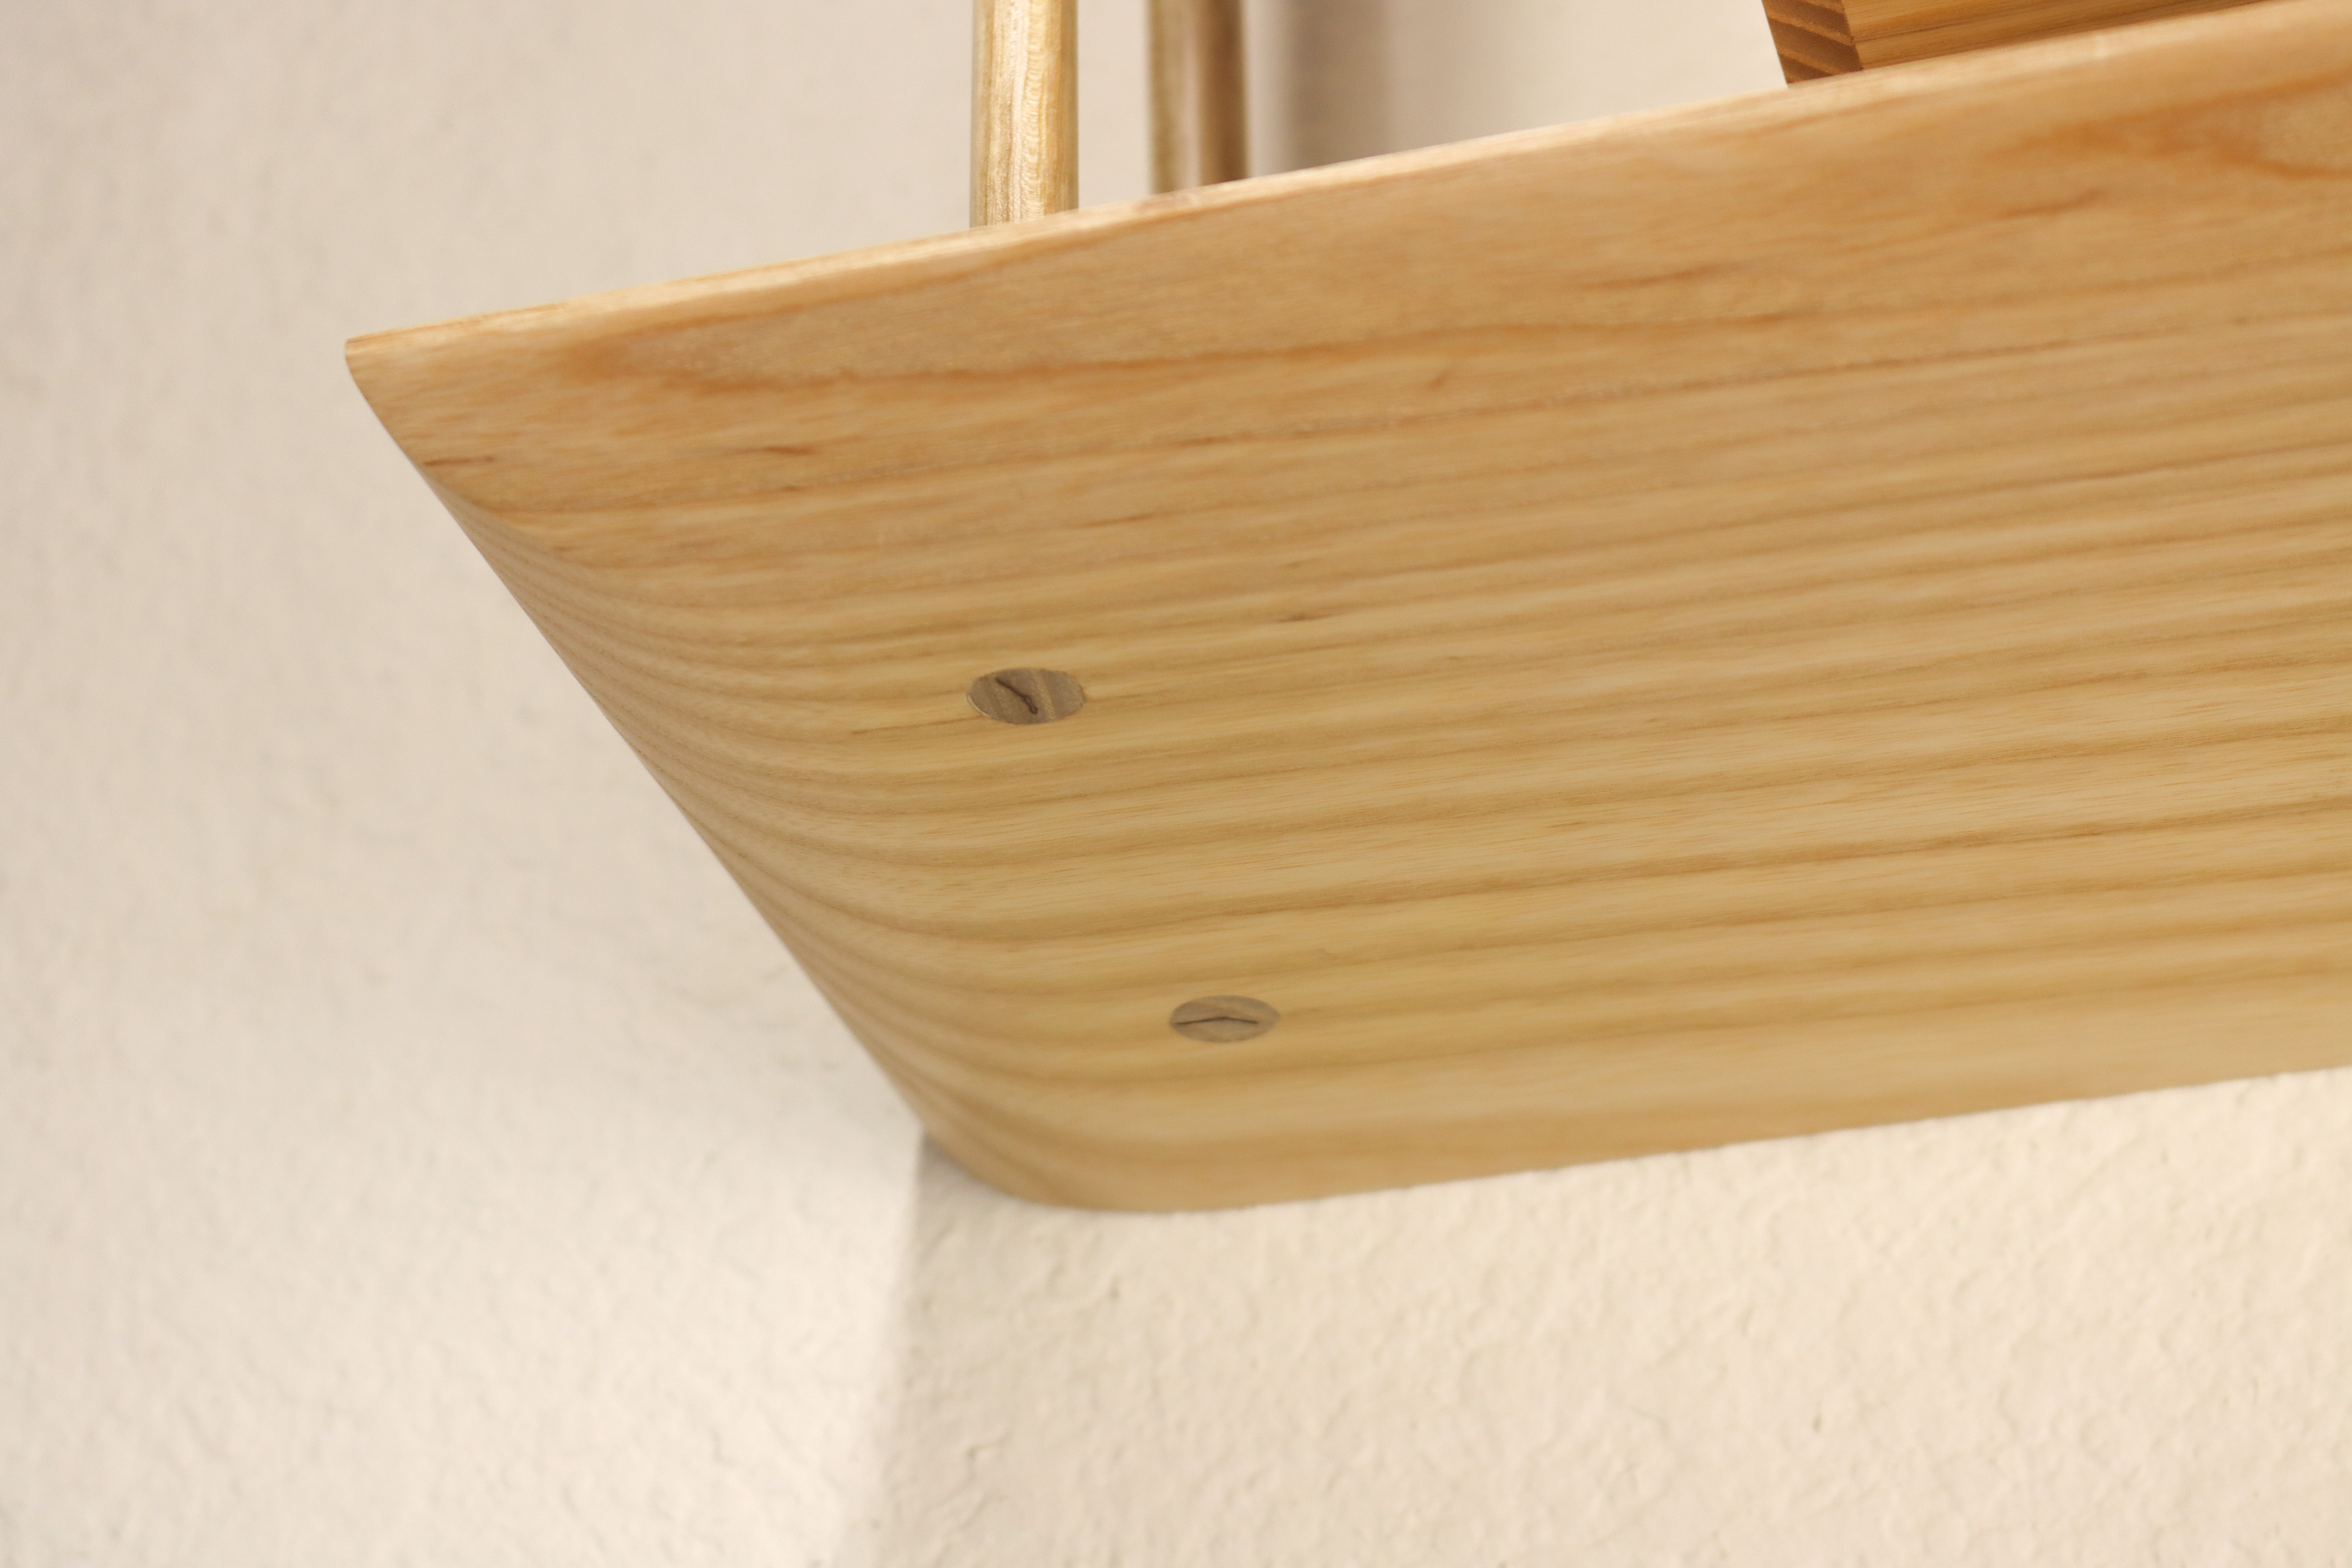
Lastly, the clock times on the underside of the shelf. This was the component of the project that was inspired by On Kawara. I love this little hidden detail, it will likely go unnoticed by most, but the attentive will discover it. I do not love the wood burned look, to me, it looks unrefined and sloppy. For the future piece, I think inlaying the clock hands with a black veneer would look best.
These are the different aspects of the design that I would like to practice and improve on for the next iteration of my vanity piece.
Wall Hanging Vanity
Iteration No. 2 - Final
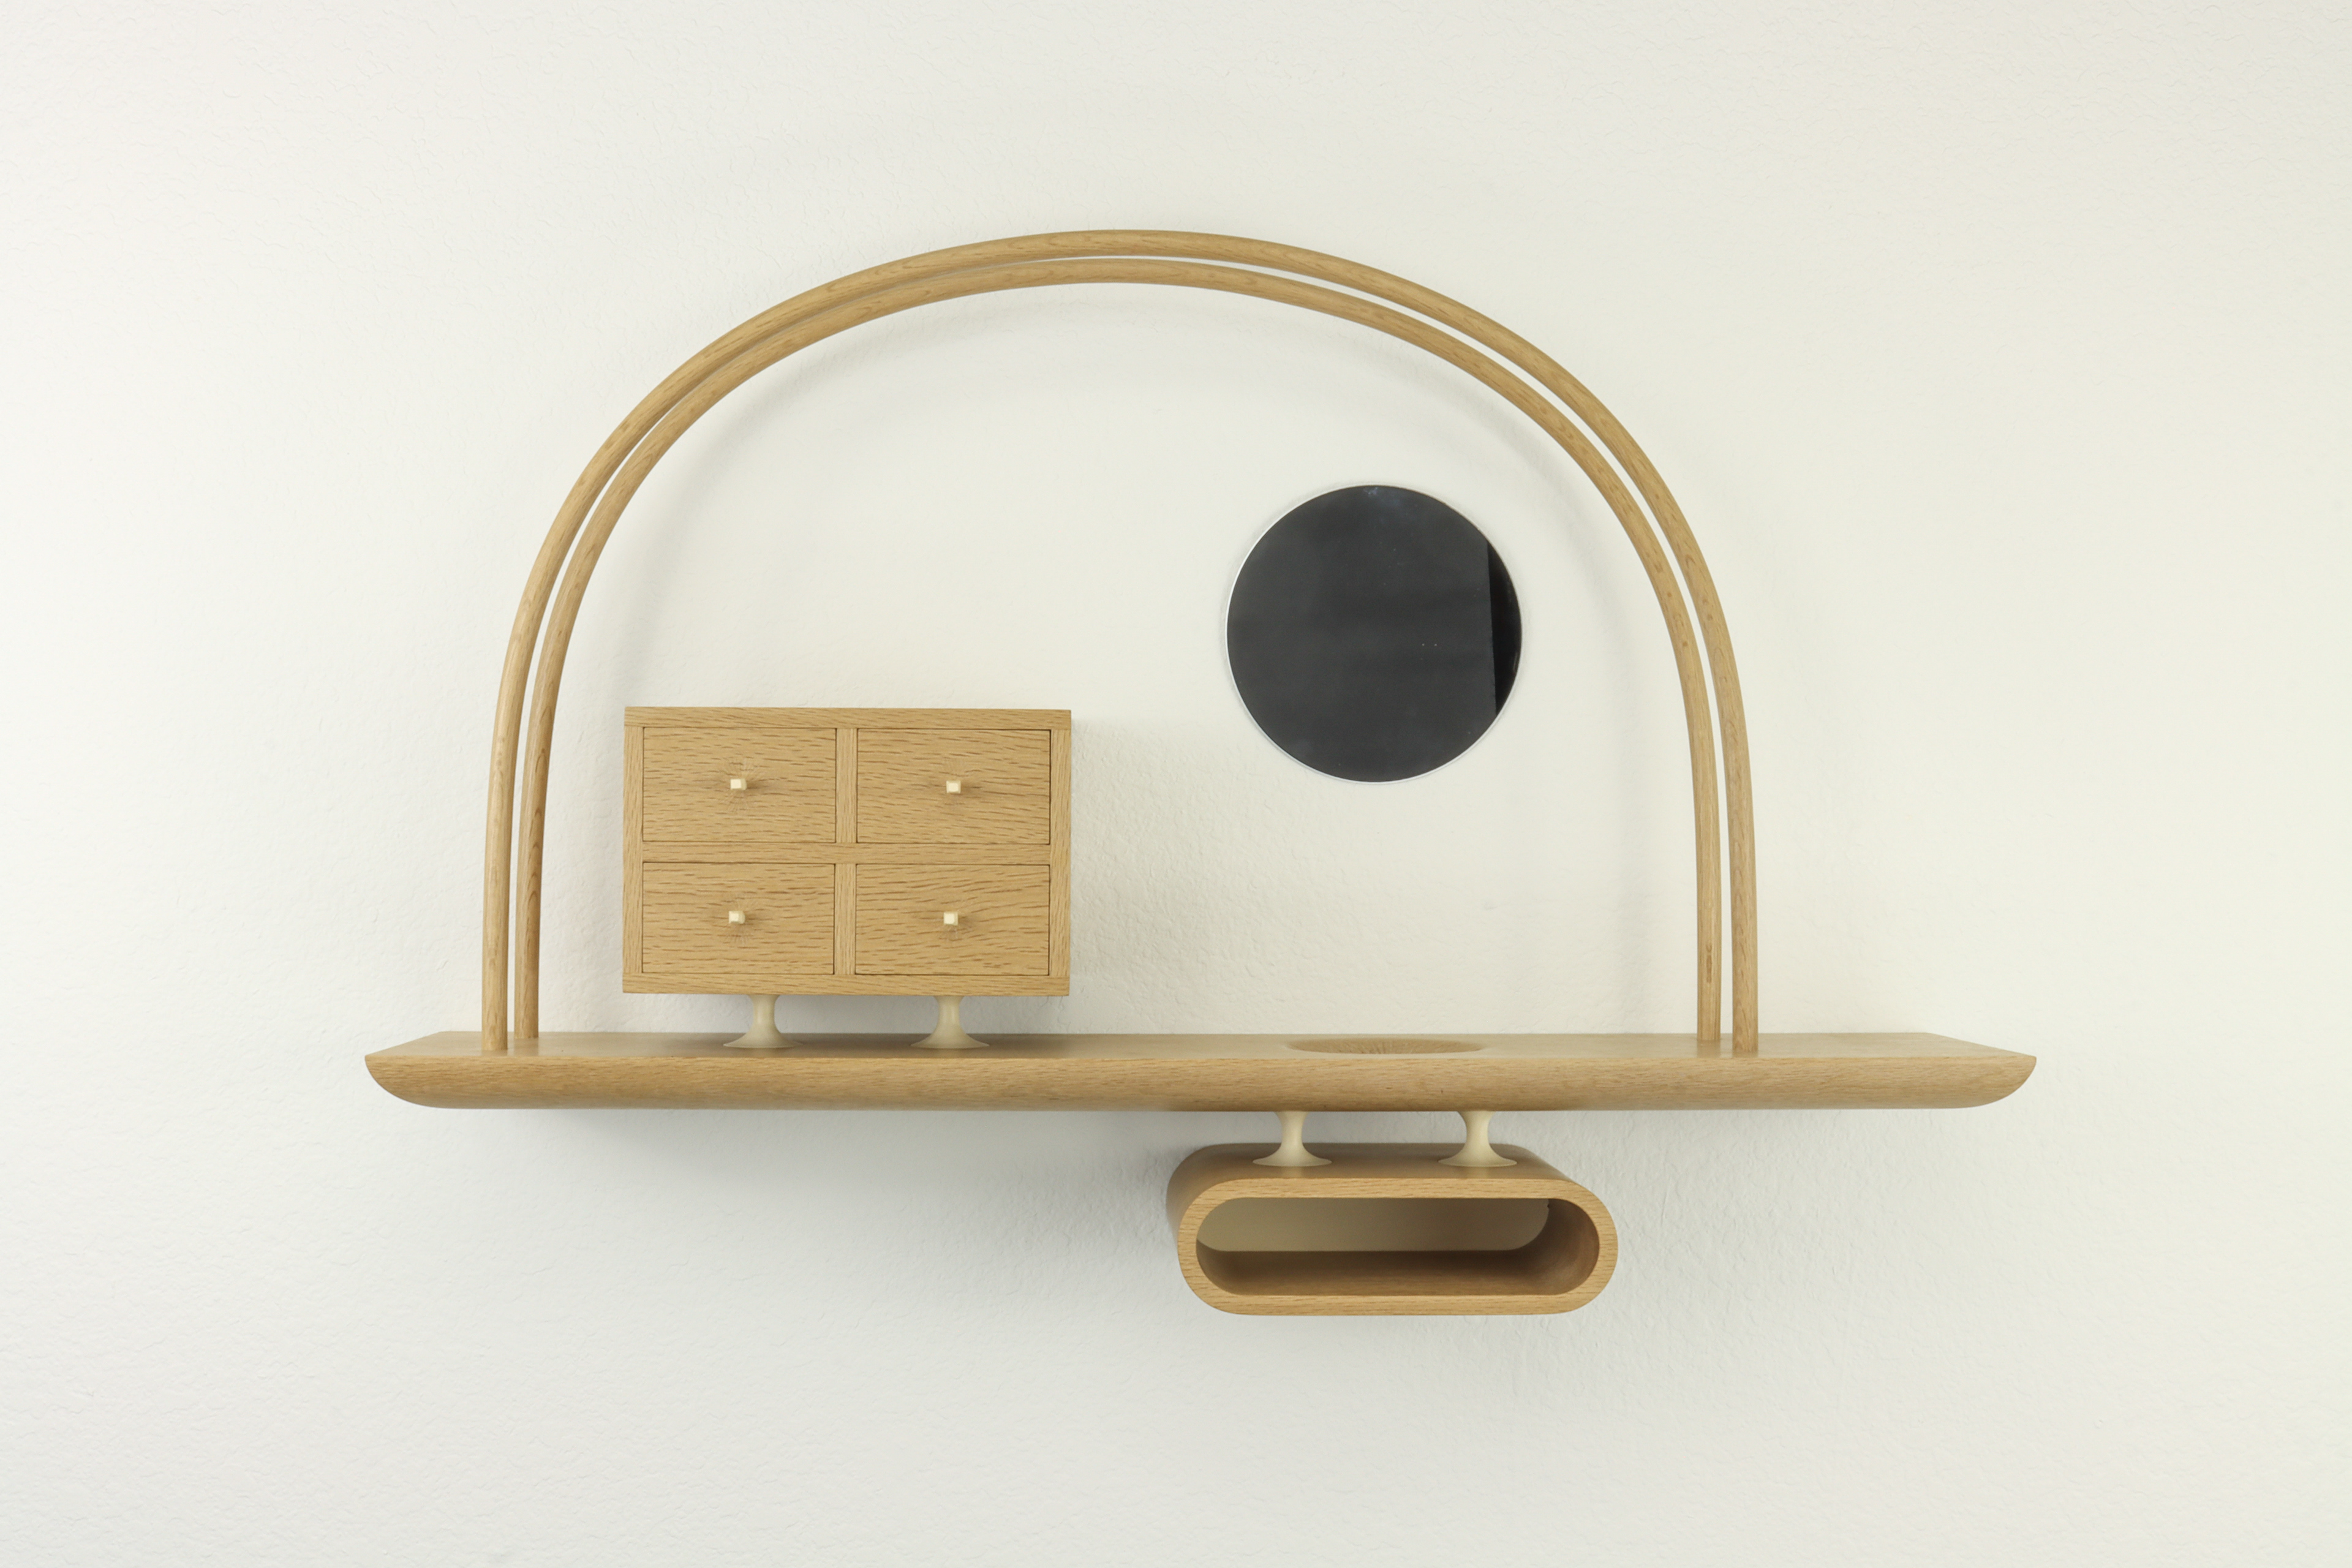
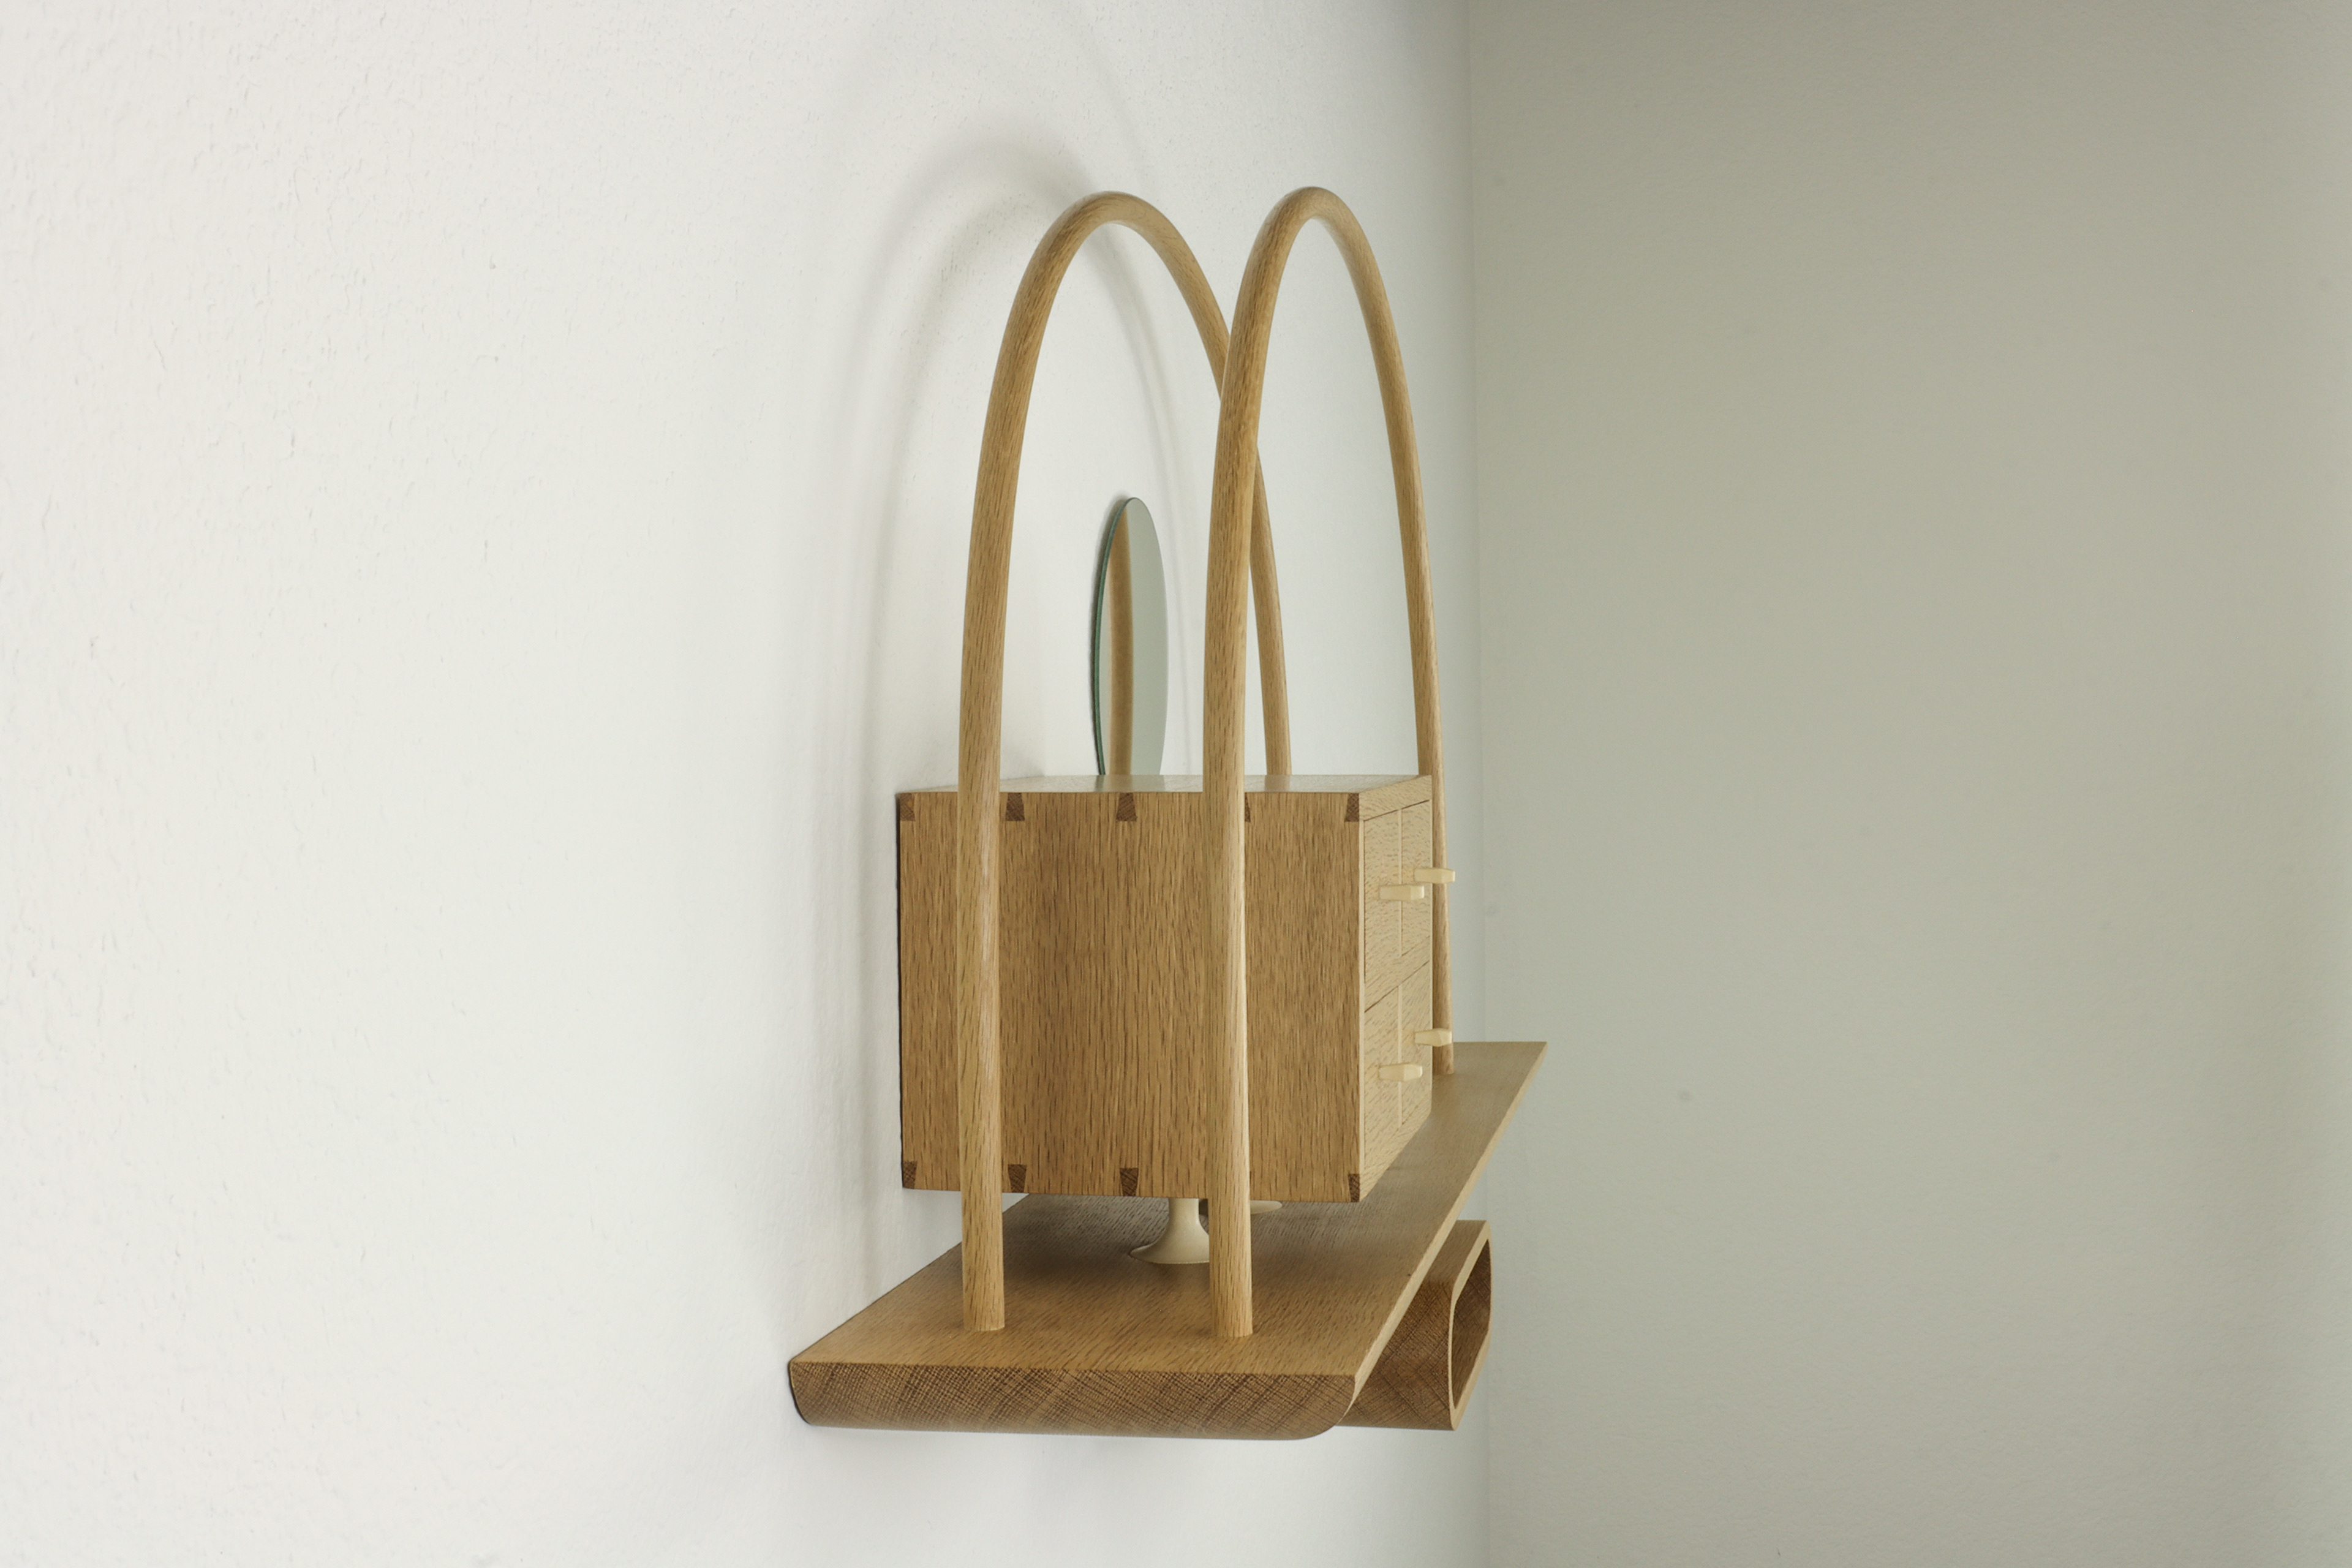

These are the final images from iteration No.2 of my Wall Hanging Vanity. In this iteration, most of the previous weaknesses of the design has been addressed, and I am very pleased with the outcome.
Some things that still need to be addressed is the mirror. I tried making a frame for the mirror out of extra Japanese Oak for a custom shaped mirror shape I was playing with, however, after many attempts, I could not cut the mirror into that shape without breaking it. I then tried to make a frame out of the same oak to fit the circular mirror you see above - the same mirror as in iteration No.1. However, the fabrication of this frame didn't work out, and I ran out of my Japanese Oak that I had on hand at my shop in San Diego. While back in Seattle for the summer of 2024, I plan to resolve this mirror issue with the Japanese stock that I have on hand here at my home shop, and update photos with the incorporation of the final mirror.
Another thing which didn't end up perfect was the veneer inlays in the end grain of the Japanese Oak arches on the underside of the the shelf. These inlays are made out of black dyed oak, and represent the time of sunrise and sunset at the beginning and ending of the construction of this piece. If you remember from above, on iteration No.1, these inlays were just wood burned. While the execution of the inlay worked great, I should've used a sharper chisel when flushing up the extra protrusion. In the photos, some minor chip out can be seen. This piece is currently on view at an exhibition in San Diego, once it is returned to me, I plan on digging out the problem areas and gluing in a touchup patch, the results of which will be included below.
CNC Tray Improvements

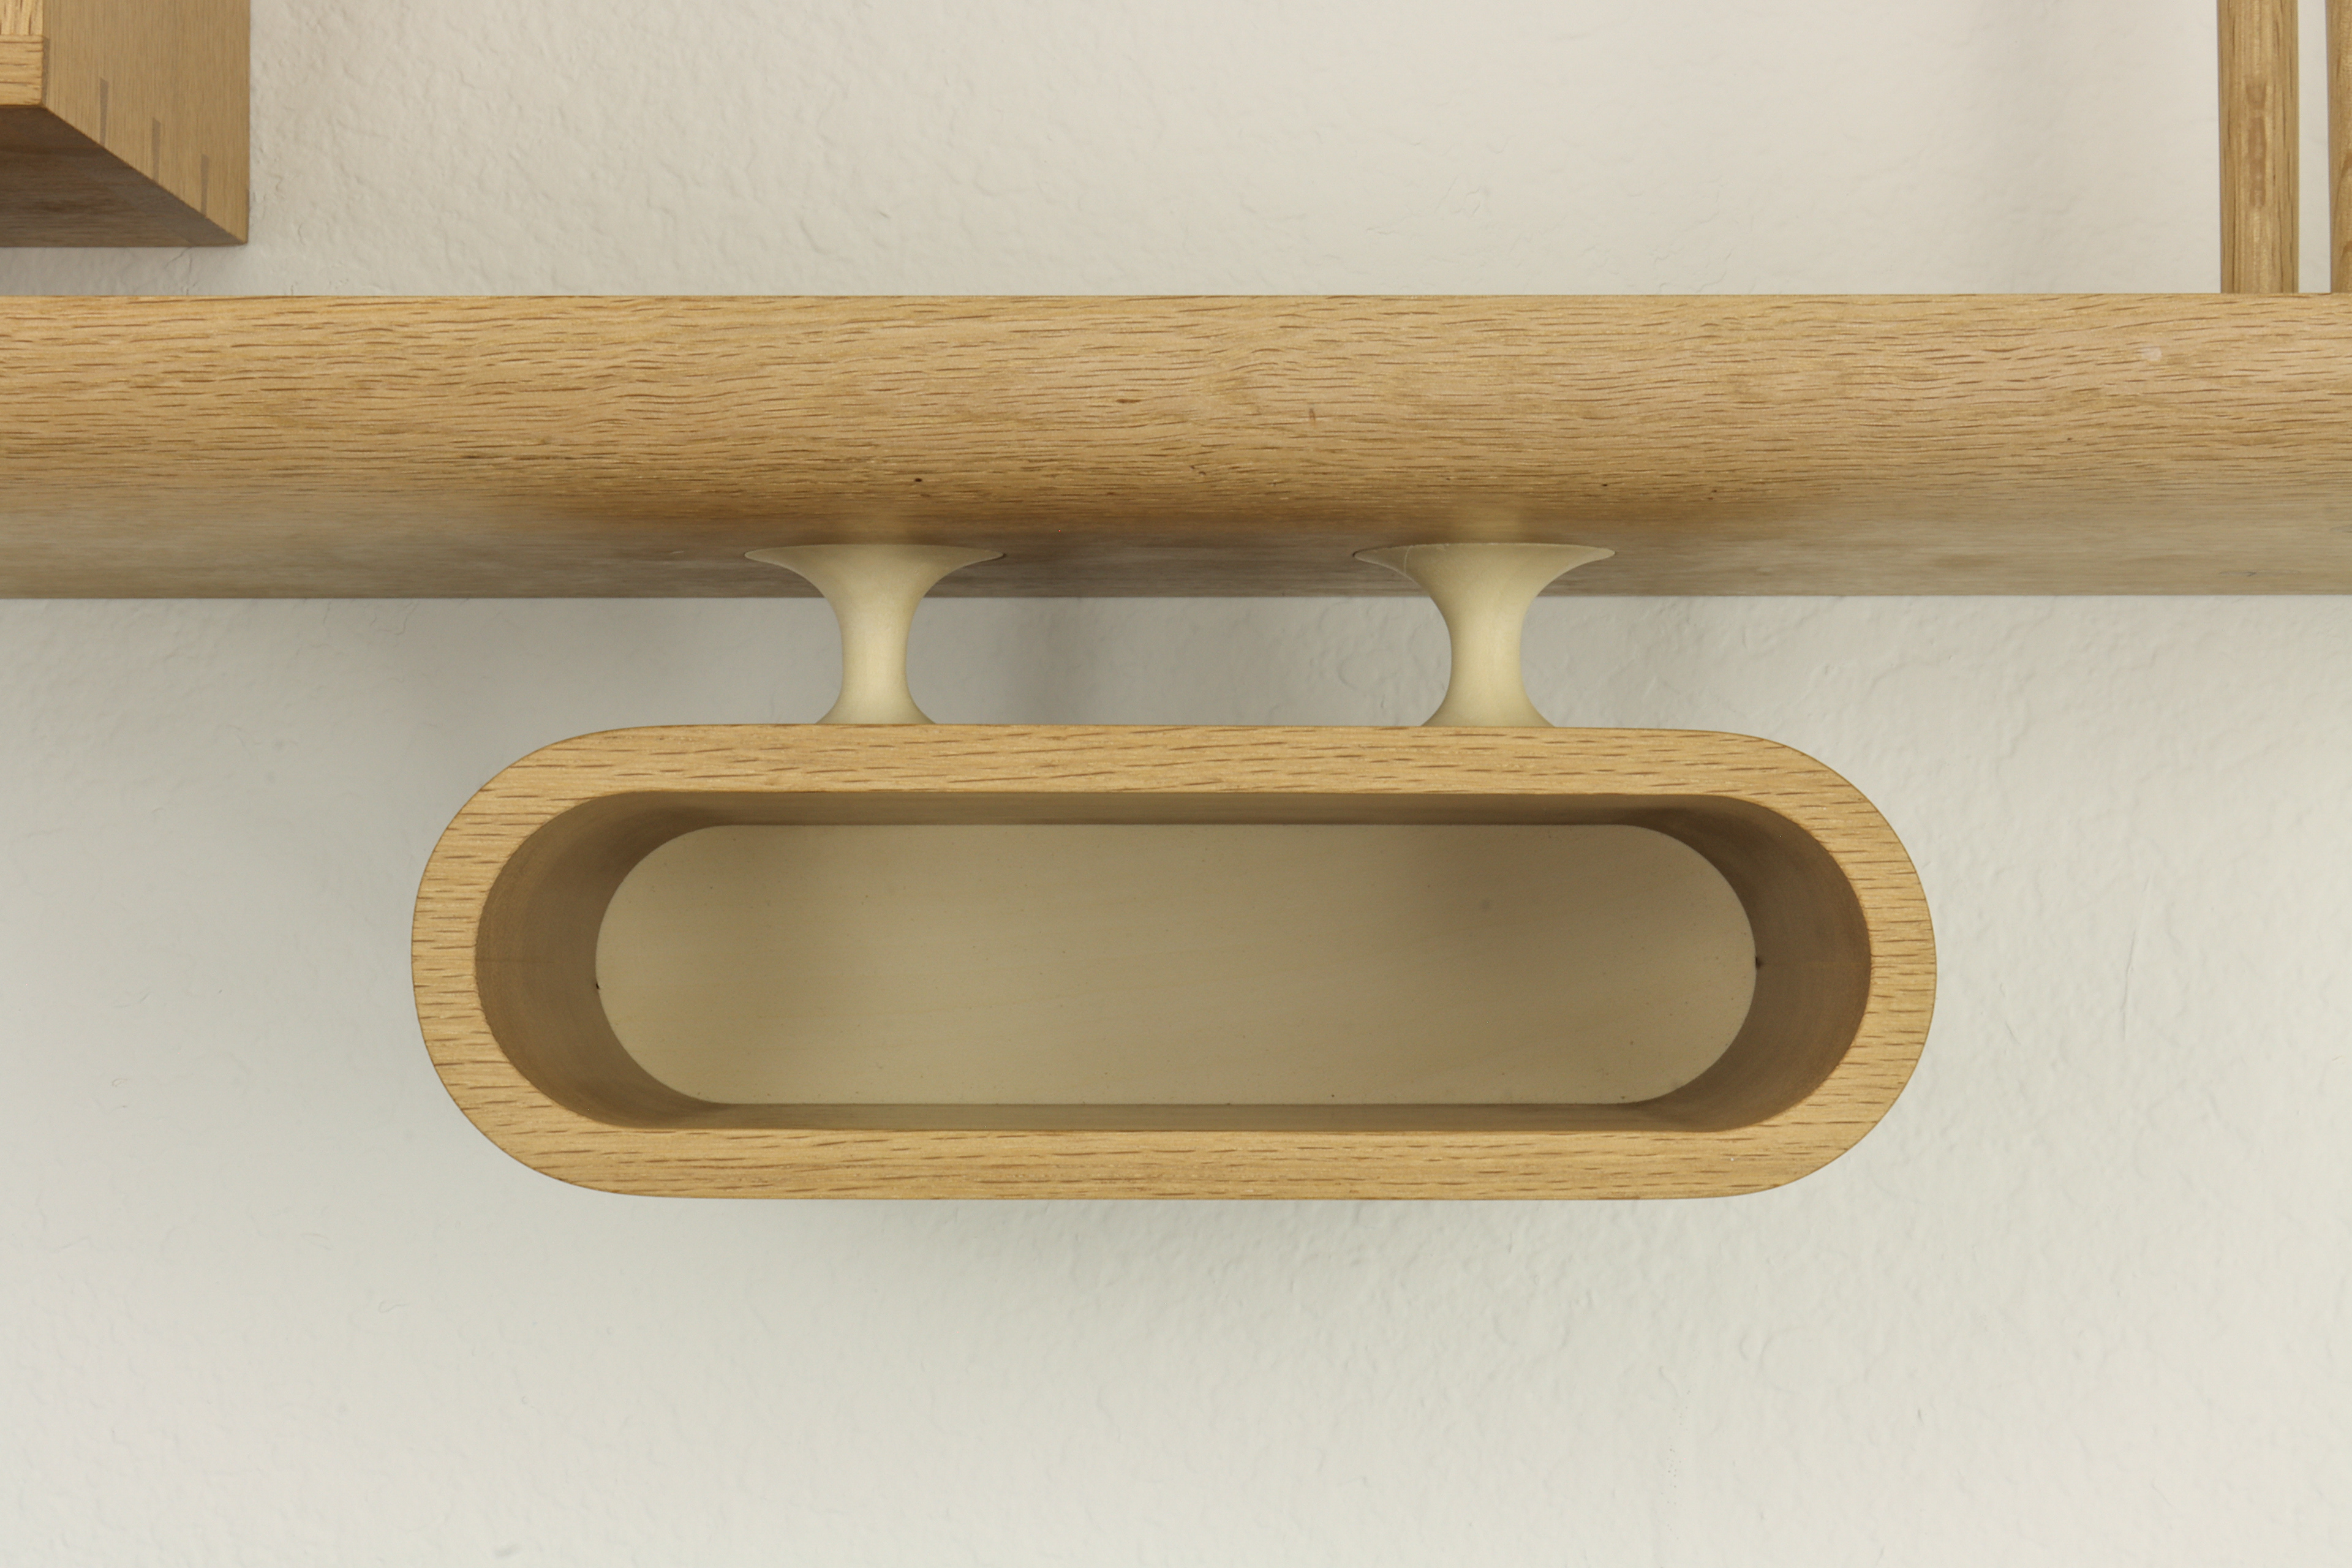
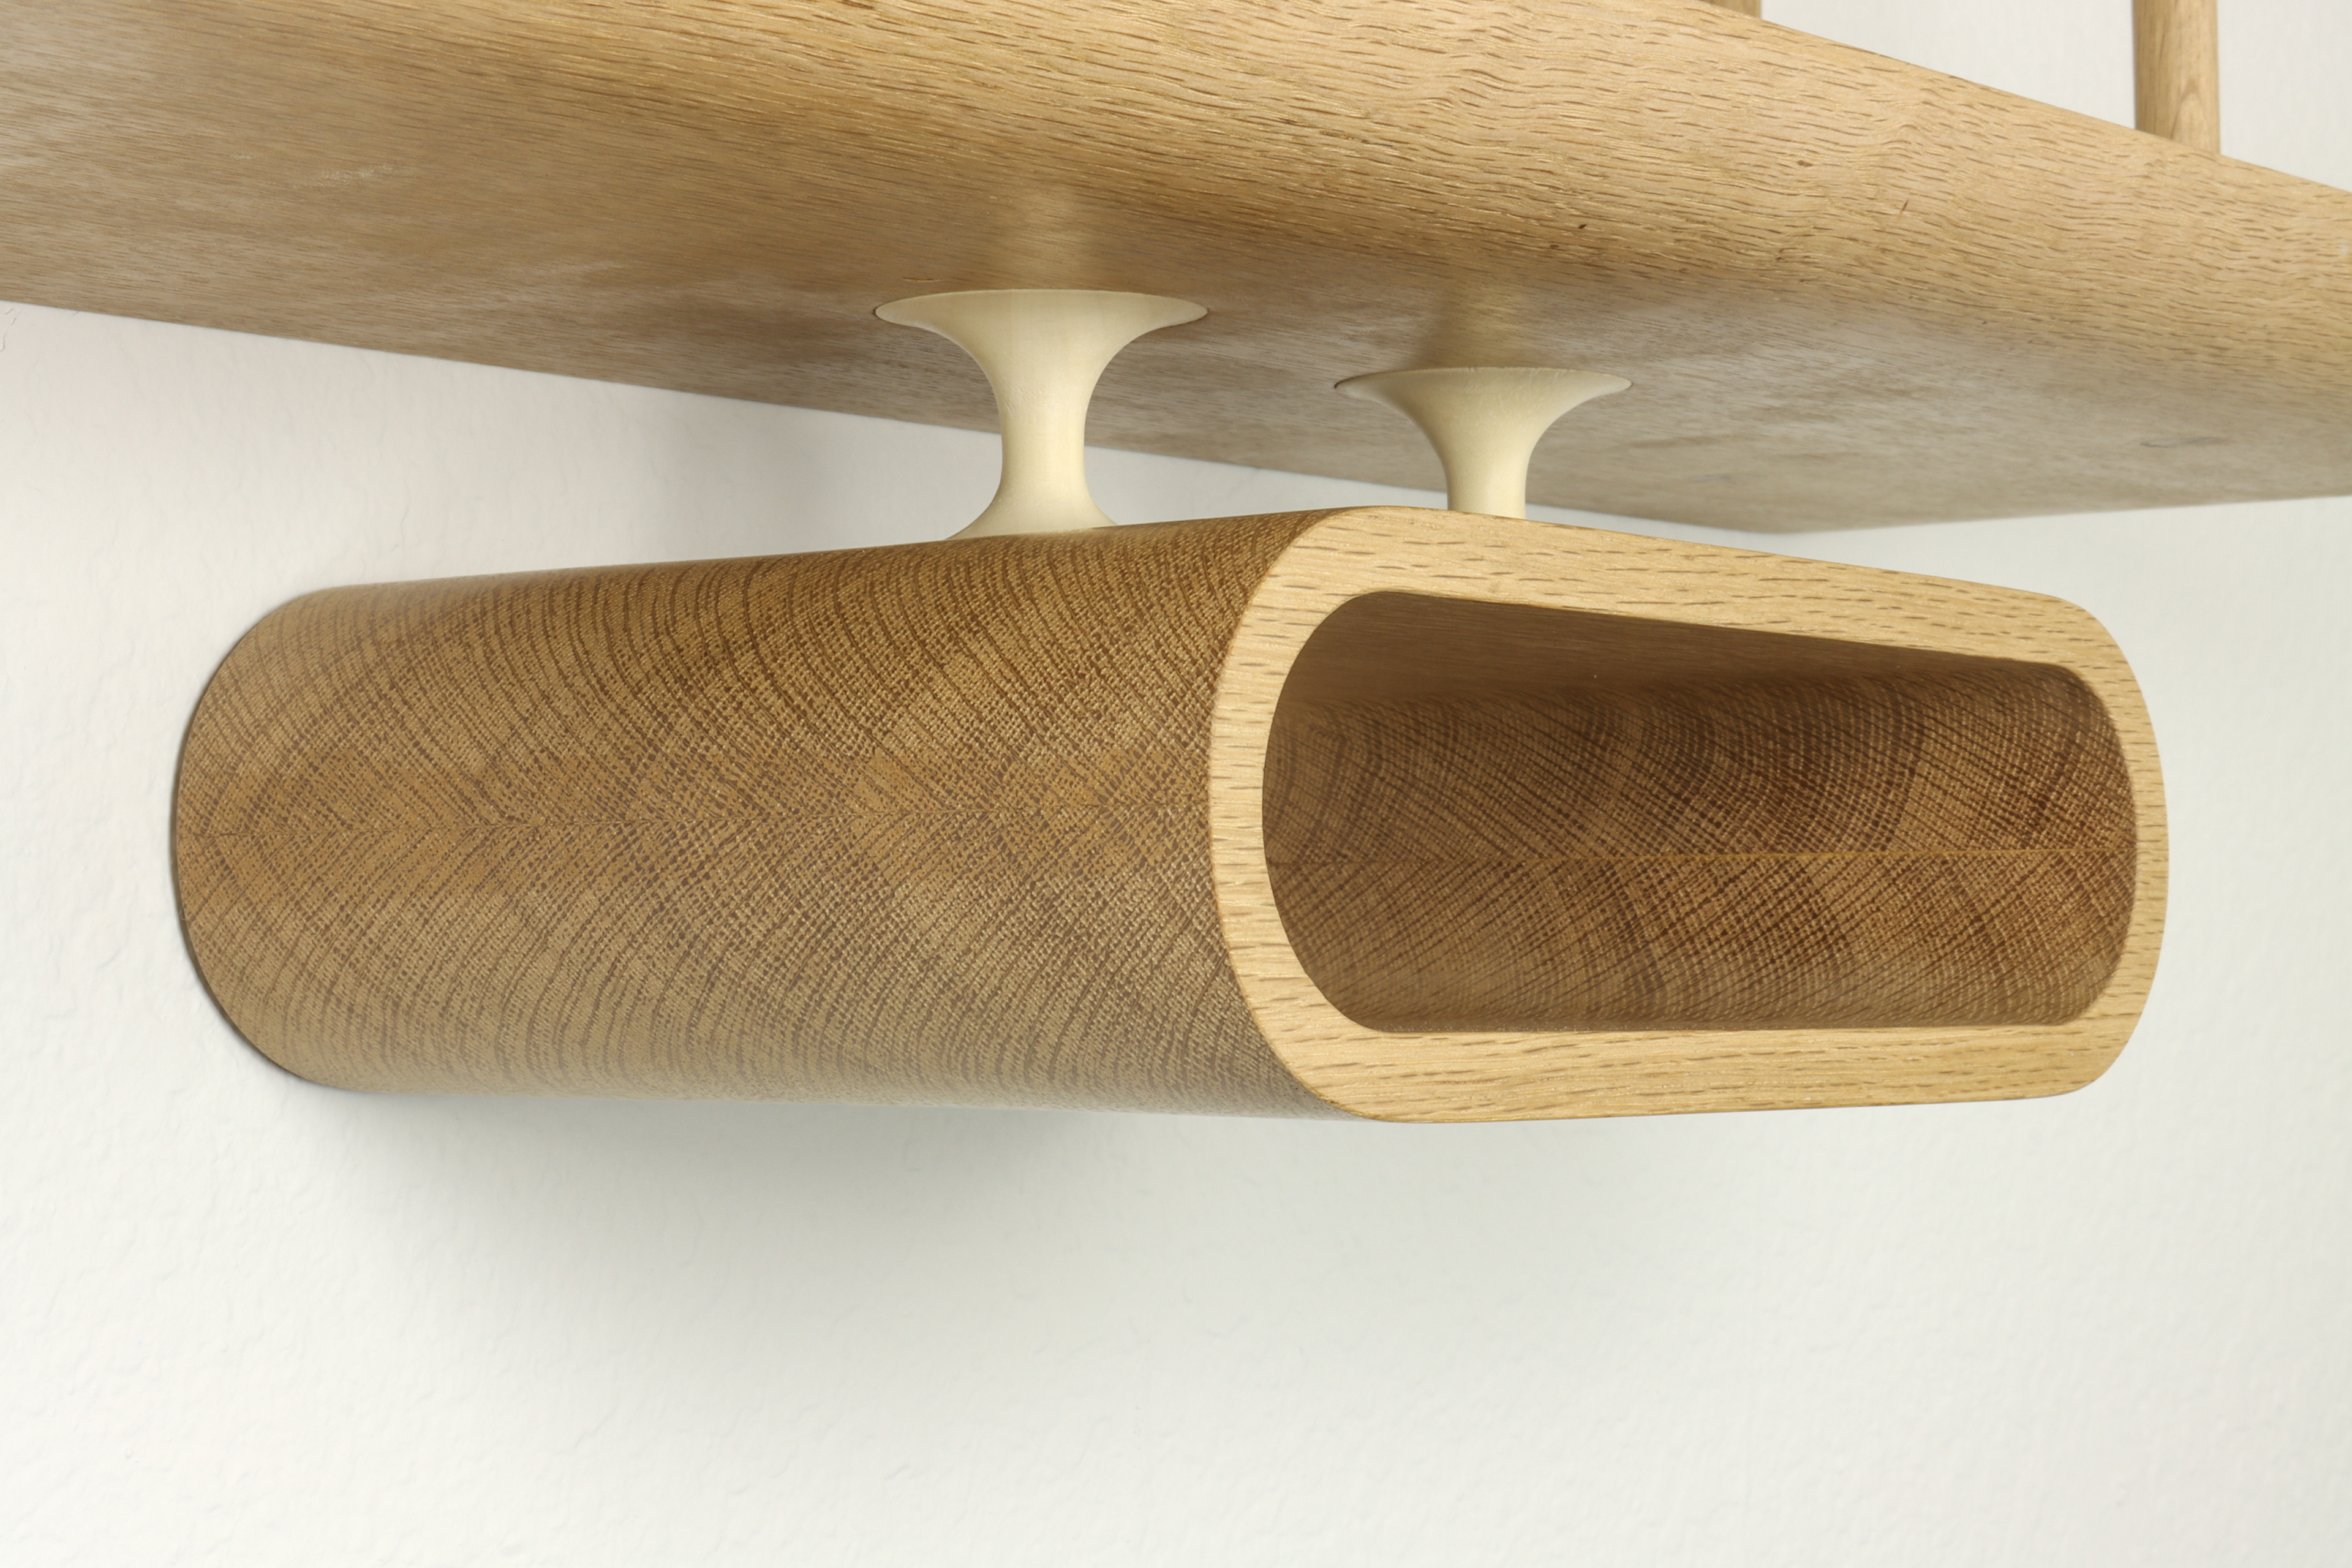

One of the major components between iteration No.1 and No.2 is the ovular formed tray hanging on the underside of the shelf. The result of which came about through over a dozen tests, and over a hundred hours of active CNC running time, not including modeling, troubleshooting, and file setups. This component alone required about 10 hours of labor per week for the majority of the spring semester. The main challenge here was figuring out compensation of the discrepancies between the model, and how the CNC code interprets the data from the model. Once that was figured out, we needed to create a new system for mounting the workpiece of the spoil board due to material usage limitations of the Japanese Oak. Additionally, I wanted to refine the quality of the milling in order to reduce hand sanding, and therefore reduce the inclusion of the possibility of human error into the otherwise computerized component.
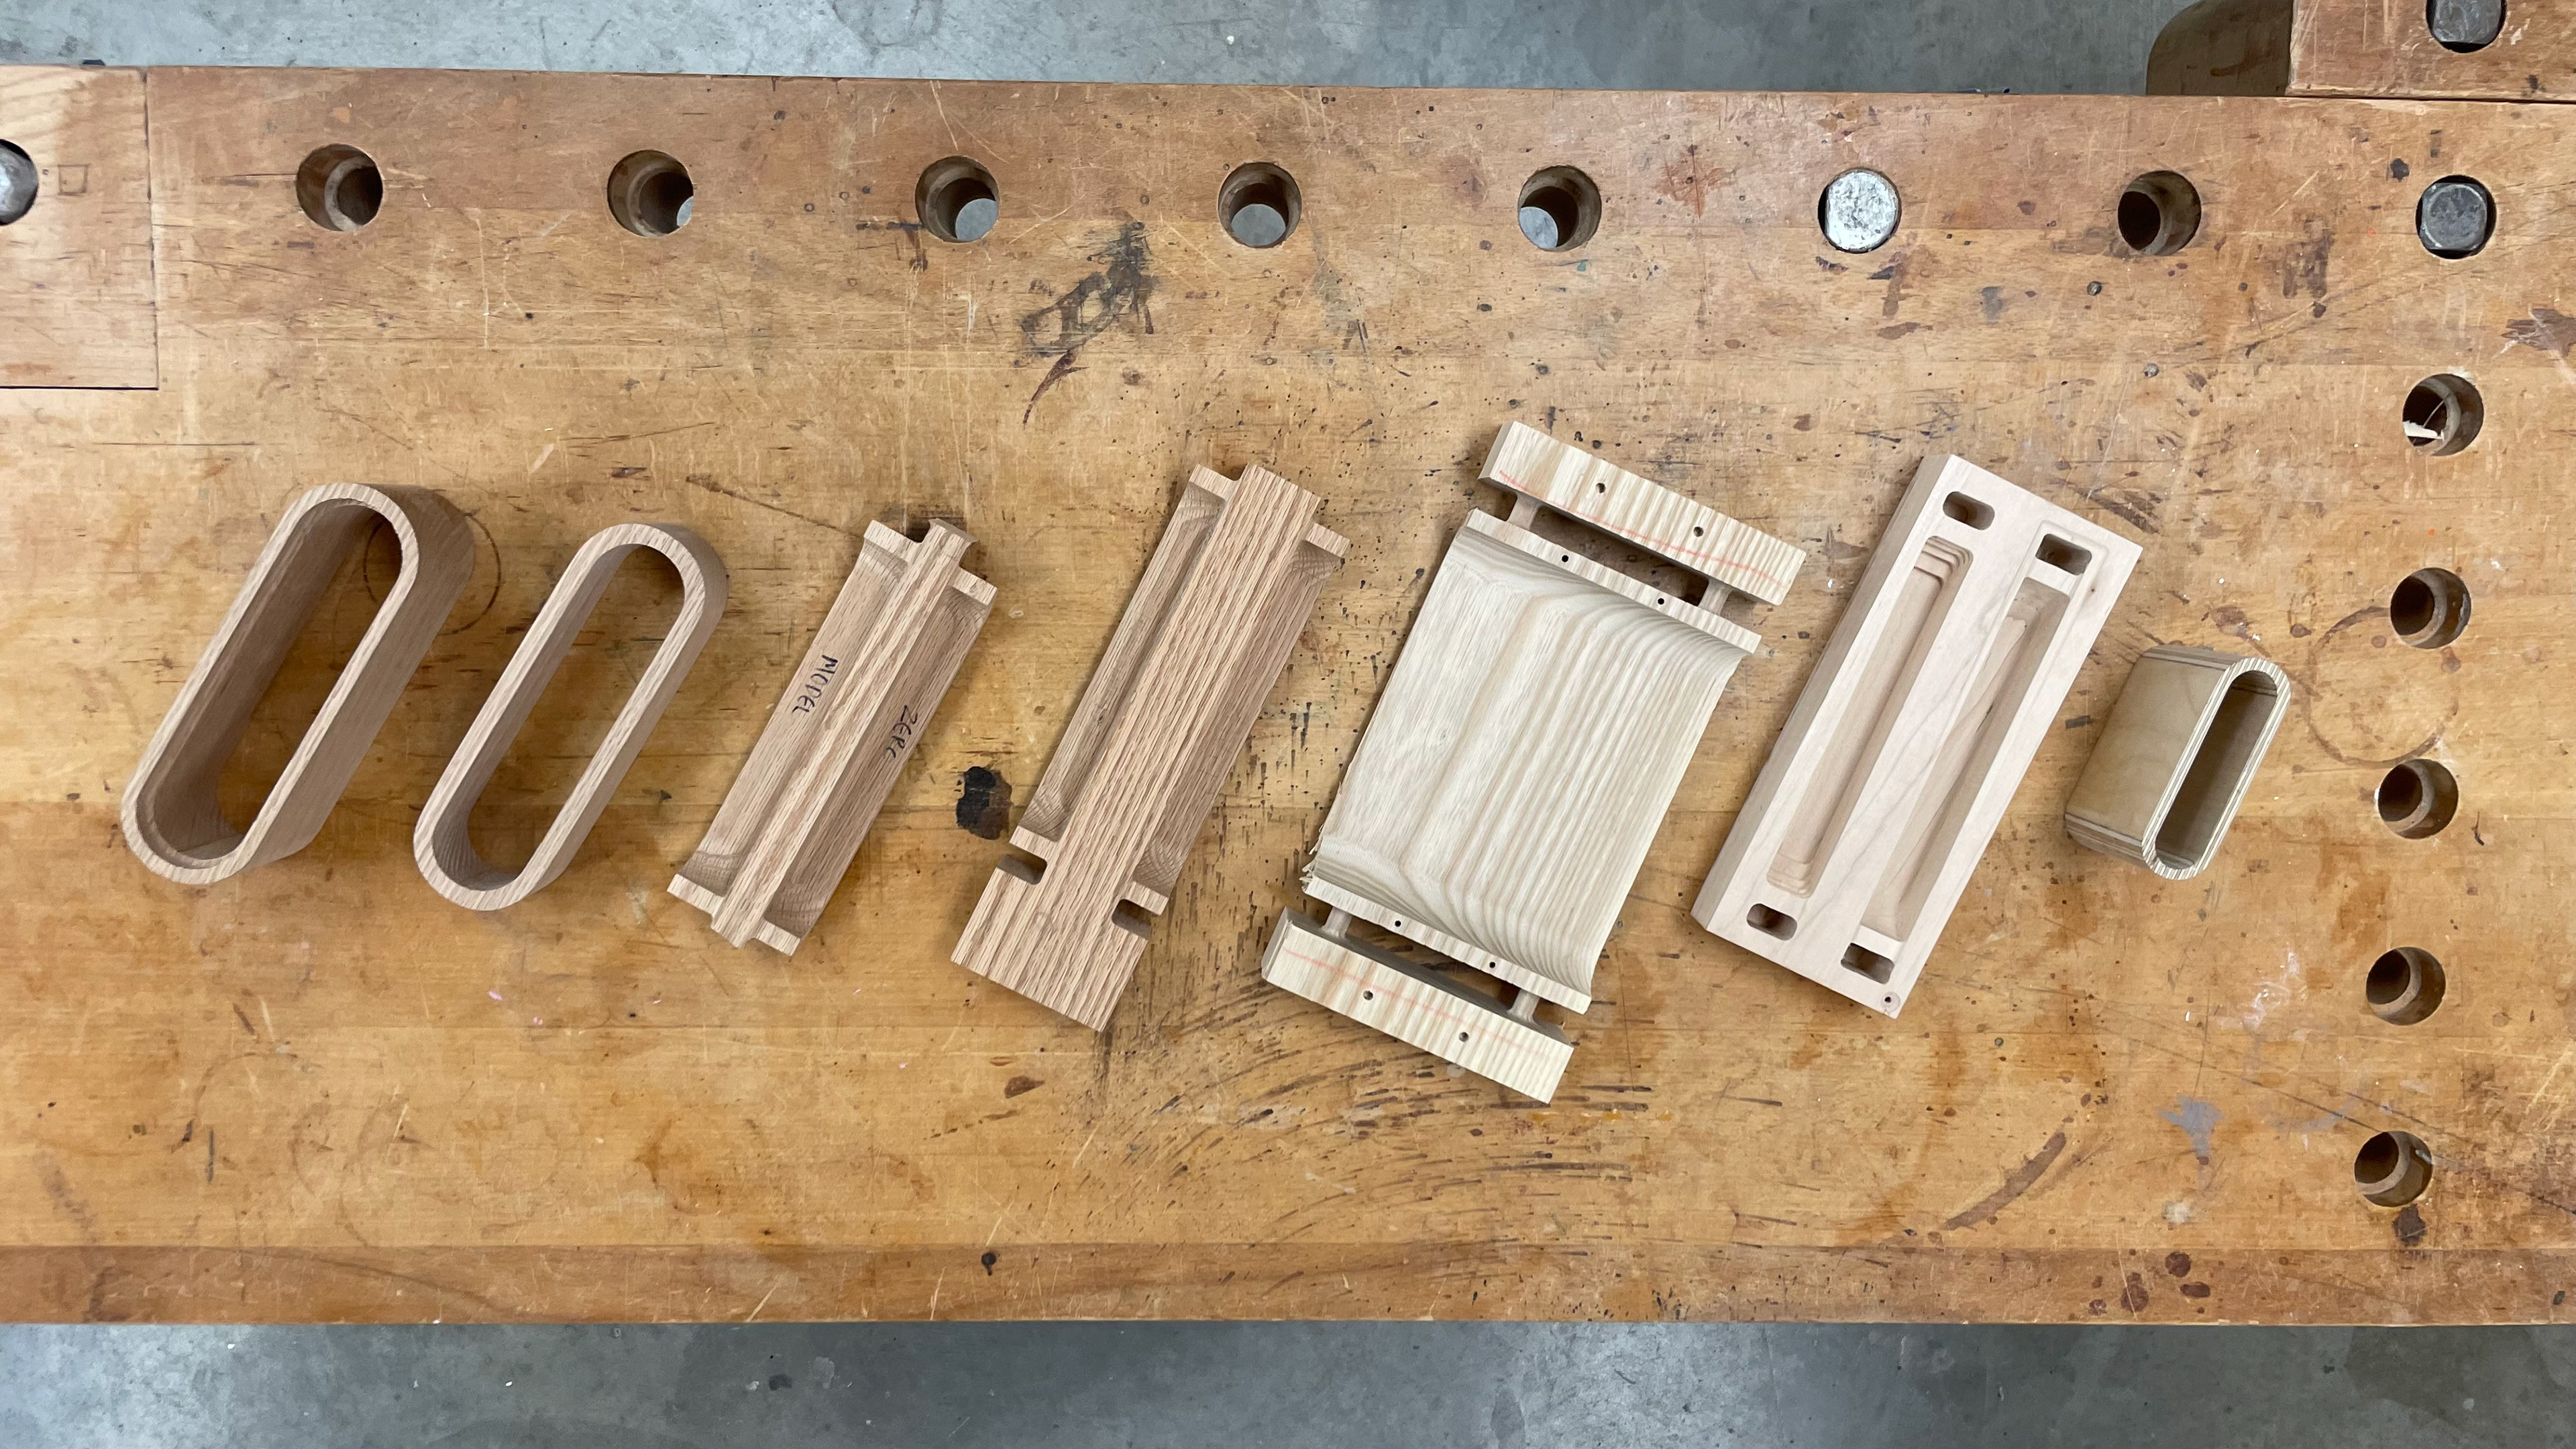
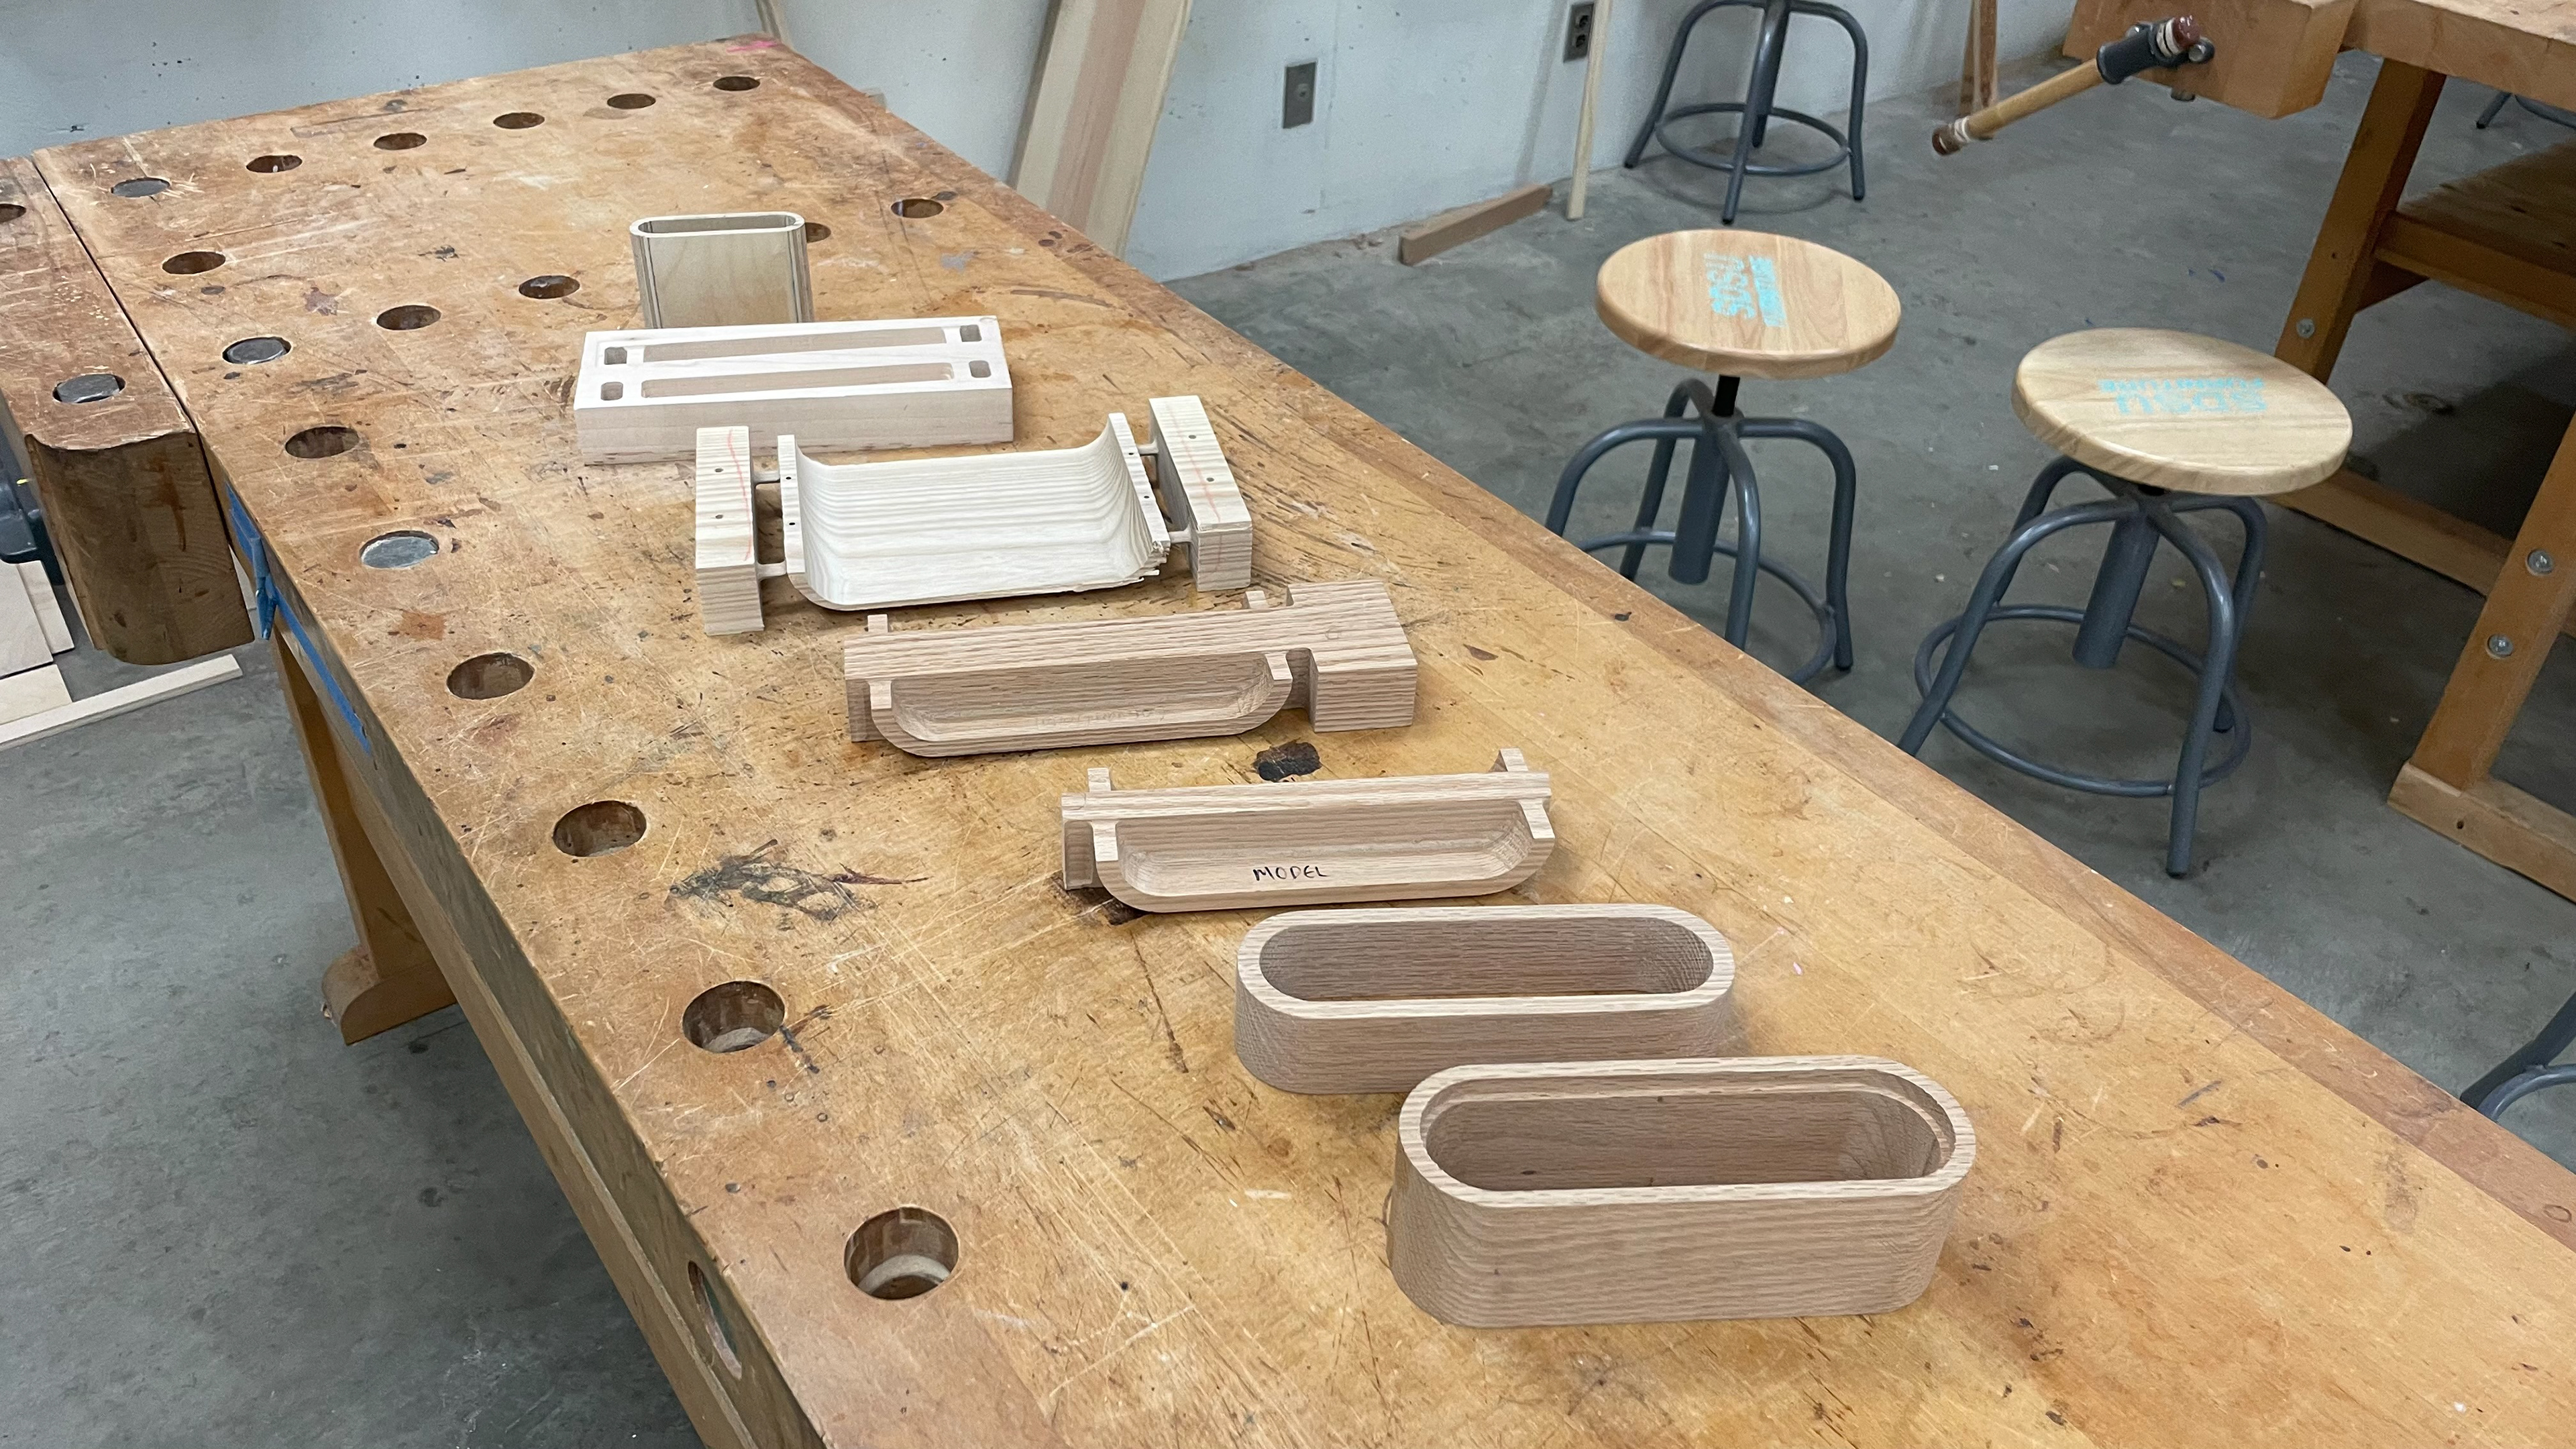
Image shows just a small fraction of the tests preformed before the final milling of the iteration No.2 tray component.
Final Thoughts
Overall, I am very happy with my second iteration of the Wall Hanging Vanity. I believe that the differences in quality, craftsmanship, and finish is recognizable between the first and second. This entire project has taken about 9 months to complete, and the skills that I have learned and improved upon throughout it has been invaluable, most notably my adeptness in regards to digital fabrication and CNC operation. This project has sparked a new interest in the merging of digital technologies with fine hand-crafting skills, which I believe will be evident in future works of mine as well. While I have been woodworking for almost 8 years at the time of writing this, I have never spent so much time in the design and analyzation stage as I have with this.
Additionally, I have learned a ton from the analytical portion of this project; this case study that you have just finished reading. Through this study, I have better learned how to analyze and critique my own designs, how to always be improving, and how to improve efficiently. I have had this idea for this project floating around in my head for a couple years now, and it feels great to have finally seen it out through completion.
Additionally, I am incredibly grateful and proud to have had both iteration No.1 and No.2 be shown in art exhibitions. No.1 back in January/February of 2024 at the Escondido Arts Partnership Wood: A Furniture Show XIV, and No.2 (which was picked up through a juried exhibition before I even completed it) for showing in May/June 2024 at the SDSU University Gallery show On the Line/En la Línea.
This is an ongoing page - Document last updated 5/27/2024.